Sync Tool
The Sync Tool is an upcoming addon that will facilitate syncing entities between different inorigo® instances.
It is planned to be released in the first half of 2026. Stay tuned!
This Resource hub article is a stub. If you need further support regarding the subject, contact the inorigo® helpdesk.
Overview
The Sync tool synchronizes selected entities across inorigo® instances by creating and merging Pull Requests.
The Sync tool is available in the launcher menu, in the toolbar, or as a card in the workbench.
Source & Target
Pull requests have a Source Instance and a Target Instance.
The Target Instance is always the inorigo® instance from where you launched the Synch Tool. The Source instance can be any available inorigo® instance. The available sources are set up in System Management by an administrator.
When merging a pull request, inorigo® syncs the selected entities from the Source to the Target Instance. Depending on their state, they will either be created, updated, or deleted.
Data Context
The sync tool will use the current data context of the target instance and the data context to which the user is logged in on the source.
Considerations for Data Connections and Data Sources
Before syncing, review any Data Connections and Data Sources that reference paths or URLs tied to a specific server environment. Two common cases require attention:
- Environment-specific Connections — a Connection pointing to a base URL or file system path specific to the source environment (e.g.
https://factory.floor.test) will not resolve correctly on the target. Since multiple Data Sources may share the same Connection, a single misconfigured Connection can break all dependent Data Sources at once.
- Local file paths — Connections or Data Sources referencing local file system paths (e.g.
C:\data\or/var/data/) will break on the target instance if the same path does not exist in that environment.
inorigo® provides dynamic Import/Export connections to help manage environment differences automatically. However, custom folder connections and manually configured Connections are not covered by this and must be reviewed and updated manually after syncing.
Pull Request Overview
The Pull Request Overview lists all Pull Requests for the Target Instance by date. You can toggle between All Pull Requests and just the ones you created (My Pull Requests).
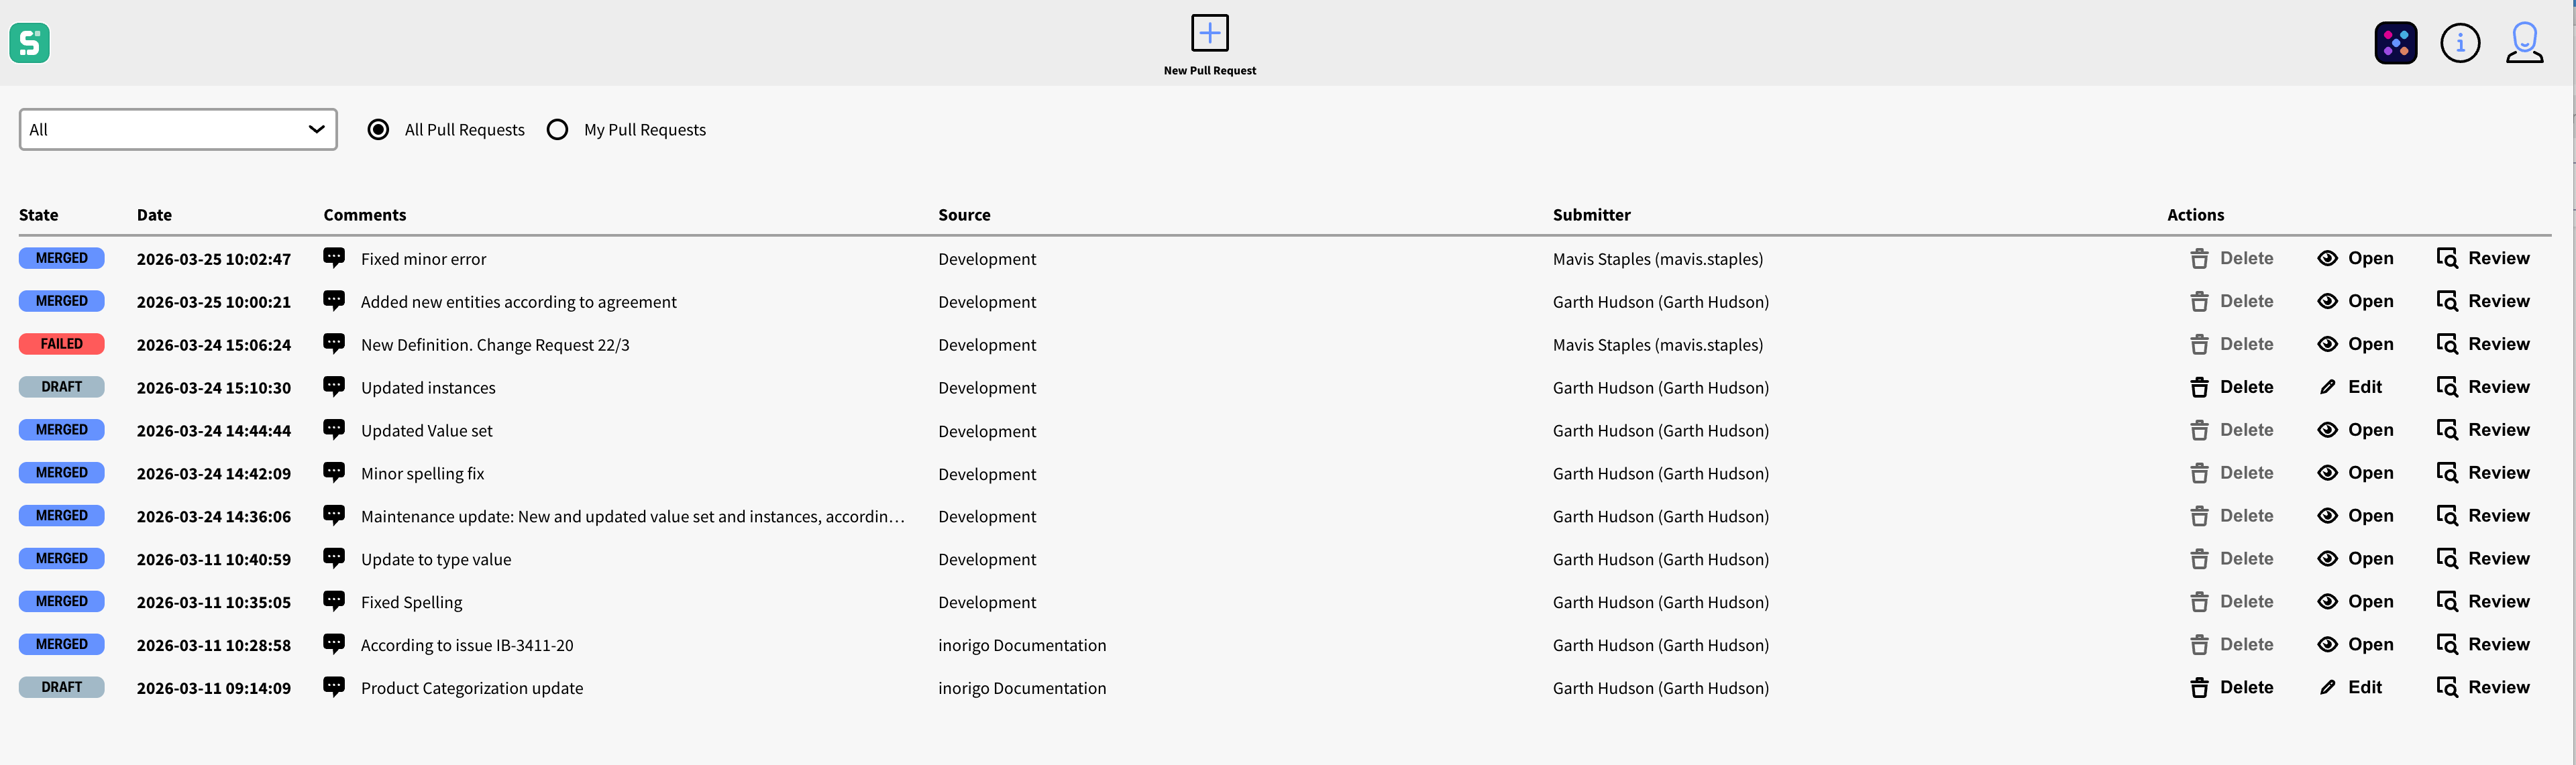
State
Pull requests can have the following states:
Draft
![]()
Draft Pull Requests are created but not yet merged. You can view all drafts, but you can only edit and delete the ones you created.
Merged
![]()
These are Pull Requests that have been synchronized successfully. You can open and review a merged Pull Request, but you cannot edit or delete it.
Failed
![]()
These are Pull Requests that have failed for any reason. You can delete failed Pull Requests that you have created.
Pull Request Properties
Date
Shows the date when the Pull Request was last saved or merged. The Pull Requests are sorted by date.
Comments
![]()
Displays a preview of any comment attached to the Pull Request. Clicking the icon or the comment itself opens it in a dialog.
Source
Displays the name of the Source Instance.
Submitter
Displays the name and email of the person who created the Pull Request.
Actions
Delete: Deletes the Pull Request; you can only delete your own Drafts and Failed Pull Requests.
Edit: Opens the Pull Request in the Draft state in Edit mode. You can only edit Pull Requests that you've created.
Open: Opens the Pull Request in read-only mode. Pull requests are in read-only mode when created by another user, merged or failed state.
Review: Opens the Review dialog to review the outcome of a Pull Request. You can merge your own pull requests from the Review view.
New Pull Request
To create a new Pull Request, press the + icon from the toolbar.

Sync Setup
When creating a New Pull Request, you will be prompted with a dialog to select the Source Instance from a dropdown menu. If you’re not currently logged in to the Source, you will be prompted to do so.
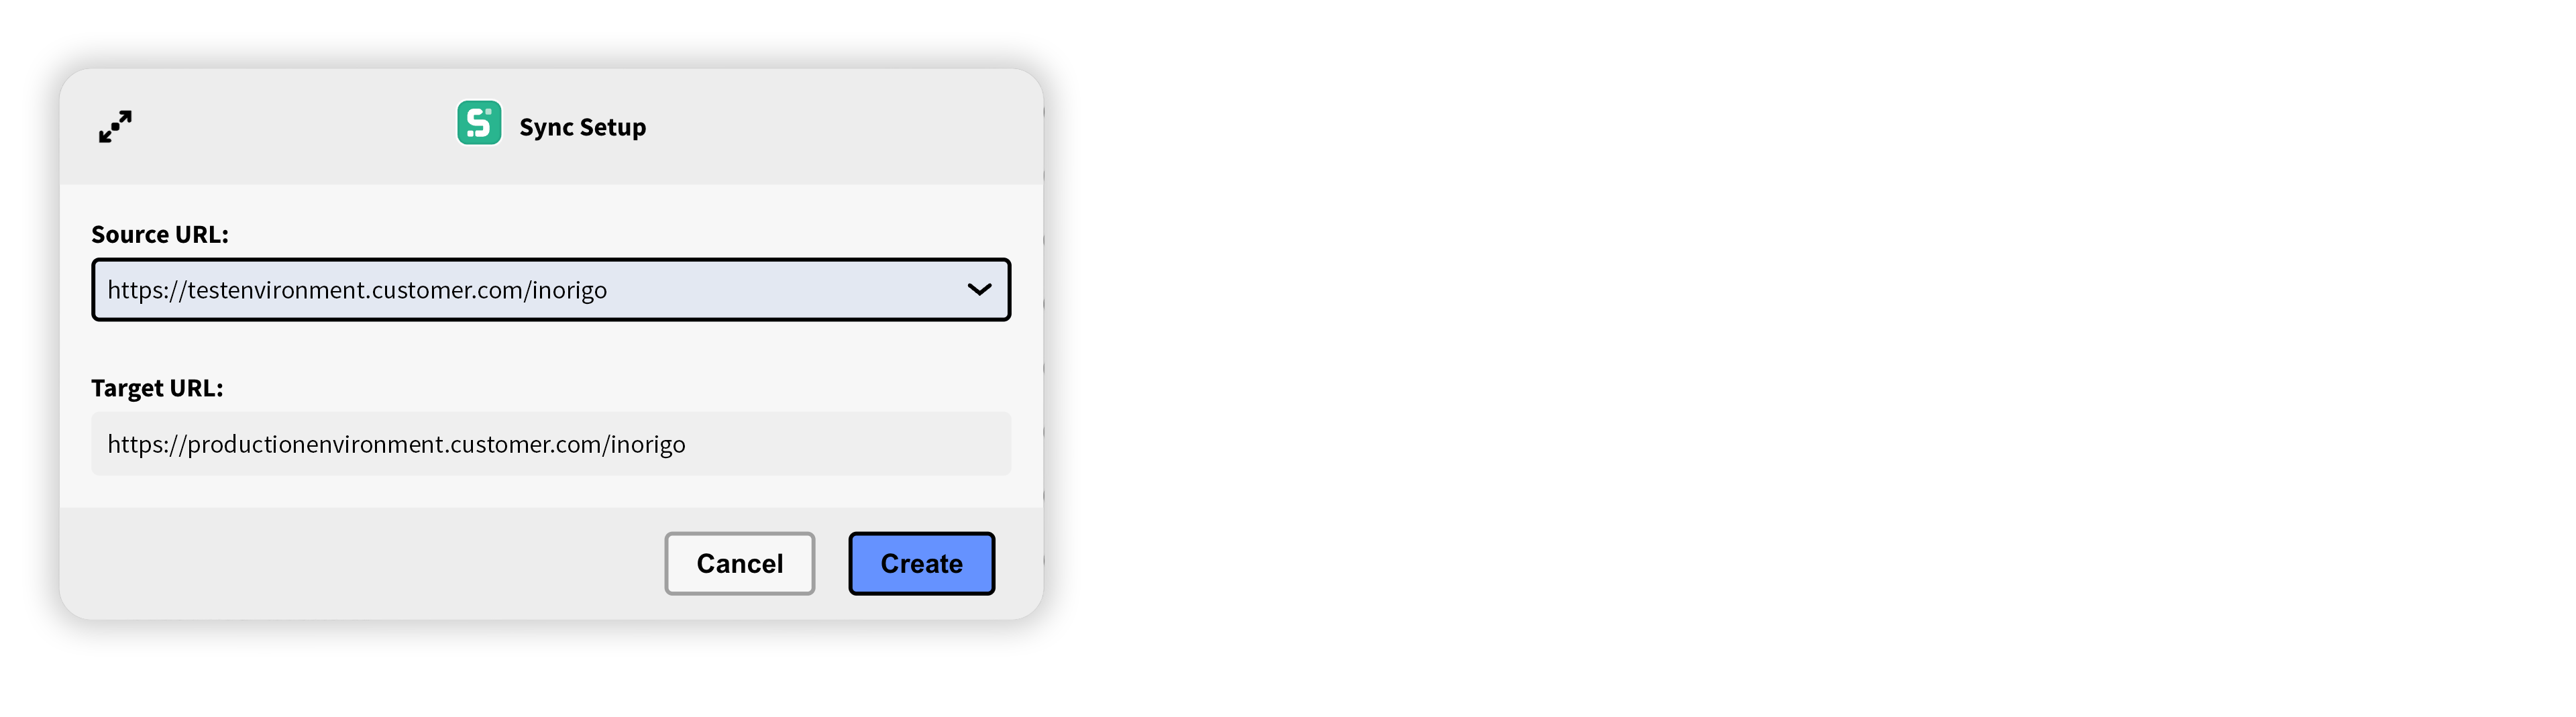
The available Sources are administered by an administrator through the System Management.
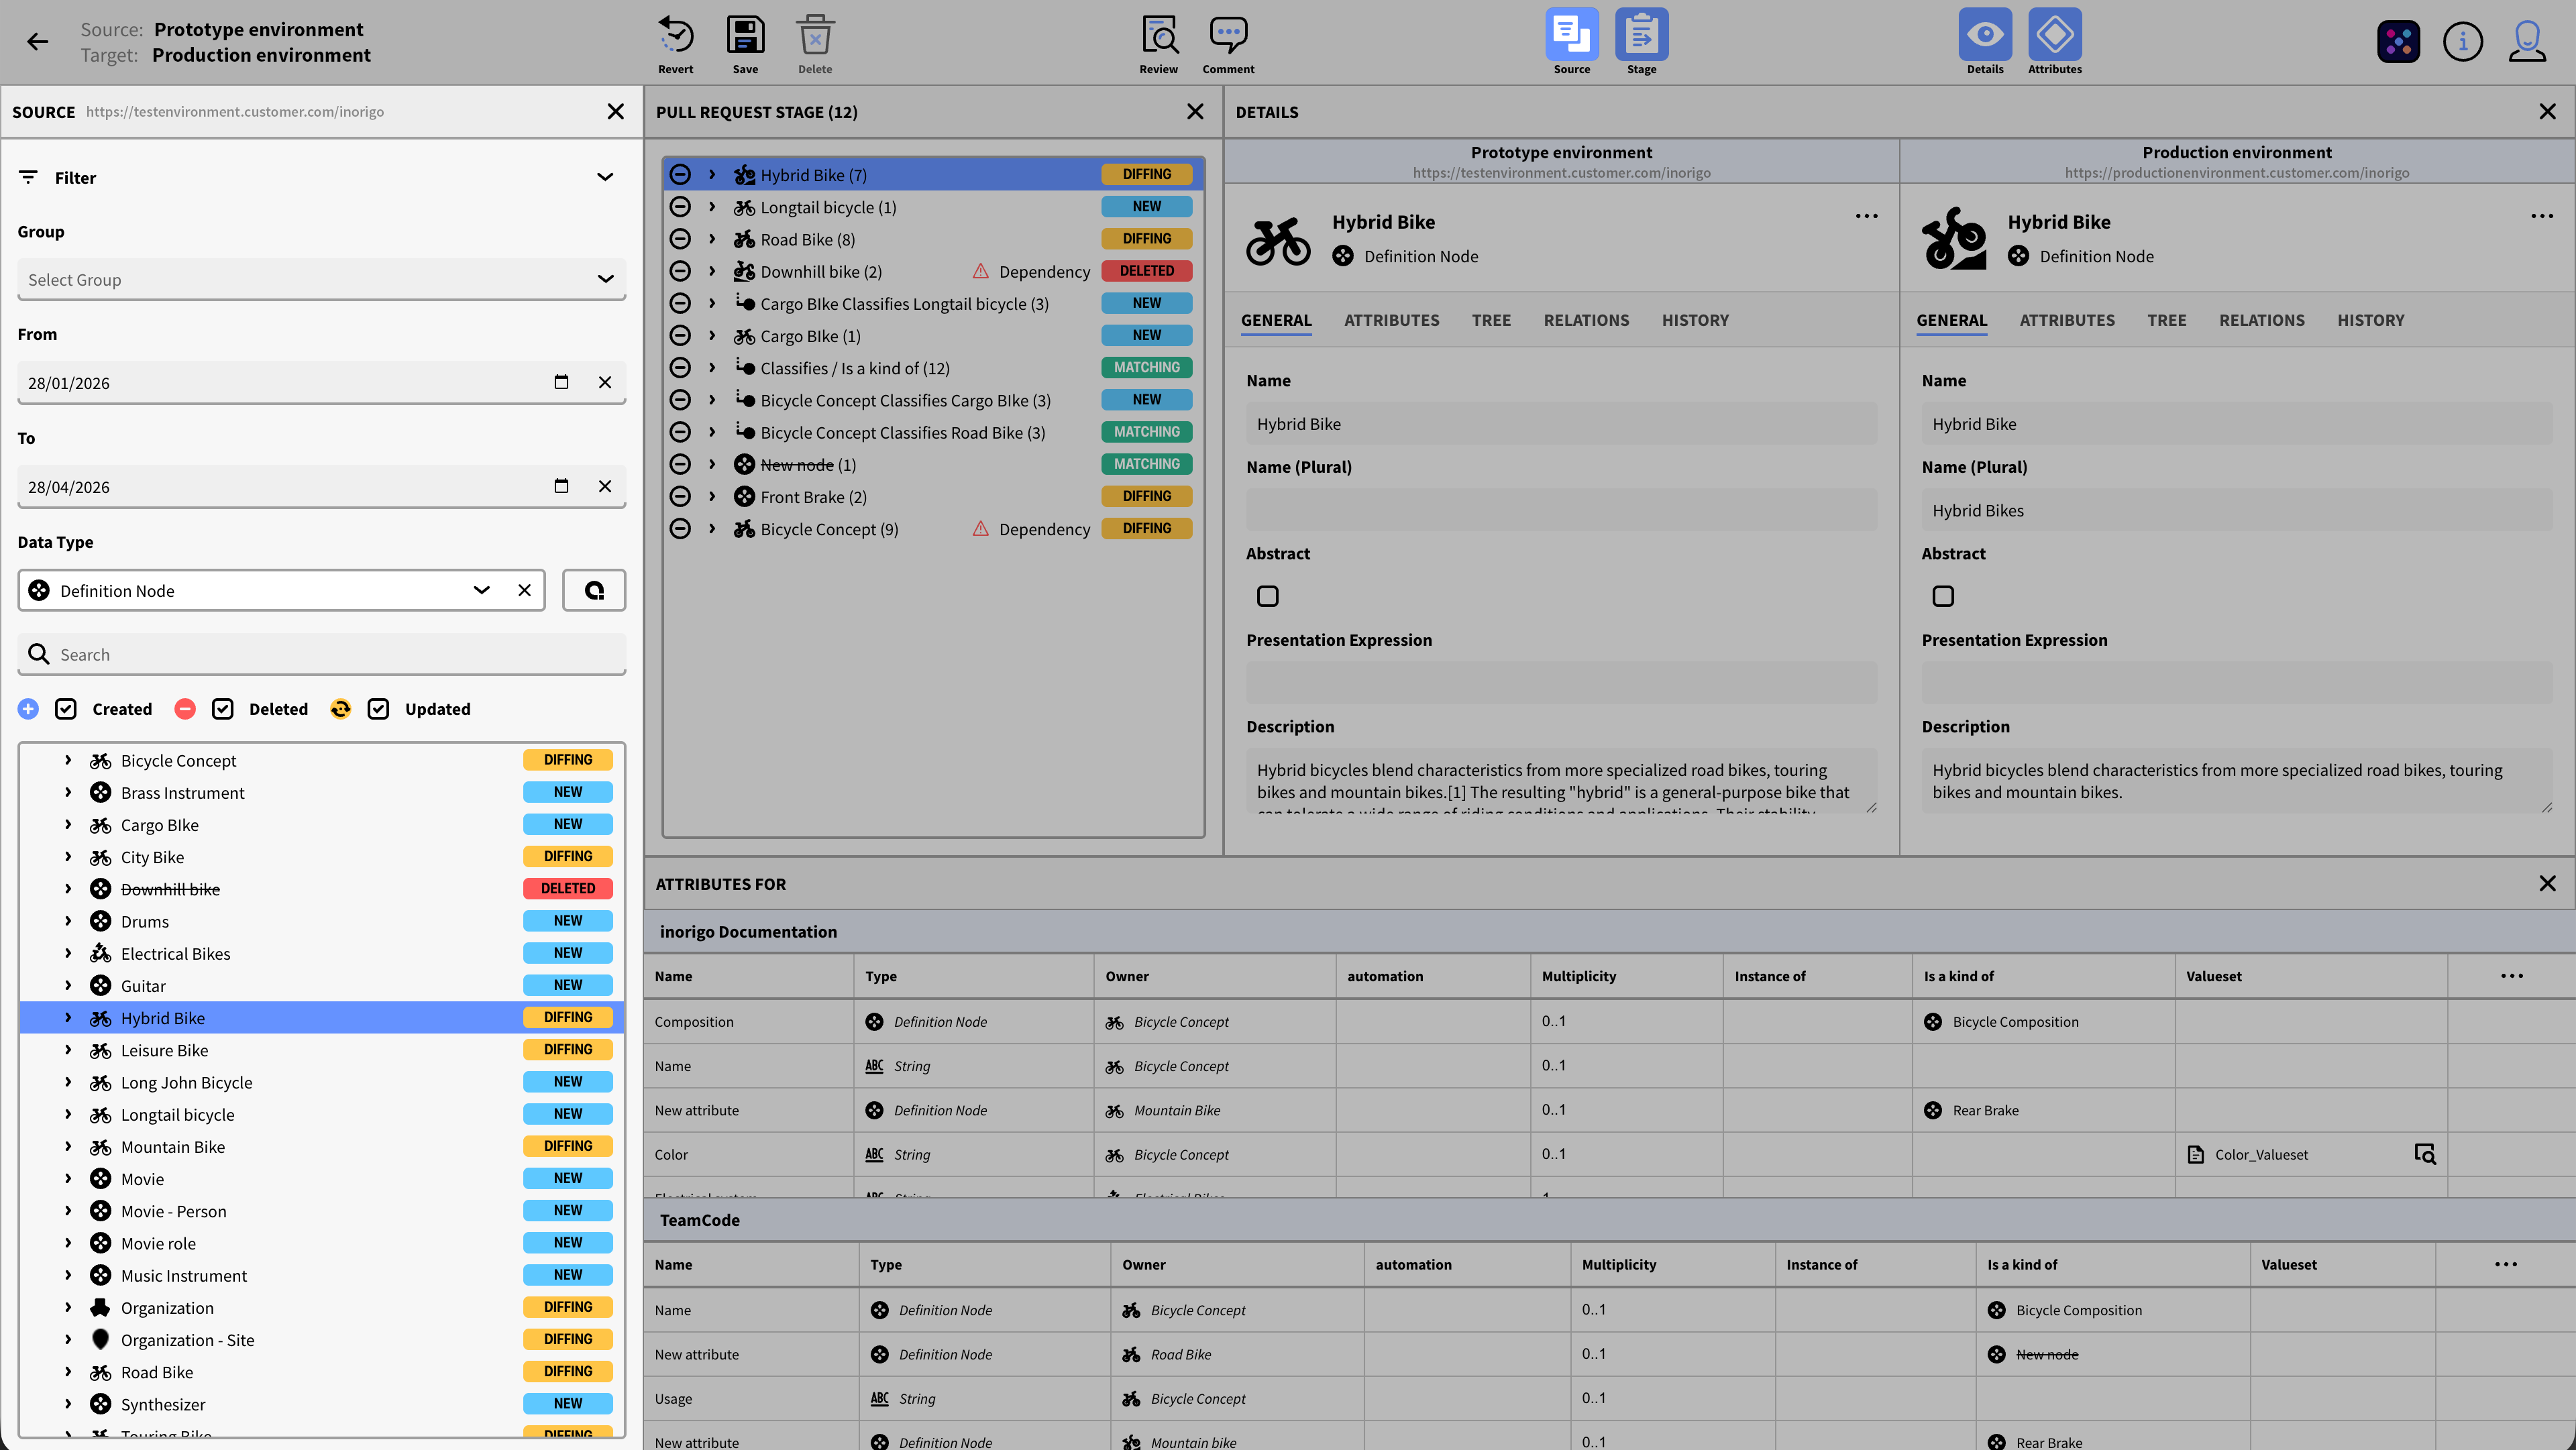
Edit Pull Request Overview
The Edit Pull Request view consists of a Toolbar and several panels. The panels are resizable and can be toggled from the toolbar.
The Toolbar

1. Back Arrow: Returns to the main view. If there are any unsaved changes, you will be prompted to save or discard them.
2. Pull Request Info: Displays the Source and Target inorigo® Instance.
3. Revert: Undoes all changes made up until the last save.
4. Save: Saves all changes made to the Pull Request.
5. Delete: Deletes the current Pull Request and closes the view. You will be prompted to confirm the deletion.
6. Review: Opens the Review dialog, which lets you inspect and preview the result of the Pull Request before merging. See Review.
7. Comment: Opens a dialog from where it is possible to enter a comment. The comment is saved with the Pull Request and is visible in the Pull Request list.
8. Source: Toggles the Source Panel.
9. Stage: Toggles the Stage Panel.
10. Details: Toggles the Details Panel
11. Attributes: Toggles the Attributes Panel
Source Panel
The Source Panel is where you search for and select the entities to include in the Pull Request. It consists of two sections. The upper part is a Filter, and the lower part is the Result Table.
Filter
Use the filter section to find the entities that you want to add to your Pull Request.
Note: To mitigate the time required to search the whole inorigo® database, the filter section is pre-populated to narrow the scope from the start. The maximum From and To timespan is limited to 6 months for the same reason.
You can collapse the filter section to make more room for the Result Table.
Group: Allows you to select an entity group. When a group is selected, the other filters are reset, so all entities in the group are shown, regardless of data types or transaction date.
From: Specifies the earliest date to look for any transaction. By default, From is set to a month ago. The earlier the date, the more data inorigo® must process. Depending on the other filters and the number of entities, this can take a long time.
To: Specifies the last date to look for transactions. By default, this will be today’s date.
Query: Opens the Query Editor, where you can create a more advanced filter. Click here to learn more about how to construct queries with the Query Editor. When a query is active, it is summarized as a string in the filter. You can clear the filter by clicking the X next to it.
Data Type: Lets you specify which type of entity you are interested in. By default, the data type is set to Definitions.
Search: Lets you filter on an entity name.
Quick Filters:
The checkboxes let you quickly filter the result list on transactions: Created, Deleted, or Updated.
Note that though similar, these are not 1:1 with the tags in the result table. The quick filters apply to transactions in the source, while the tags show differences between the source and the target.
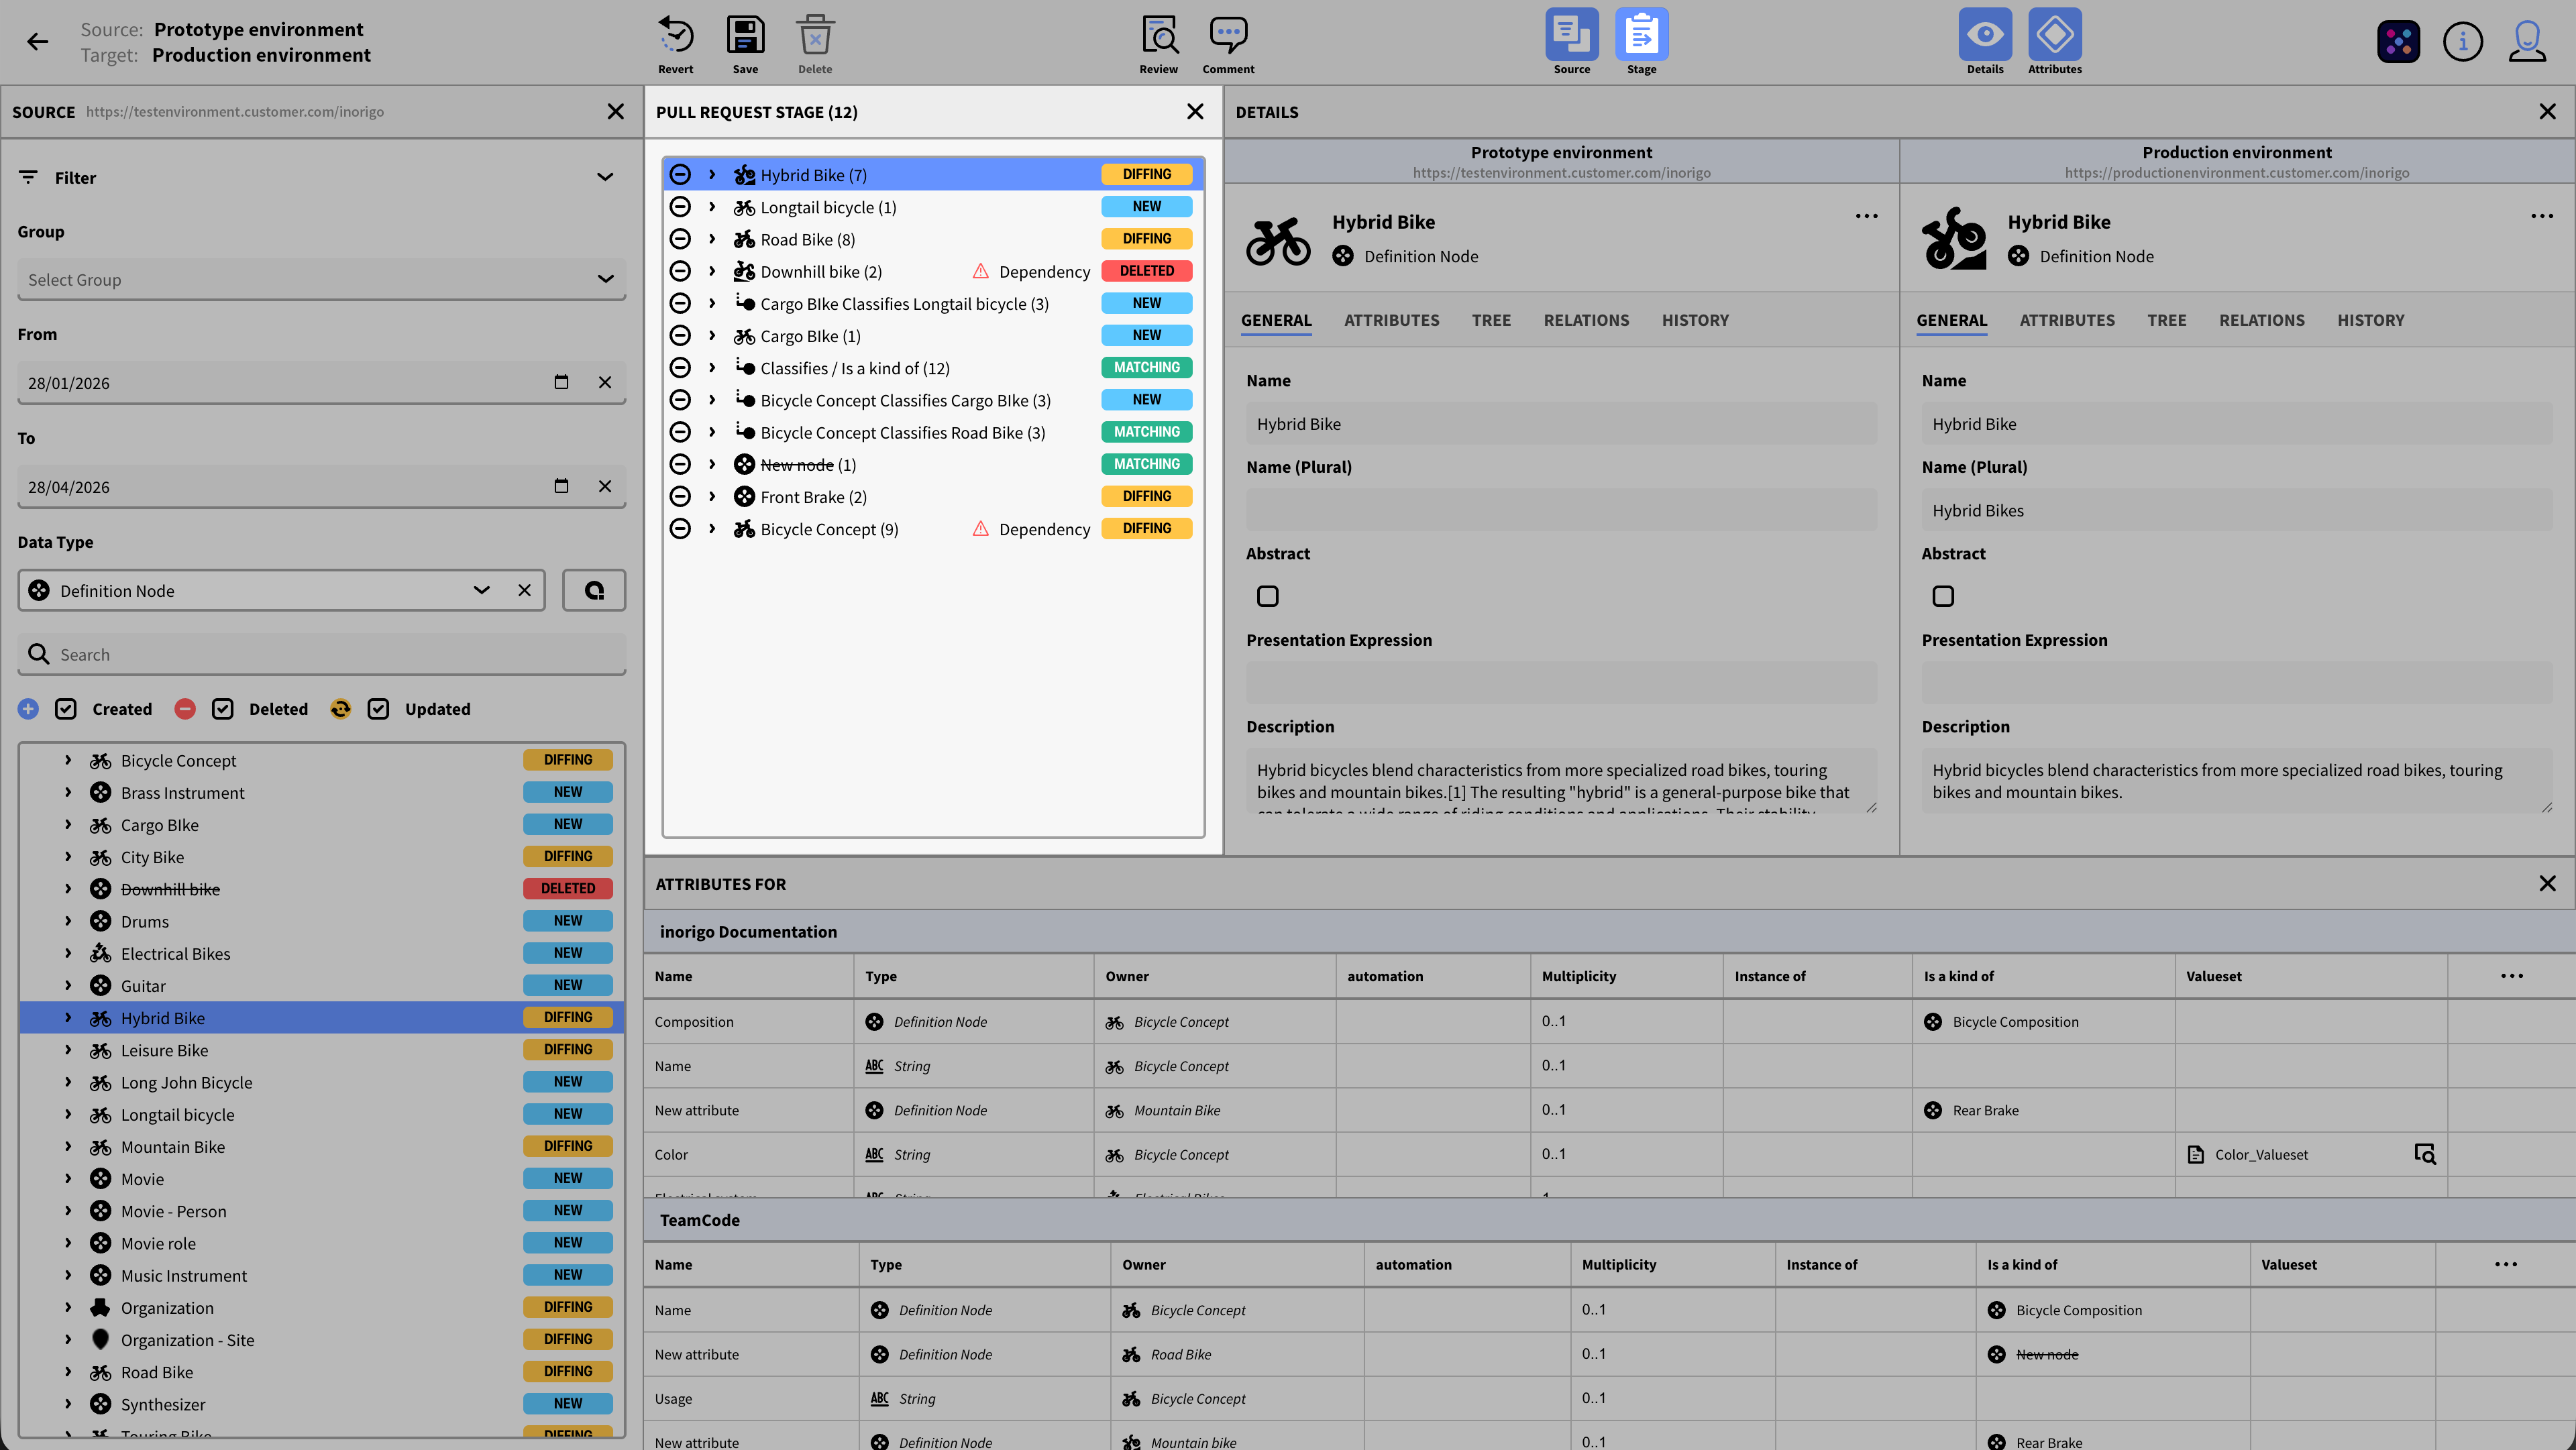
Result Table
The result table shows entities based on the current filter. To add an entity to the Pull Request, hover over it and press the [+] icon. The Entity will be added to the Pull Request Stage. To remove it, press the [-] icon from either the Result Table or the Pull Request Stage.
The Result Table lists all entities matching the filter in alphabetical order in a tree list. Entities are tagged with one of the following states:
![]()
Matching: The entity is identical in the Source and Target environments. No need to synchronize.
![]()
New: The entity only exists in the Source Instance. When merging, the new entity will be synced to the Target.
![]()
Diffing: The entity exists on both the source and target instance, but differs. All changes to the source entity will be synced to the target entity if merged (overwriting any values, etc.).
![]()
Conflict: The entity has been deleted from the Target instance. You will not be able to merge this entity.
![]()
Deleted: The entity has been deleted from the Source. If merged, it will be deleted from the Target instance.
![]()
Restricted: You don’t have permission to synchronize this entity. For instance, inorigo® users or user groups.
You can hover over any tag to get a tooltip.
By expanding an entity in the list, you can see its values and references.
Pull Request Stage
The Stage shows all entities currently included in the Pull request. The total number of entities in the Pull Request is shown in parentheses in the title.
You add entities from the Result table in the Source panel by clicking the [+] icon next to an entity.
You can remove entities either from the Source Panel or the Stage by clicking the [-] icon.
The Pull Request stage lists all entities added from the Source in the order they were added, in a tree list. Entities are tagged with the same states as the ones shown in the Result table.
Dependencies & Dependents:
An entity may have multiple dependencies on other entities. Likewise, other entities may be dependent on the entity. This is shown with a warning icon and ‘Dependency’ on the list object. Some dependencies may be required for it to function (e.g., a superclass), while others are optional. (e.g. icons)
To synchronize an entity, all its Required dependencies and dependents must also be included in the pull request; optional dependencies and dependents are not needed. Note that an entity that is a dependency may itself have dependencies!
To resolve an entity’s necessary dependencies and dependents, expand the list object, then press the [+] on the Required dependencies or Required Dependents item to add all required entities to the stage. You can also add entities one by one. You can add optional dependencies using the same method.
Details
The Details panel facilitates reviewing and comparing entities, similar to the Details panel in Metagraph Builder.
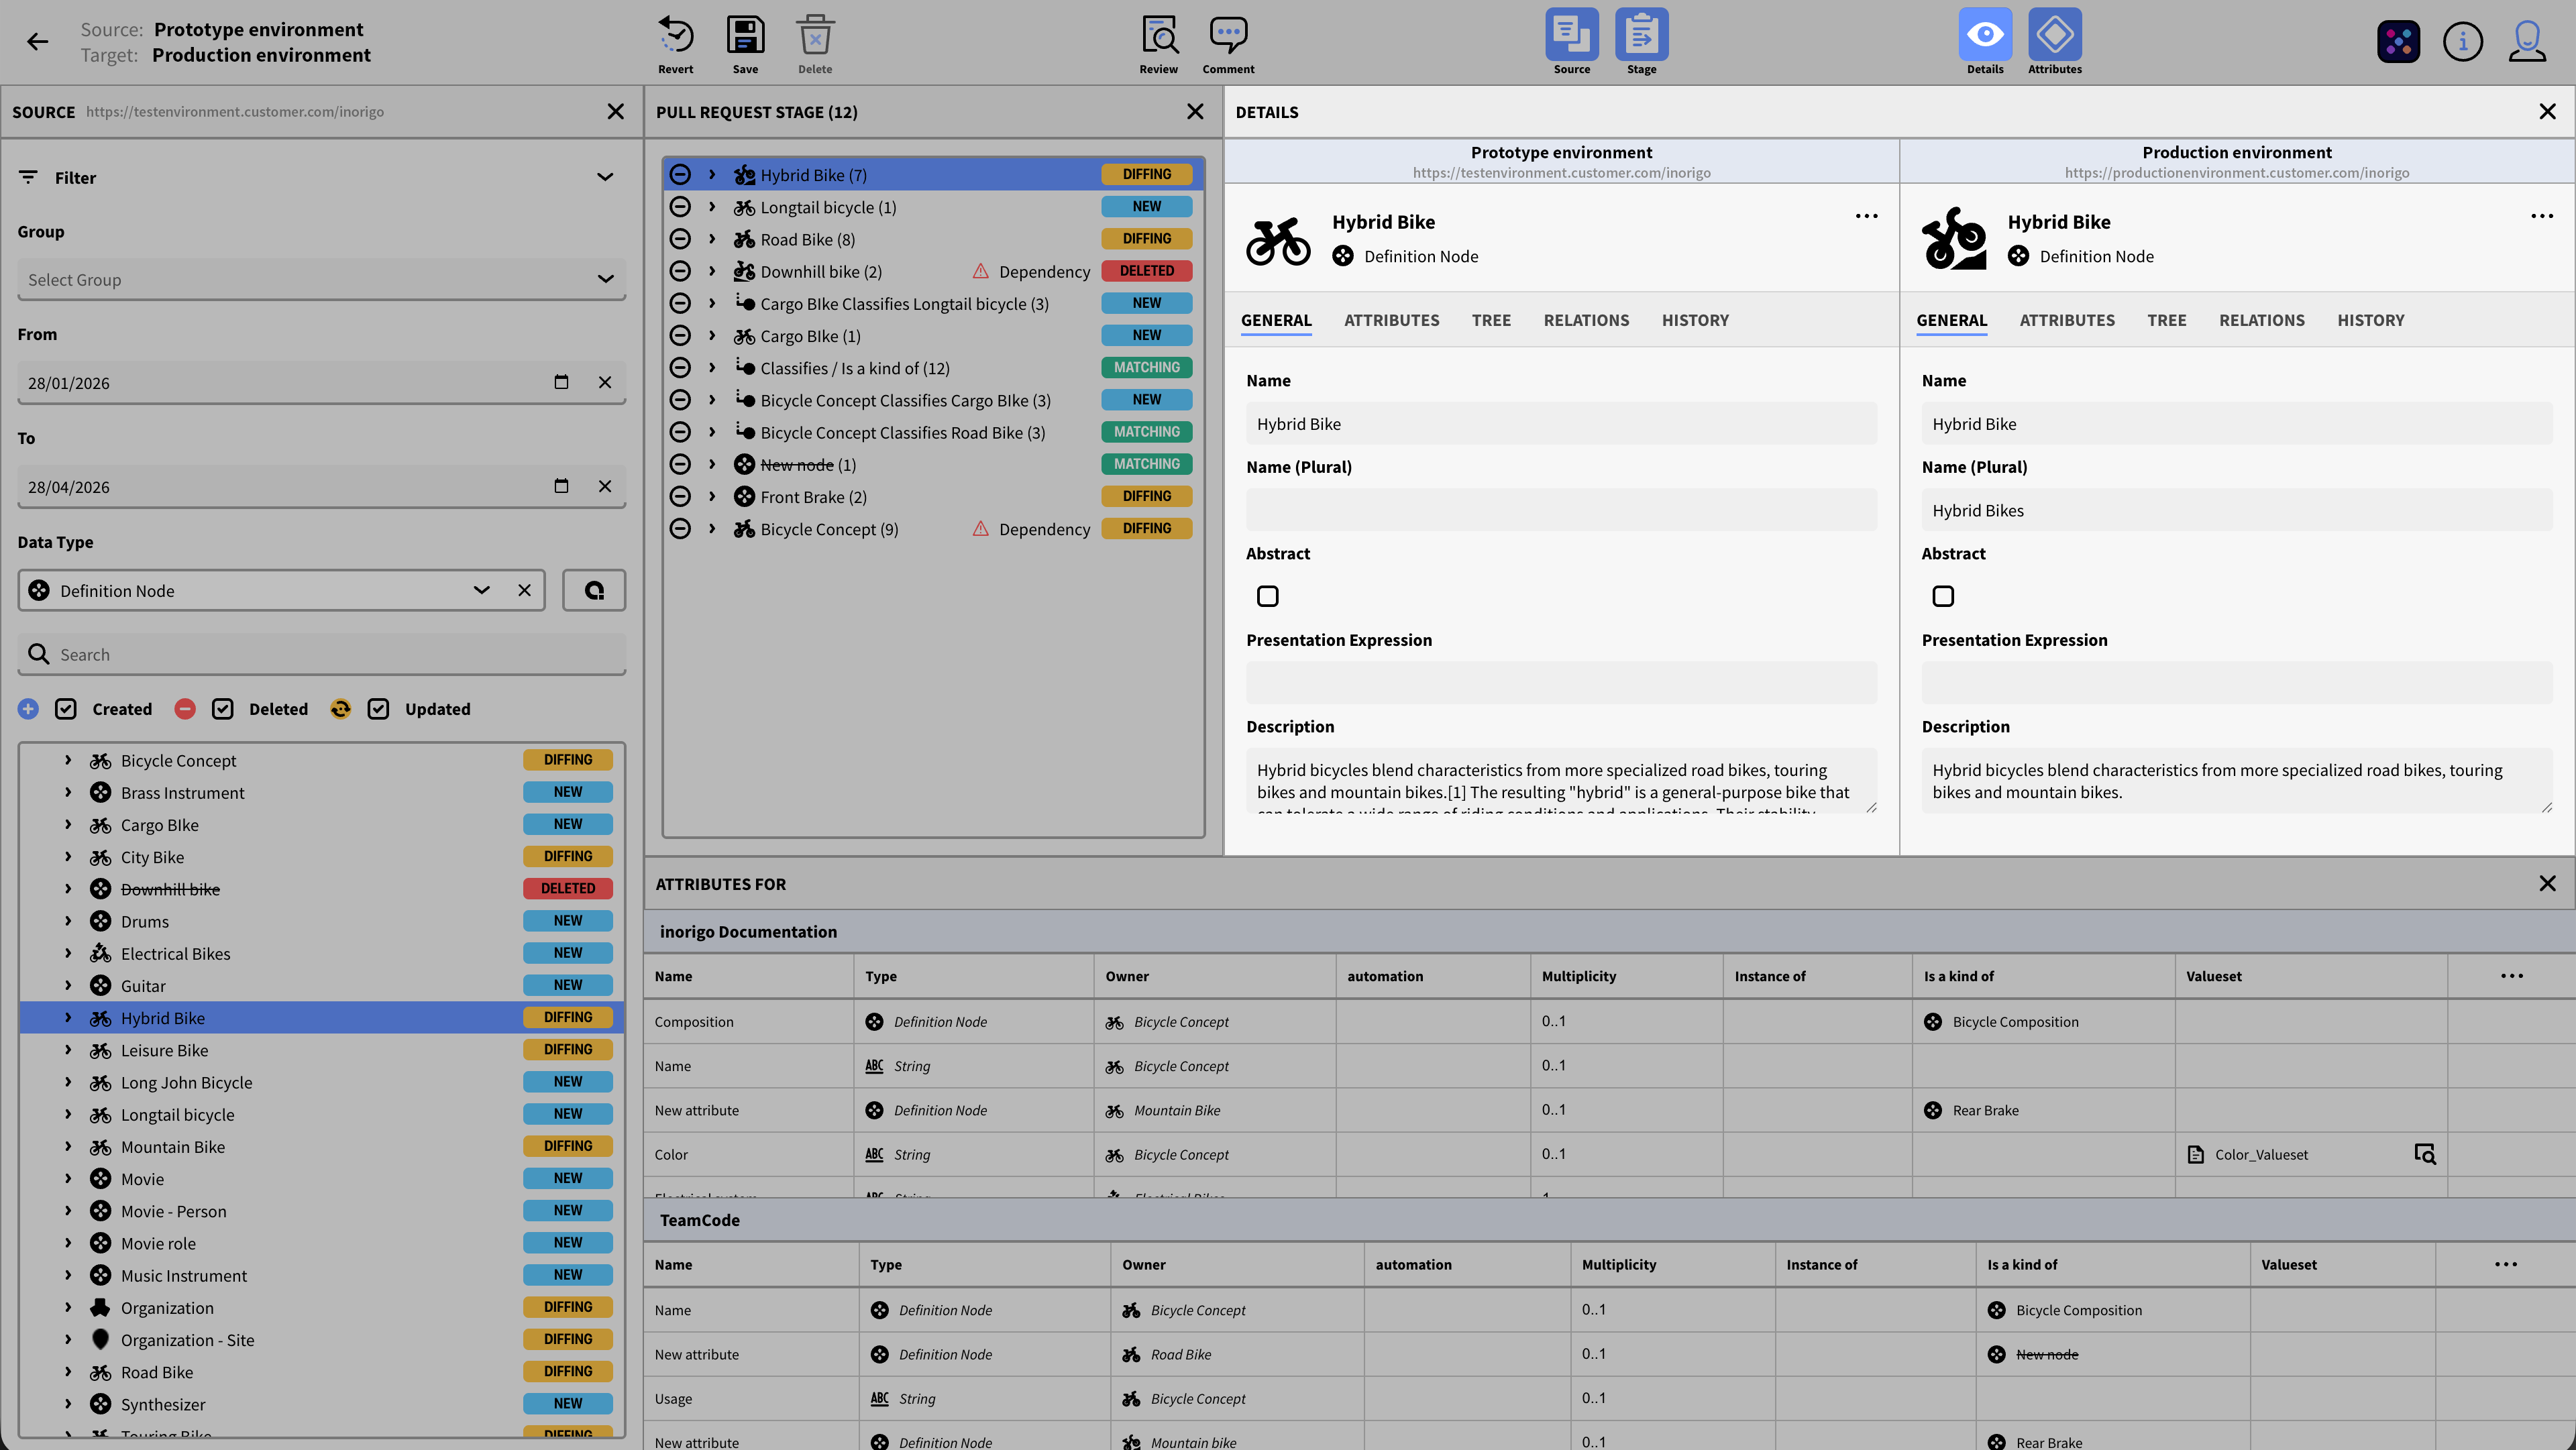
The Details panel shows the different values of the selected entity in both the Source and Target instances, side by side in a split view.
The General tab displays primitive values such as name, icon, and description.
The Attributes tab displays all attributes for the selected entity in a table. It has the same functionality as the Attributes Panel, but its layout is vertical.
The Tree tab lets you explore the structure of the selected entity in a recursive tree.
The Relations tab lists all relations and possible relations for the selected entity.
The History tab lists all transactions for the selected entity in a timeline, with dates and timestamps. It also displays the user who committed the transaction and any comments associated with it.
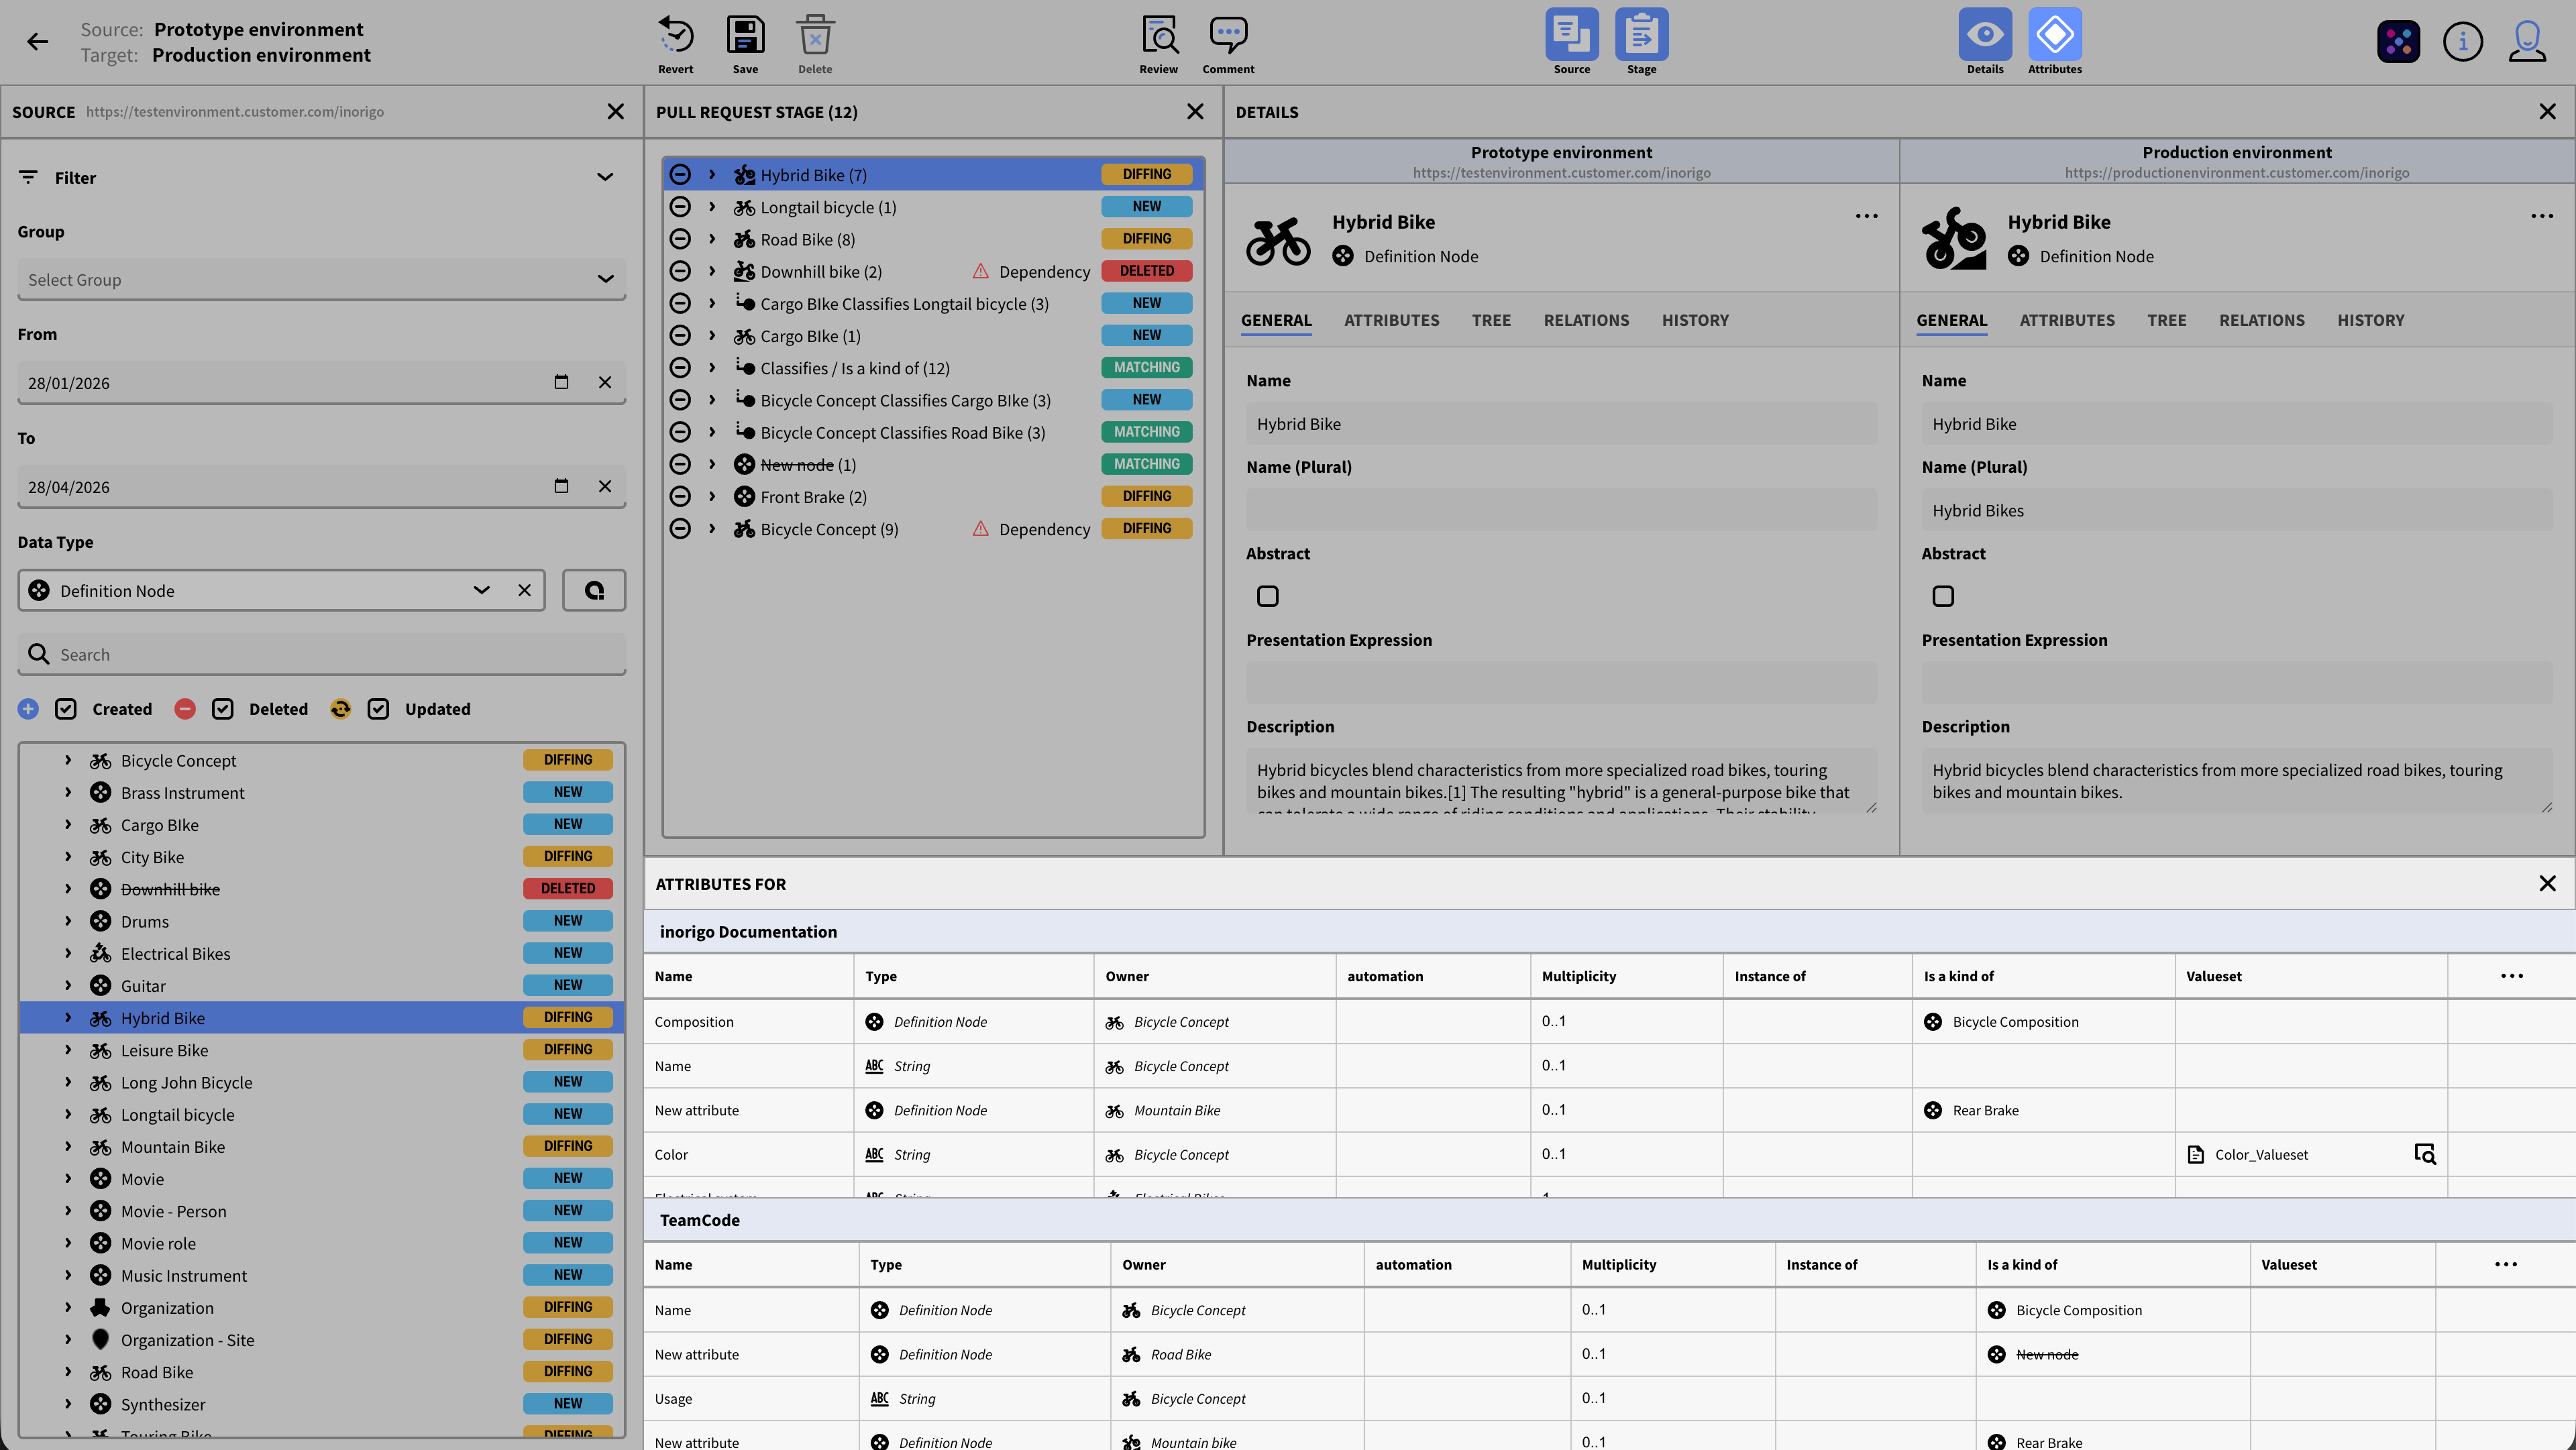
Attributes
The attribute panel mirrors the Attribute tab under details, but displays the tables horizontally, which can make it easier to overview, especially when comparing many columns.
Comment
Clicking the Comment icon in the toolbar opens a dialog to attach a comment to the Pull Request. The comment is automatically transferred between the Edit Pull Request view and the Review Dialog.
Adding a comment is a mandatory step to merge the Pull Request. However, you can save a pull request as a draft without a comment. Comments are visible in the Pull Request Overview.
Review Dialog
Review is a mandatory step before merging a Pull Request. You can open the Review Dialog by either clicking Review in the main view or Review from the Toolbar in the Read/Edit/New Pull Request view.
The current state of the Pull Request is shown in the title as a tag (Draft, Merged, Failed)
To merge a Pull Request, you must always do so from the Review Dialog; it serves as a mandatory checkpoint where you examine the expected result of the merge before it is executed.
Once a Pull Request has been merged, you can open the Review to examine the result.
The Review Dialog consists of several Panels that can be toggled from the toolbar.
Log Panel
Similar to the log panel in Metagraph builder, the log summarizes the number of actions that will be committed when merging and any errors. You can expand the log to see the details.
Unsaved
The Unsaved tab lists all unsaved changes to the model that are ready to be committed. The left column shows a status icon to help identify the change. You can click the icon to the right of the list item to open it in a dialog.
![]()
Unresolved issue: You will not be able to commit until it is resolved. This is typically caused by a faulty or missing mandatory attribute value. To fix the problem, you might have to open Metagraph Builder and edit the entity.
![]()
Update: Indicates that the entity will be updated when merged.
![]()
Deleted: Indicates that the entity will be deleted when merged.
![]()
Created: Indicates that the new entity will be created when merged.
Actions
The Action tab lists all pending actions that will be performed when merging, shown chronologically in a timeline. It also shows details about the action about to be committed.
The log timeline colors help quickly identify the type of action to be committed.
![]()
A blue circle behind the icon indicates that an entity was created.
![]()
A yellow circle behind the icon indicates that a value was edited.
![]()
A red circle behind the icon indicates that an entity was deleted.
Pull Request Stage
The Pull Request stage mirrors the Pull Request stage in the New/Edit view. The Title shows the number of entities in parentheses. It provides an overview of all entities included in the Pull Request, together with their state (New, Diffing, Deleted, etc.).
Clicking an entity in the stage opens it in the Detail Panel.
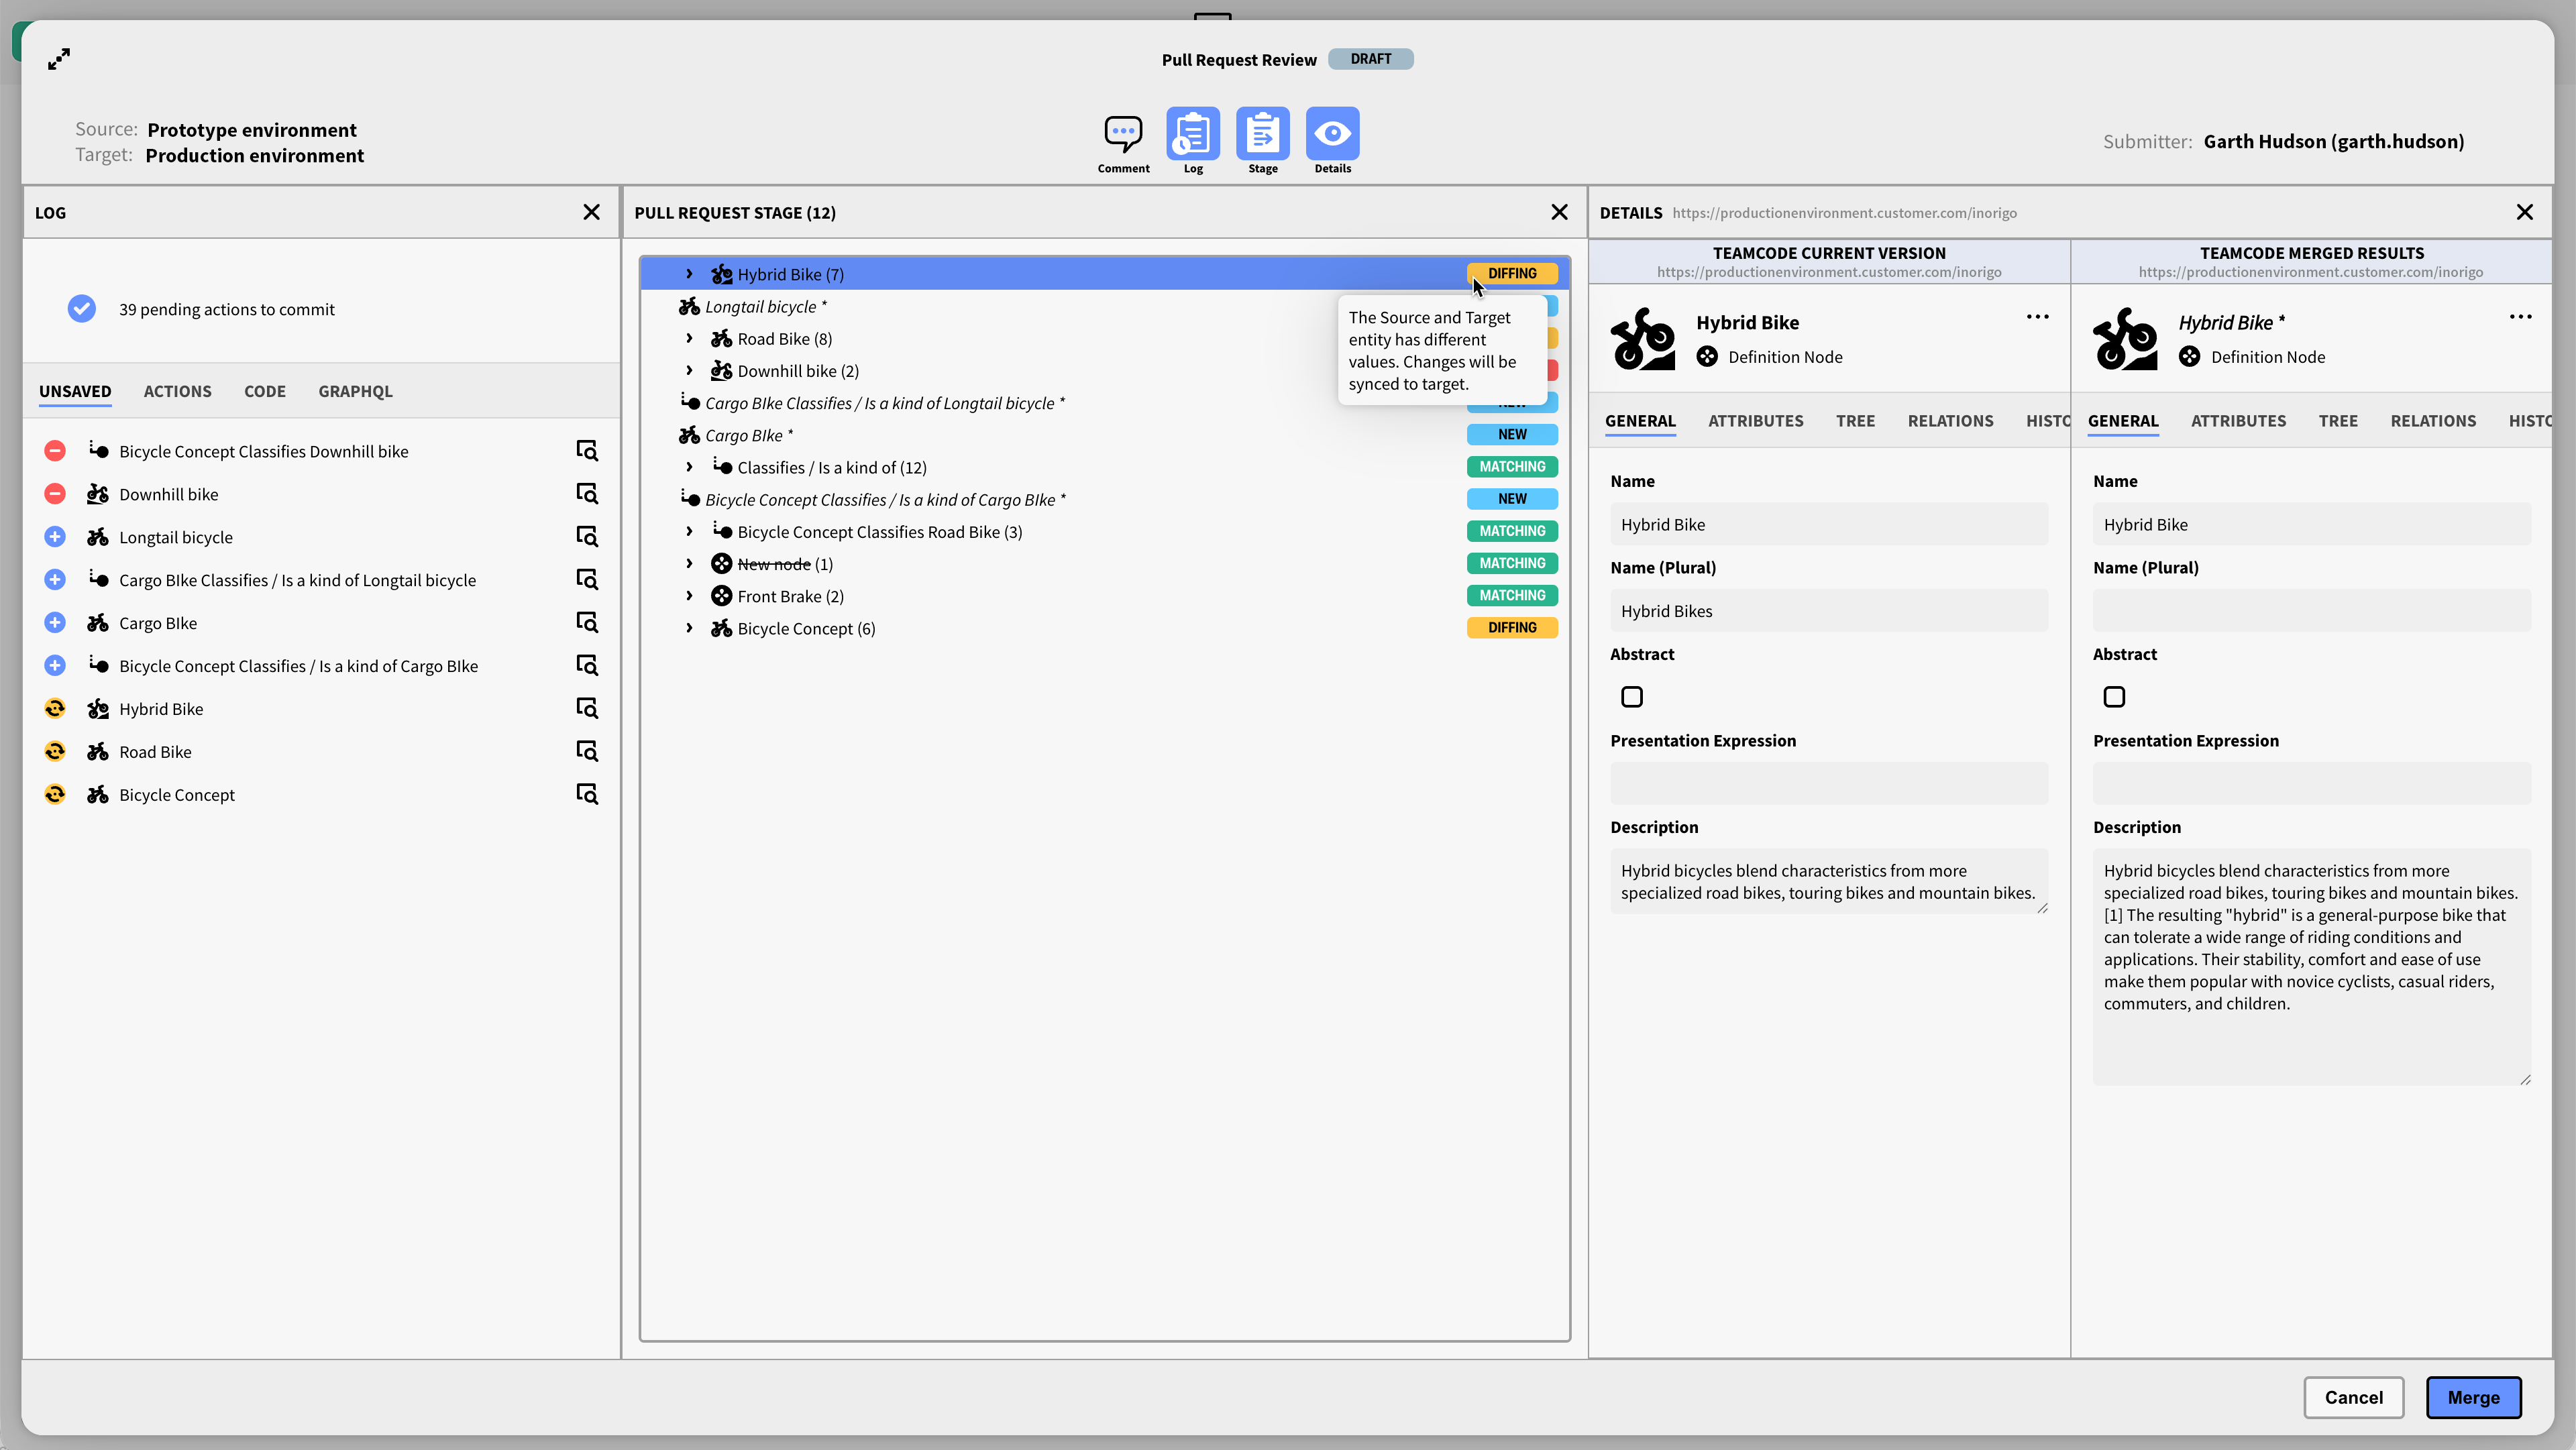
Detail Panel
The Detail panel in the Review Dialog displays the selected Entity before and after state, in the Target instance.
The General tab displays primitive values such as name, icon, and description.
The Attributes tab displays all attributes for the selected entity in a table. It has the same functionality as the Attributes Panel, but its layout is vertical.
The Tree tab lets you explore the structure of the selected entity in a recursive tree.
The Relations tab lists all relations and possible relations for the selected entity.
The History tab lists all transactions for the selected entity in a timeline, with dates and timestamps. It also displays the user who committed the transaction and any associated comments.
Merging a Pull Request
To merge the Pull Request, press the Merge button in the bottom right corner of the dialog. A comfirmation dialog will be opened. If there's any errors or dependencies in the Pull Request, you will be asked to address those before you can proceed with the Merge. You must also provide a comment.
Once there are no conflicts or errors in the Pull request, the merge button will become active.
Note that you may only merge Pull Requests that you have created. When reviewing someone else's Pull Request (or a Pull Request that already has already been merged), the button is not available.
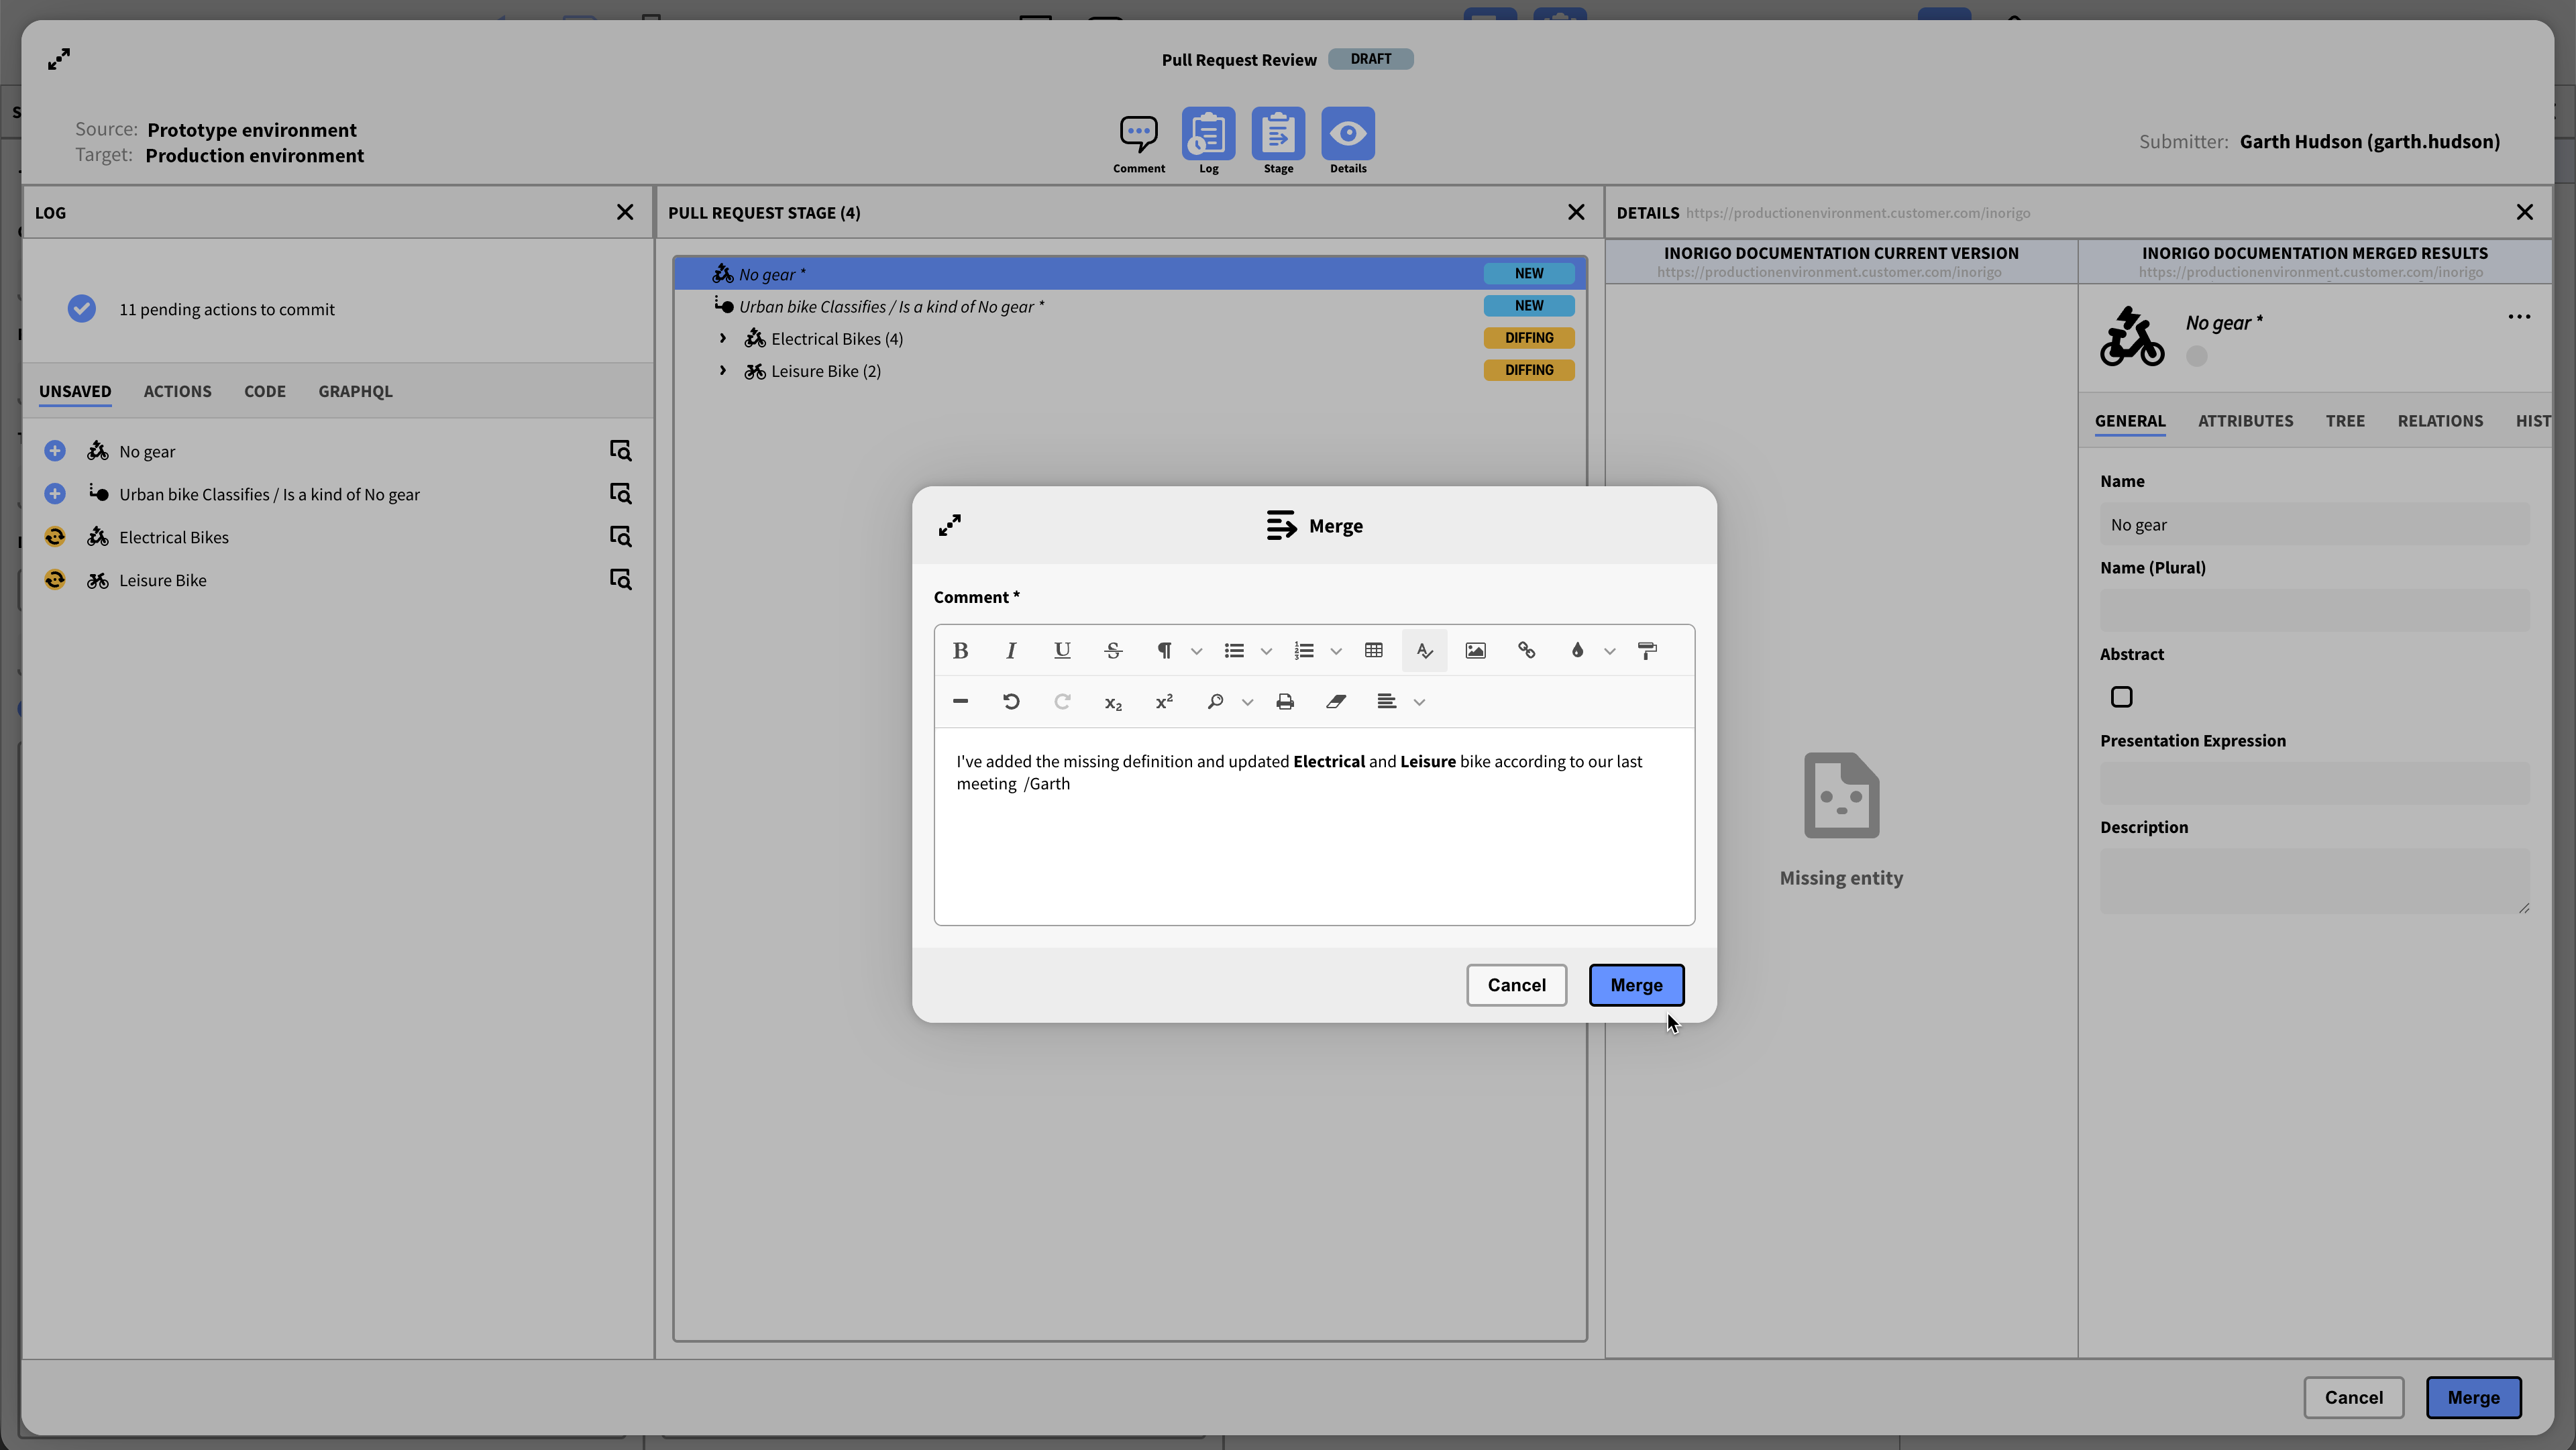
Comment
It is mandatory to add a comment before merging, this is to distinguish between the different Pull request in the Pull Request overview, and to facilitate keeping a record of all changes made. Any previous commenting made during the create/edit step will be transferred to the dialog. See Comment.
© 2026 Inorigo AB. All rights reserved.