Rights Manager
The Rights Manager enables flexible rights management across multiple levels within the inorigo® platform. It works in conjunction with the Access Manager to ensure secure and controlled access.
Overview
Understanding the Rights Manager
The Rights Manager is organized into five main tabs: Rules, Users, User Groups, Entity Groups, and Scenarios.
- Rules: Rules connects users and user groups, with Entities and Entity groups – regulating permissions.
- Users: To Manage individual users, add new ones and lists relevant user information.
- User Groups: To manage groups of users.
- Entity Groups: To Manage entity groups. Entity groups, can contain any combination of inorigo® entities.
- Scenarios: Allows for running a test to see how a rule is affecting a specific user, or user group.
Rules Tab
The Rules Tab provides overview of all rules in inorigo®.
From here it is possible to edit, create and delete rules, search rules and clone rules.
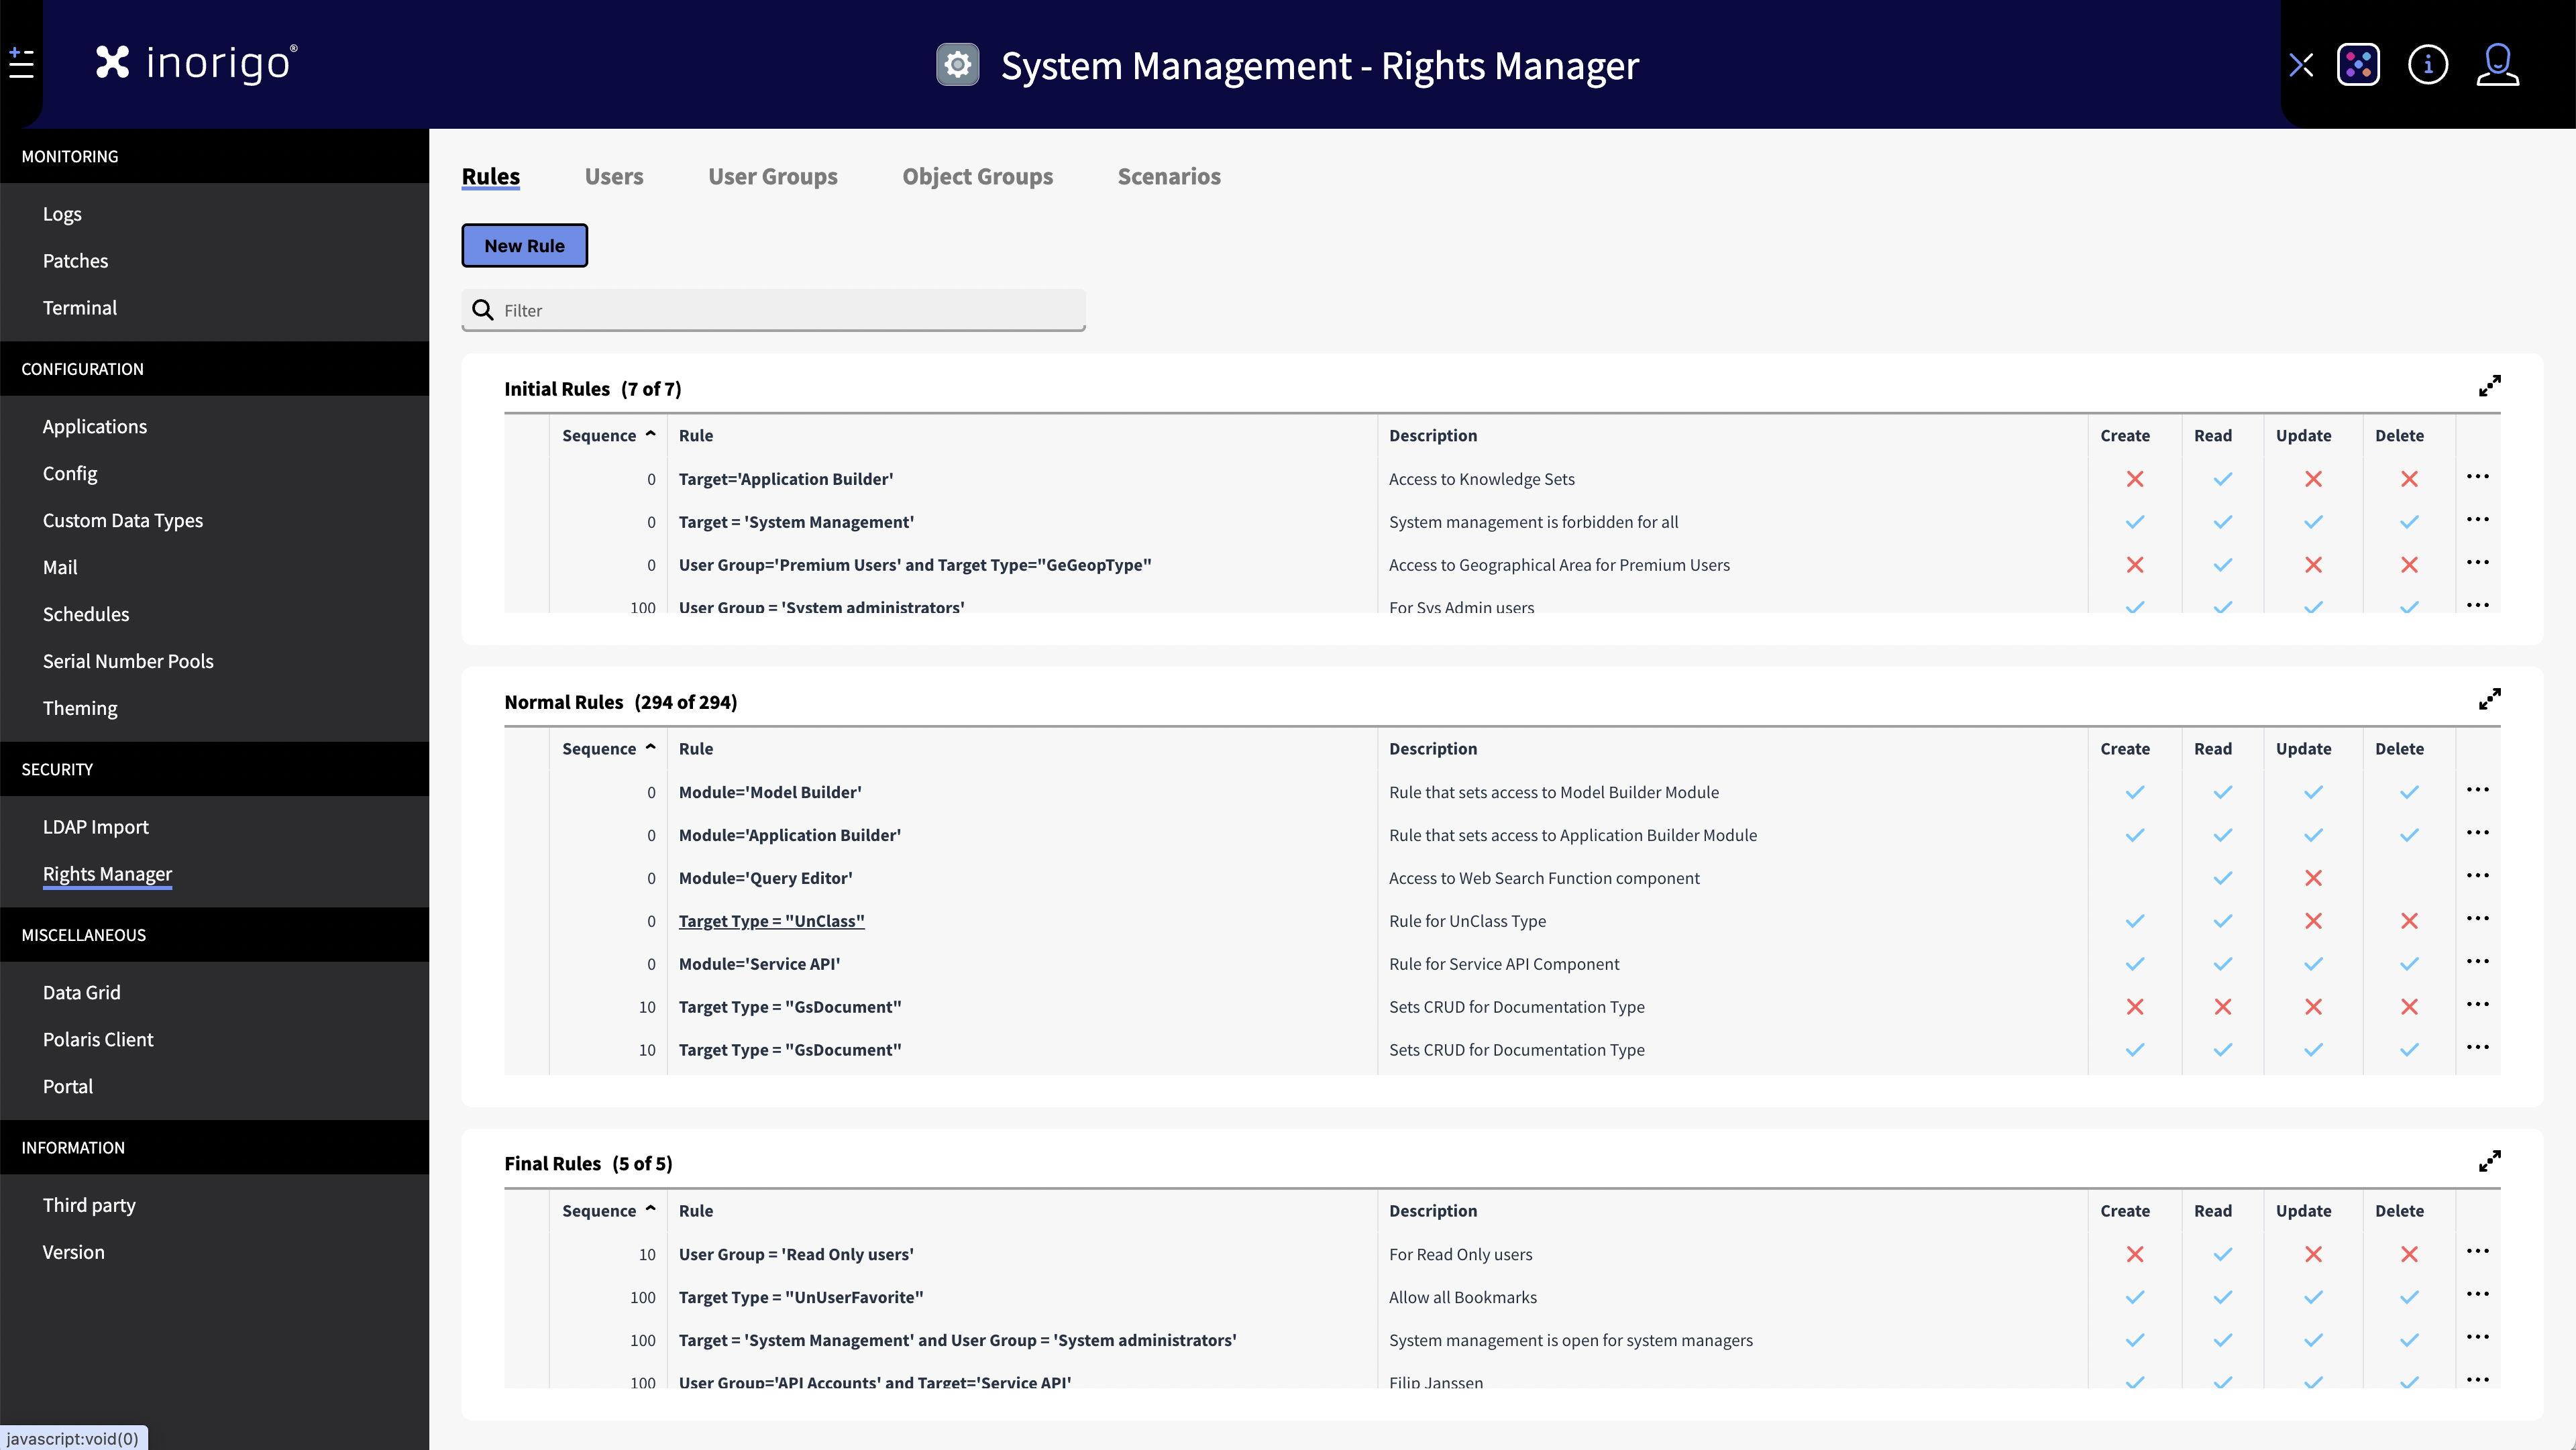
Filter Rules
Use the filter to find a specific rule. You can search for a Sequence Number, Rule Name or Description.
Targeting
Rules define a target consisting of either a single entity or an entity group, and either a specific user or a user group. This determines which users are granted access to the specified entities.
Rule Hierarchy
Rules are structured in two different hierarchies. First Rule Level and then Sequence.
Together these governs the priority of the rule and if the rule will override another rule.
Rule Level
Rules are always assigned to one of three Rule Levels: Initial, Normal or Final.
Tip: You can open a Rule Level in a dialog to better view all of its content, or to only filter within the specific Rule Level.
Rule levels determine the order in which rules are applied. The purpose of a rule dictates the appropriate rule level.
There are three levels:
-
Initial Level:
- Purpose: Foundational rules for your rule set.
- Examples: Basic access rules, general guidelines.
-
Normal Level:
- Purpose: Standard access rules for specific user groups or individual users.
- Examples: Regular access permissions, user-specific rules.
-
Final Level:
- Purpose: Override rules that take precedence over Initial and Normal levels.
- Examples: Special access for certain users, permissions to upload information to inorigo®, administrative access to the entirety of inorigo®, ensuring system managers have access to system management.
By categorizing rules into levels, you can effectively manage and prioritize rule application based on their intended function.
Sequence
Within each Rule Level the Sequence number of the rules determines the order of which they are applied.
Sequence number can range between 0 and upward.
Rules with higher sequence numbers will override rules with lower sequence numbers.
There can be rules with the same sequence number.
Note that Rule Level takes priority over Sequence, meaning that all rules within a Rule Level, regardless of their sequence number, will be applied before any of the rules in the next level comes into effect.
Example: An Initial rule with Sequence 40 will always be applied before a Normal rule with Sequence 20. A Normal Rule with Sequence 100 will always be applied before a Final rule with Sequence of 9999. etc.
Override Mechanism
Rules applied earlier can be overridden, by rules, lower within the hierarchy. This can occur either in the order shown in the rights manager (initial, normal, final) or regulated by the sequence number assigned when creating the rule.
Example: A Normal rule grants permission for a user to a specific application, another rule within the Final Rule Level, restricts the same user to said application. The Final Rule takes priority.
Description
Describes the purpose of the rule. It is best practice to jot down a few words why the rule exist for.
Permissions (CRUD)
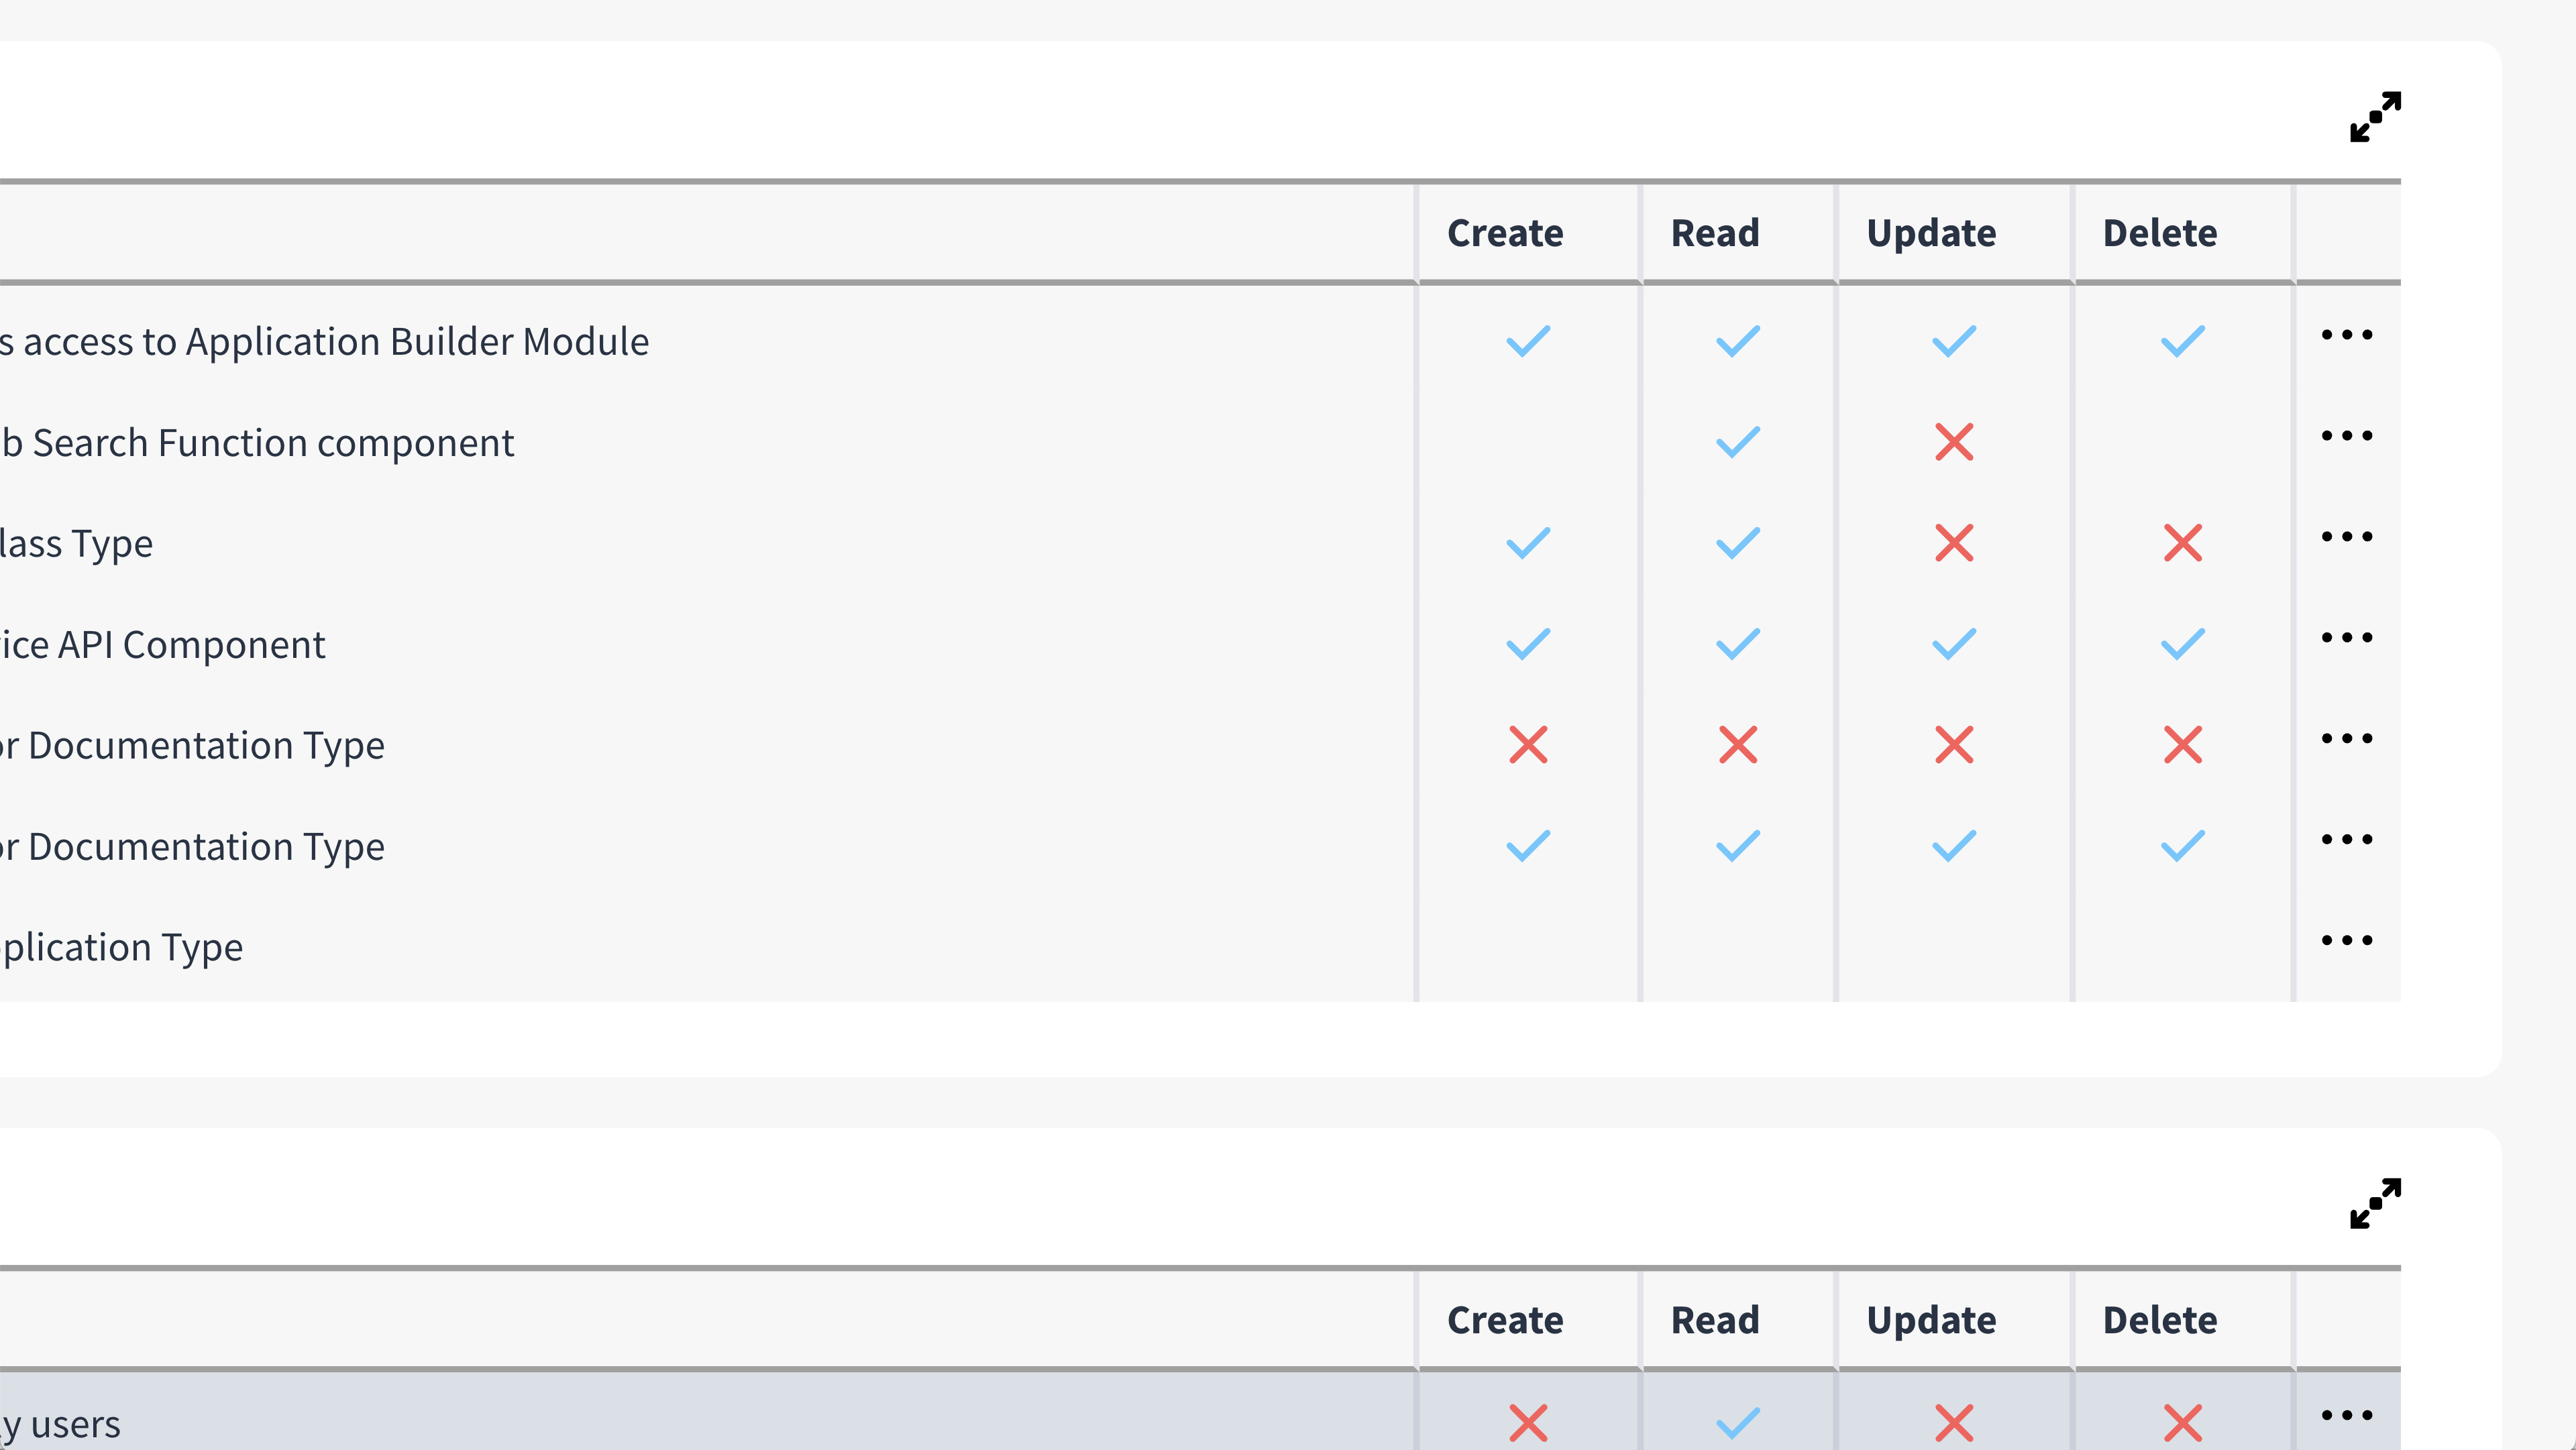
CRUD stands for Create, Read, Update and Delete. These are the permissions that govern what a user will be able to see and do in inorigo®.
Create: Create, Save & Edit
Read: See, Open, Use, Save & Edit
Update: Save & Edit
Delete: Delete
A blue check ✓ means that permission is granted, a red × means that permission is denied.
If the column is left empty, this means that the permission is not determined by this rule.
Options Meny […]
Less frequently used, and advanced functions can be found in the […] options menu. This menu contains:
Expression Editor
Opens a dialog with the expression editor and from where it is possible to edit the rule quickly.
Clone Rule
Duplicates the rule.
Delete Rule
Deletes the rule (cannot be undone)
Creating and Editing Rules
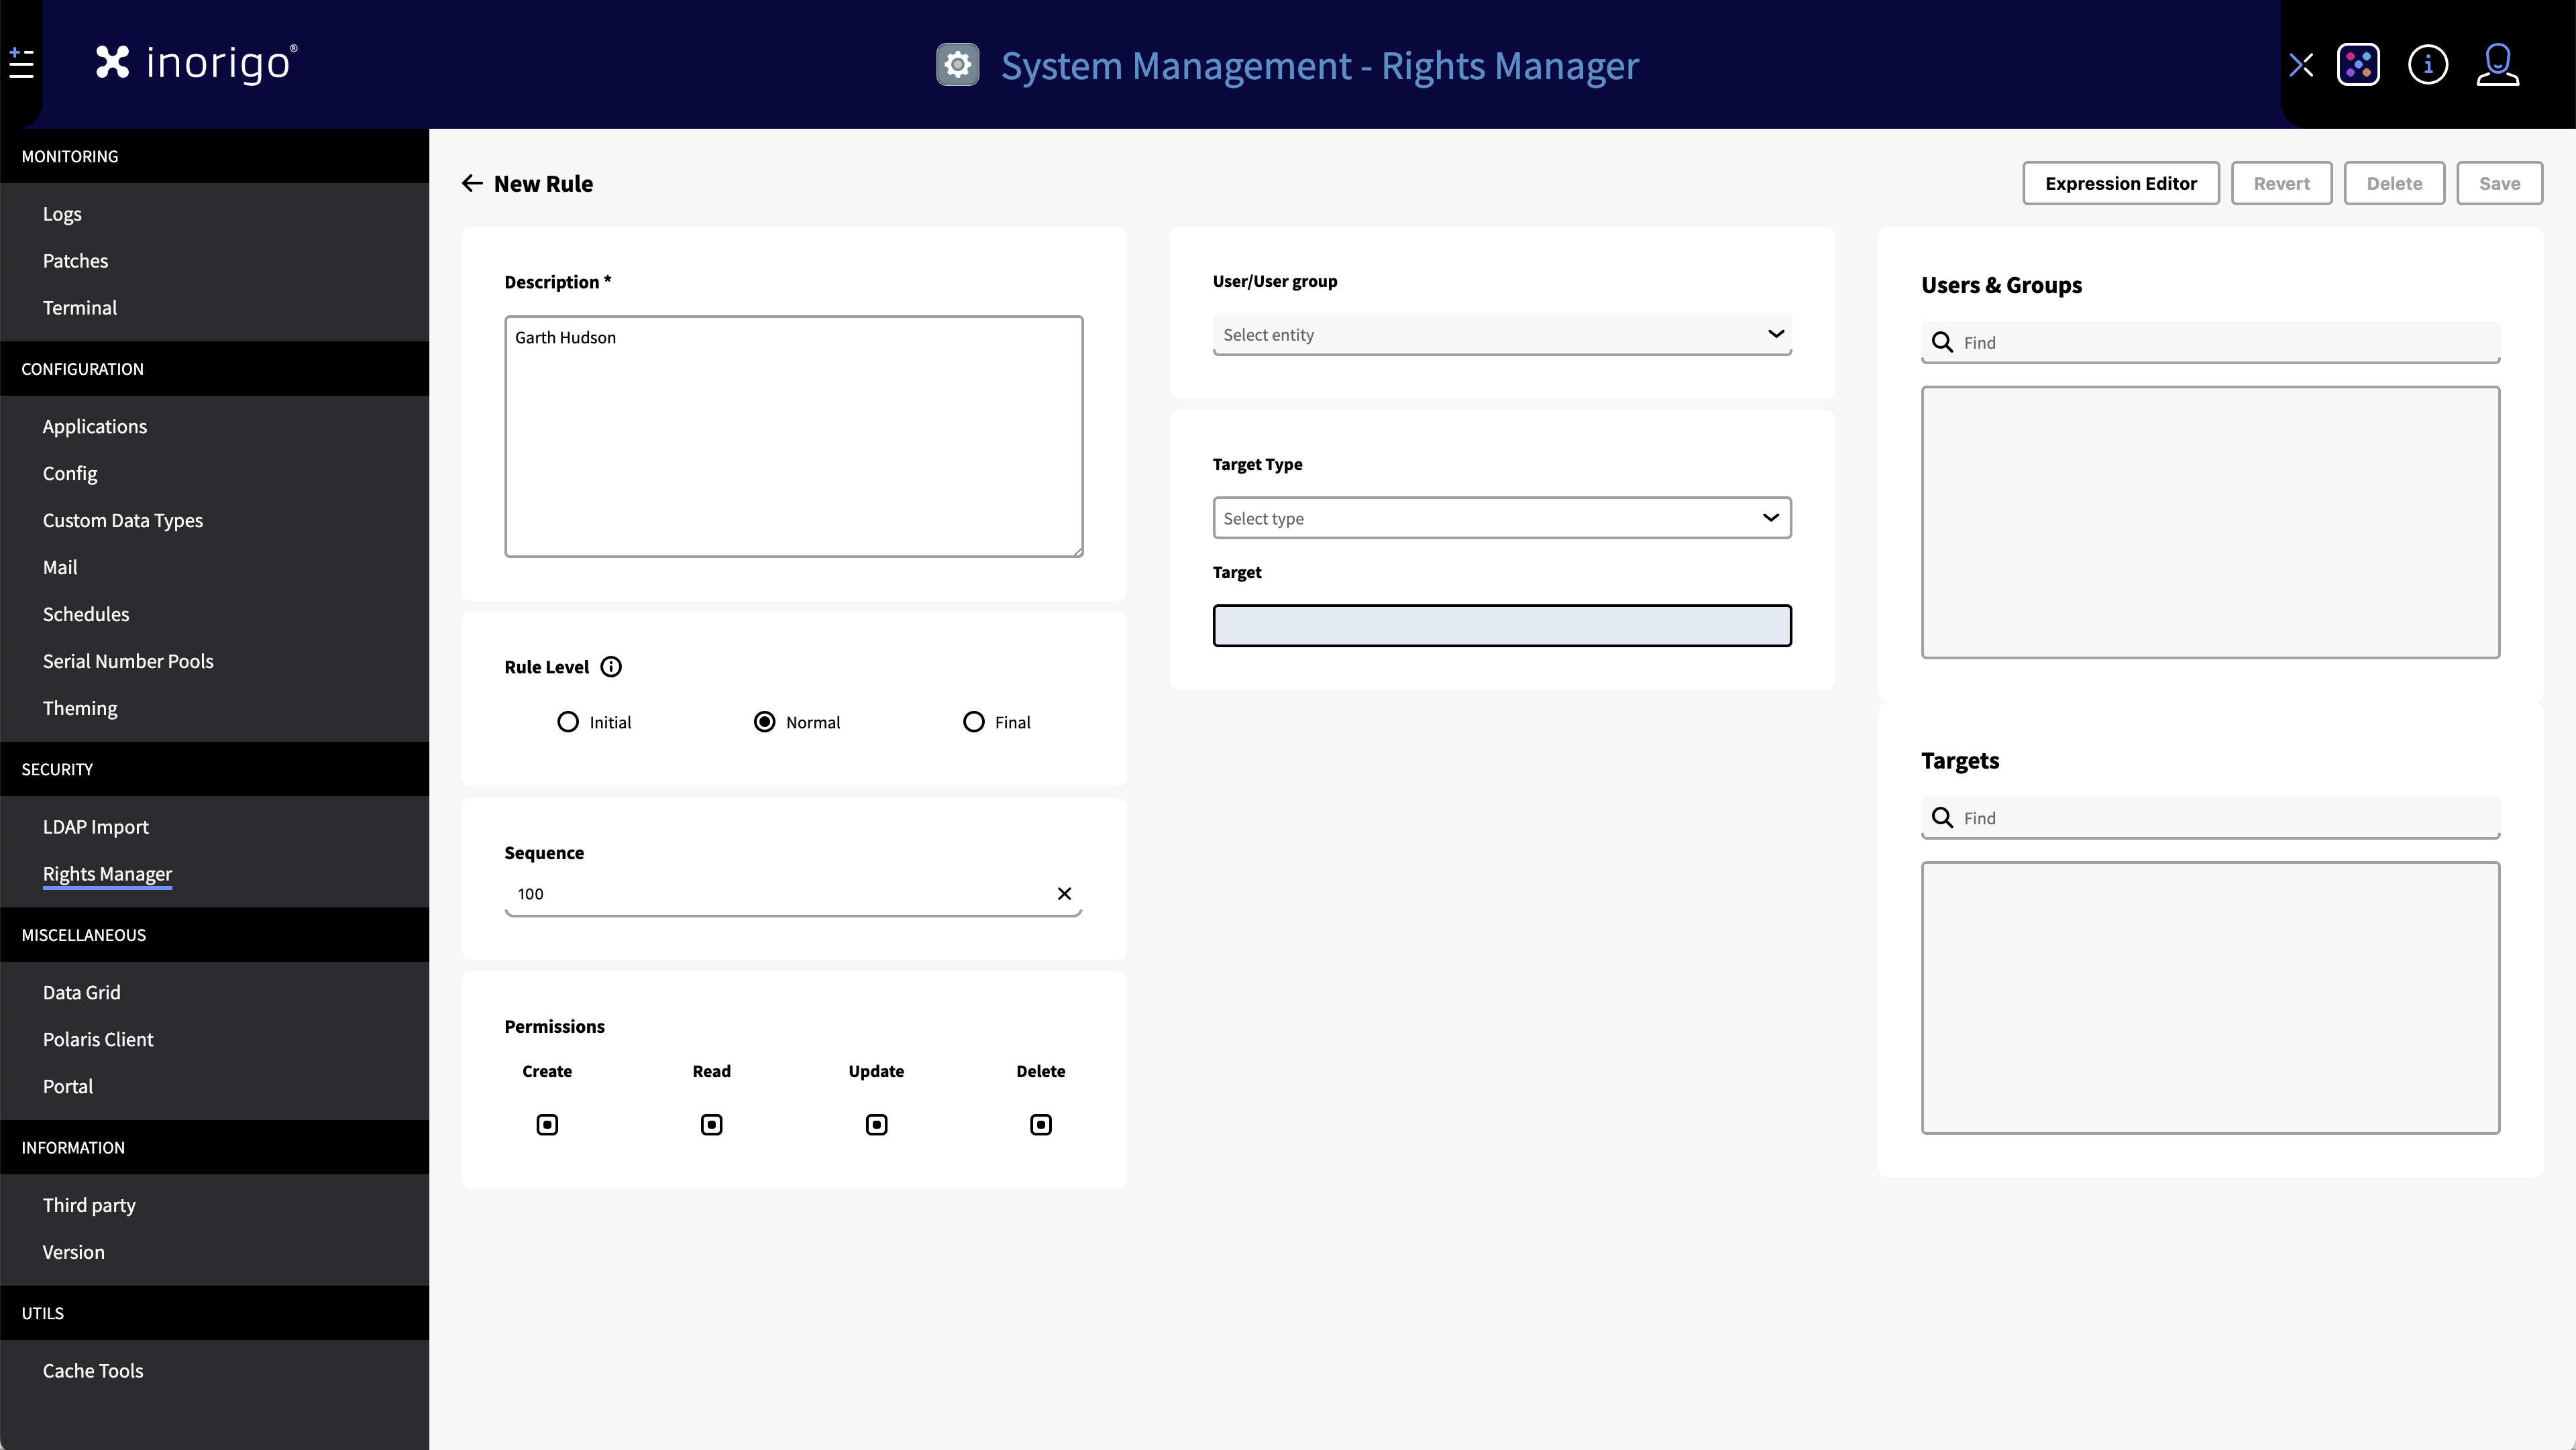
Select the New Rule button in the Rules tab to open the Edit Rule screen.
You can also edit an existing rule by clicking its name (Rule column) in the Rules Tab
The Edit Rule screen consist of the following:
Name
The name of the rule will be displayed at the top of the screen. It is automatically generated to reflect the User/User group and target of the rule.
Description
This is a mandatory field. It is best practice to add a short descriptive text with the purpose of the rule. This field will by default be populated with your username – this is so it is easier to backtrack who created the rule if no further information was added to the description.
Rule Level
Select the intended Rule Level for the rule. By default set to Normal.
Sequence
Sets the Sequence number for the rule. By default the sequence is 100, but can be any number from 0 and upward.
Permissions (CRUD)
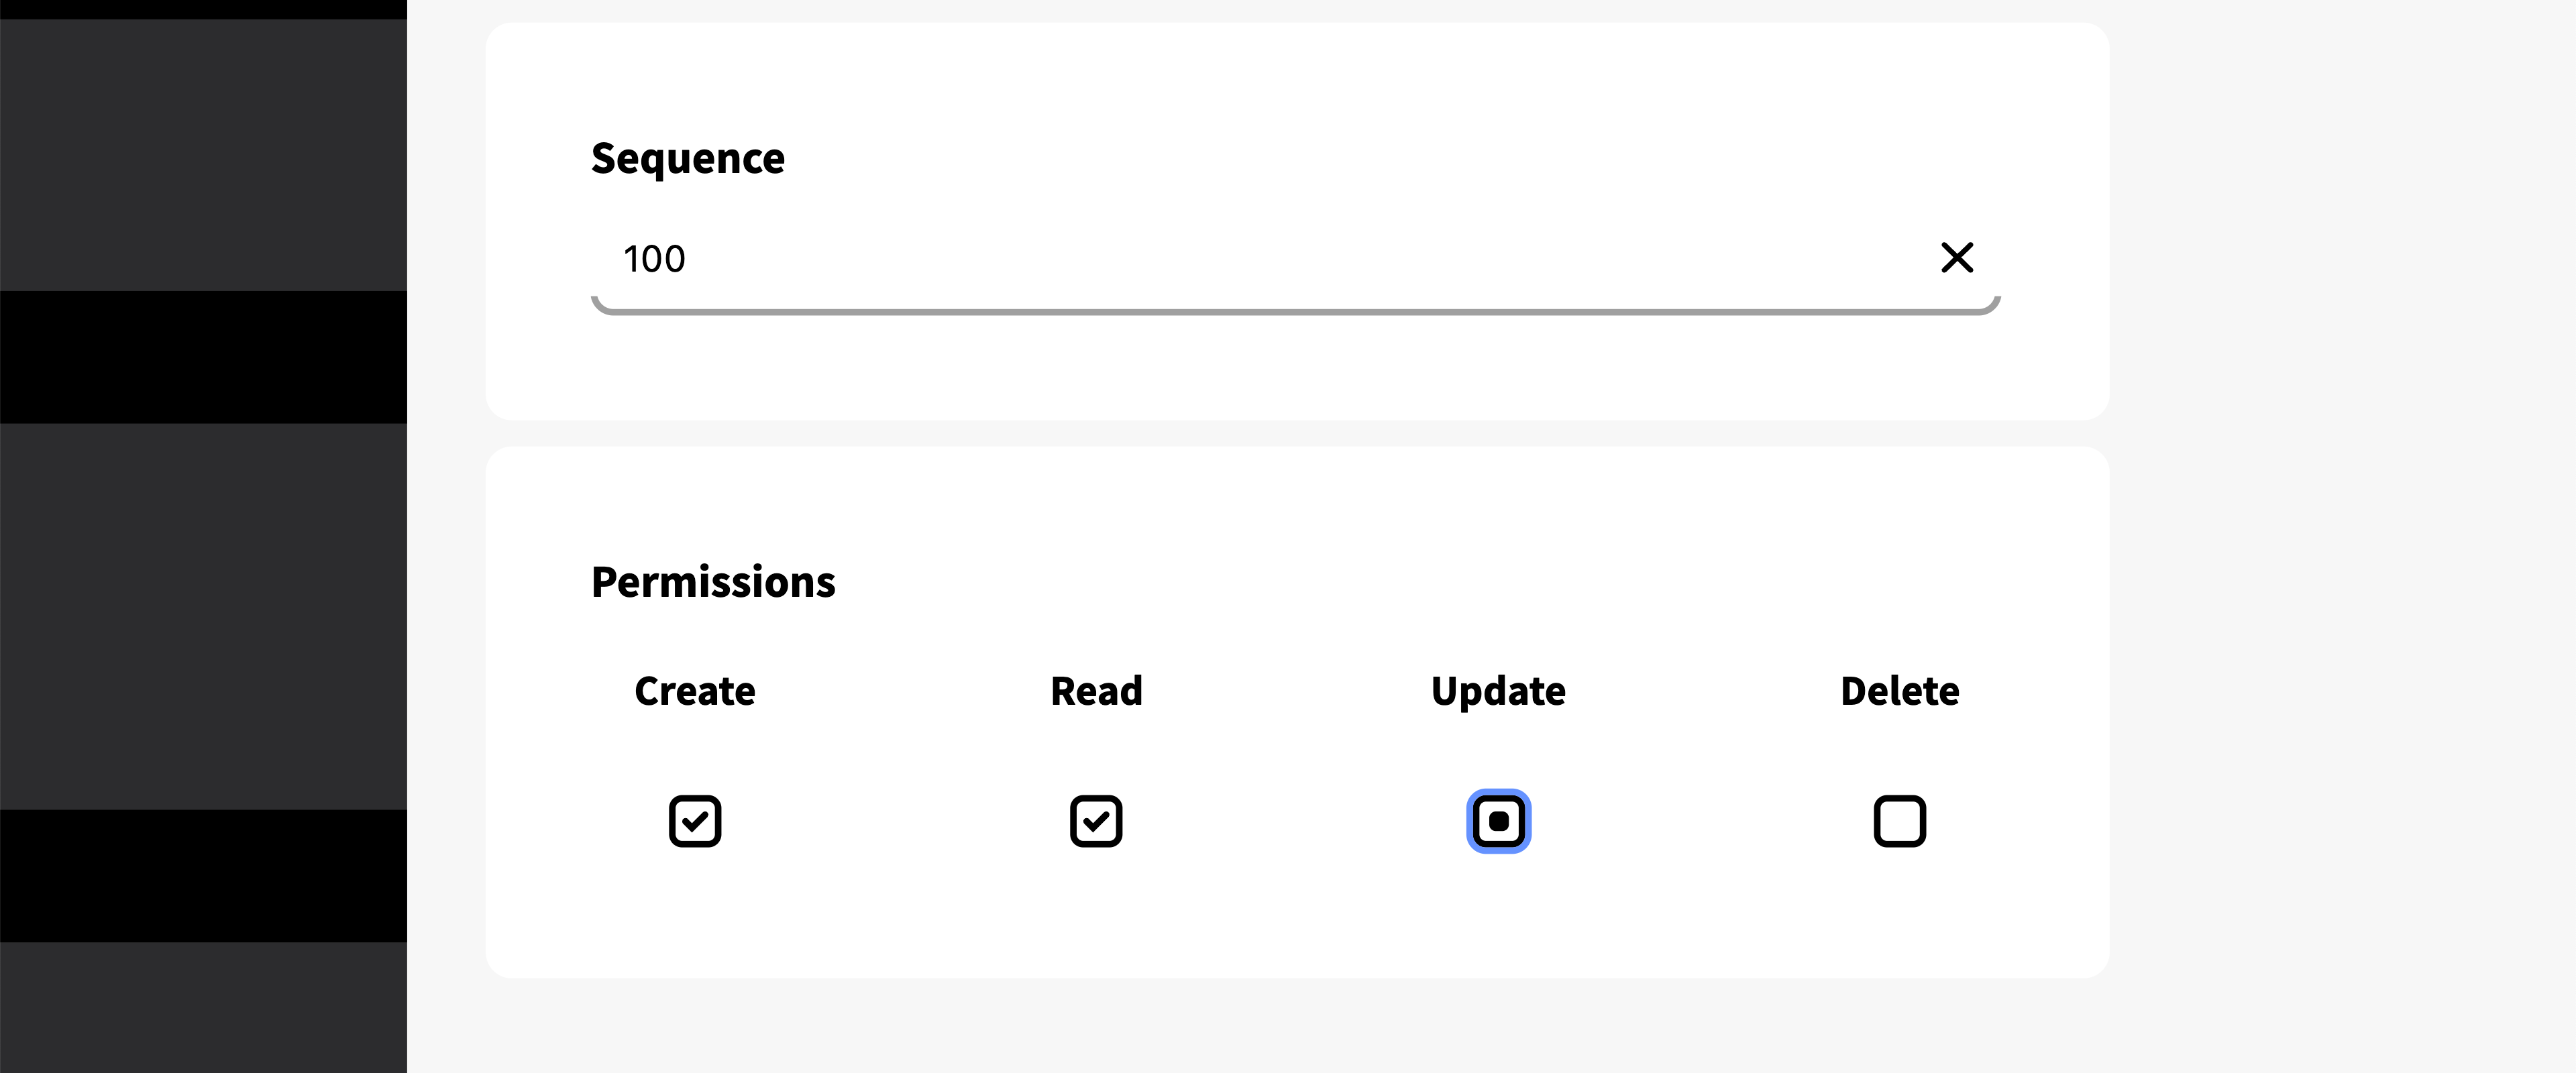
Sets the permission for the rule.
When managing CRUD (Create, Read, Update, Delete) permissions, you can assign each permission one of three states:
- Checkmark:Permission is granted.
- Dot (Null): Indicates that the permission is undetermined by the rule. (This is the default value and in most instances equivalent to "No").
- Empty Box (No): Permission is not granted.
IMPORTANT: CRUD permissions applies differently with data entities such as, knowledge sets, Association definitions etc, than with entities such as, modules, Add-ons, tools and applications.
User/User Group
Sets the user or user group that will be affected by the rule.
To target more than one user, a user group must first be created in the User Group Tab.
Once a user, or user group has been selected, you can see them in the list to the right.
Target Type
Selects the target type for the rule. This can be any type of inorigo® entity, or a Entity Group containing multiple entity types. It can even be another User Group.
Target
Once the type has been selected you can narrow it down by selecting a specific target.
Example: In order to target a specific inorigo® application, you will first need to select 'Application' as target type, and then in Target; select the desired Application.
Once a target has been selected it will appear in the list to the right.
Expression Editor, Revert, Delete and Save
In the top right corner you will find controls to Save and Delete the current Rule.
It is only possible to save a rule once all mandatory fields has been filled out.
Revert, resets the rule to the last saved version.
Expression Editor opens a dialog with expression functionality (see expressions)
Users Tab
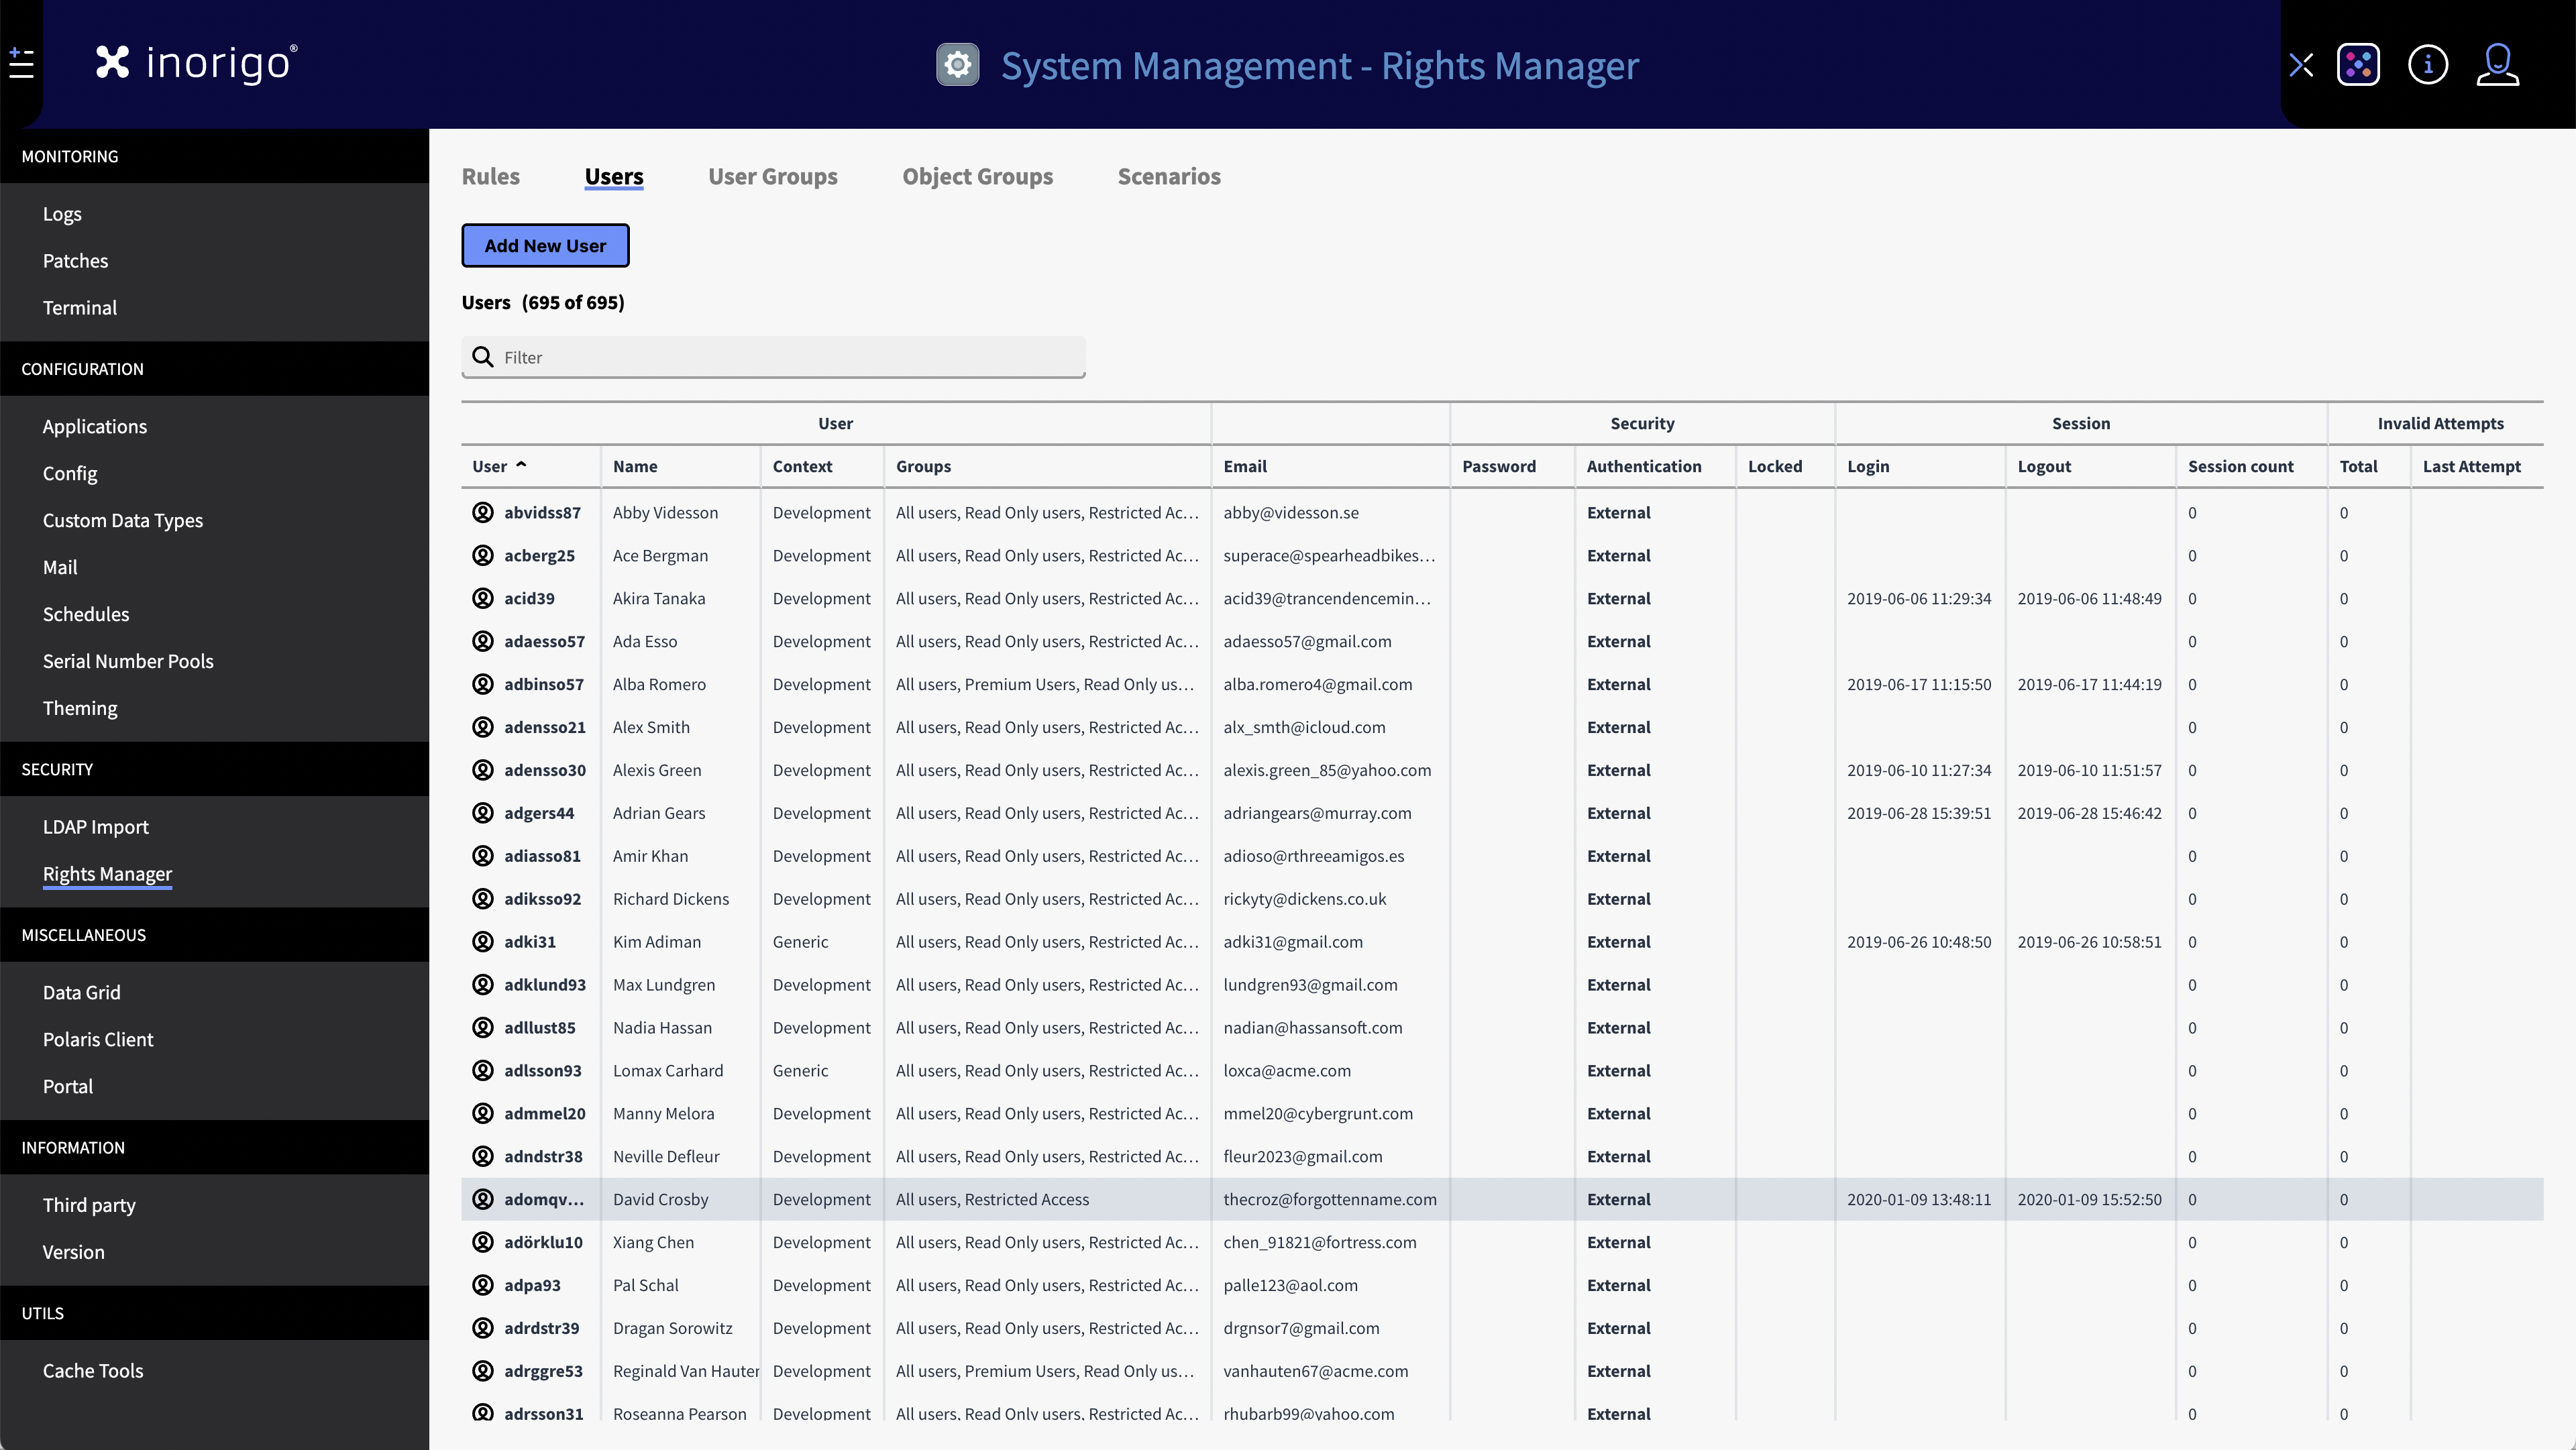
The user tab displays a comprehensive list of all users in inorigo®.
With this you can add new users and view relevant user information, such as,, the context they are working within, what groups they are in, contact information and the last time a user logged into inorigo®.
The users tab also allows you to update passwords and other authentications methods.
Add and Edit Users
To add a New User press the Add New User button, this opens a dialog.
To edit an existing user press their user name (The most left column) in the list.
Icon
Allows you to select an explicit icon from the availble resources , or upload a new icon. For best result use a square, monochrome .svg adpated to work in smaller sizes (IE 16x16px).
Name
Mandatory field. This is the user name. Typically the name is an abbreviation of the user's real first and last name.
Full Name
The full name of the User. Not mandatory but recommended to identify the user more easily.
Email
Mandatory field. The email address must be valid.
Login Context
Sets the default login context for the user.
User Groups
Allows for edit which User Groups the user belongs to. This can also be managed from the User Group Tab.
User Group Tab
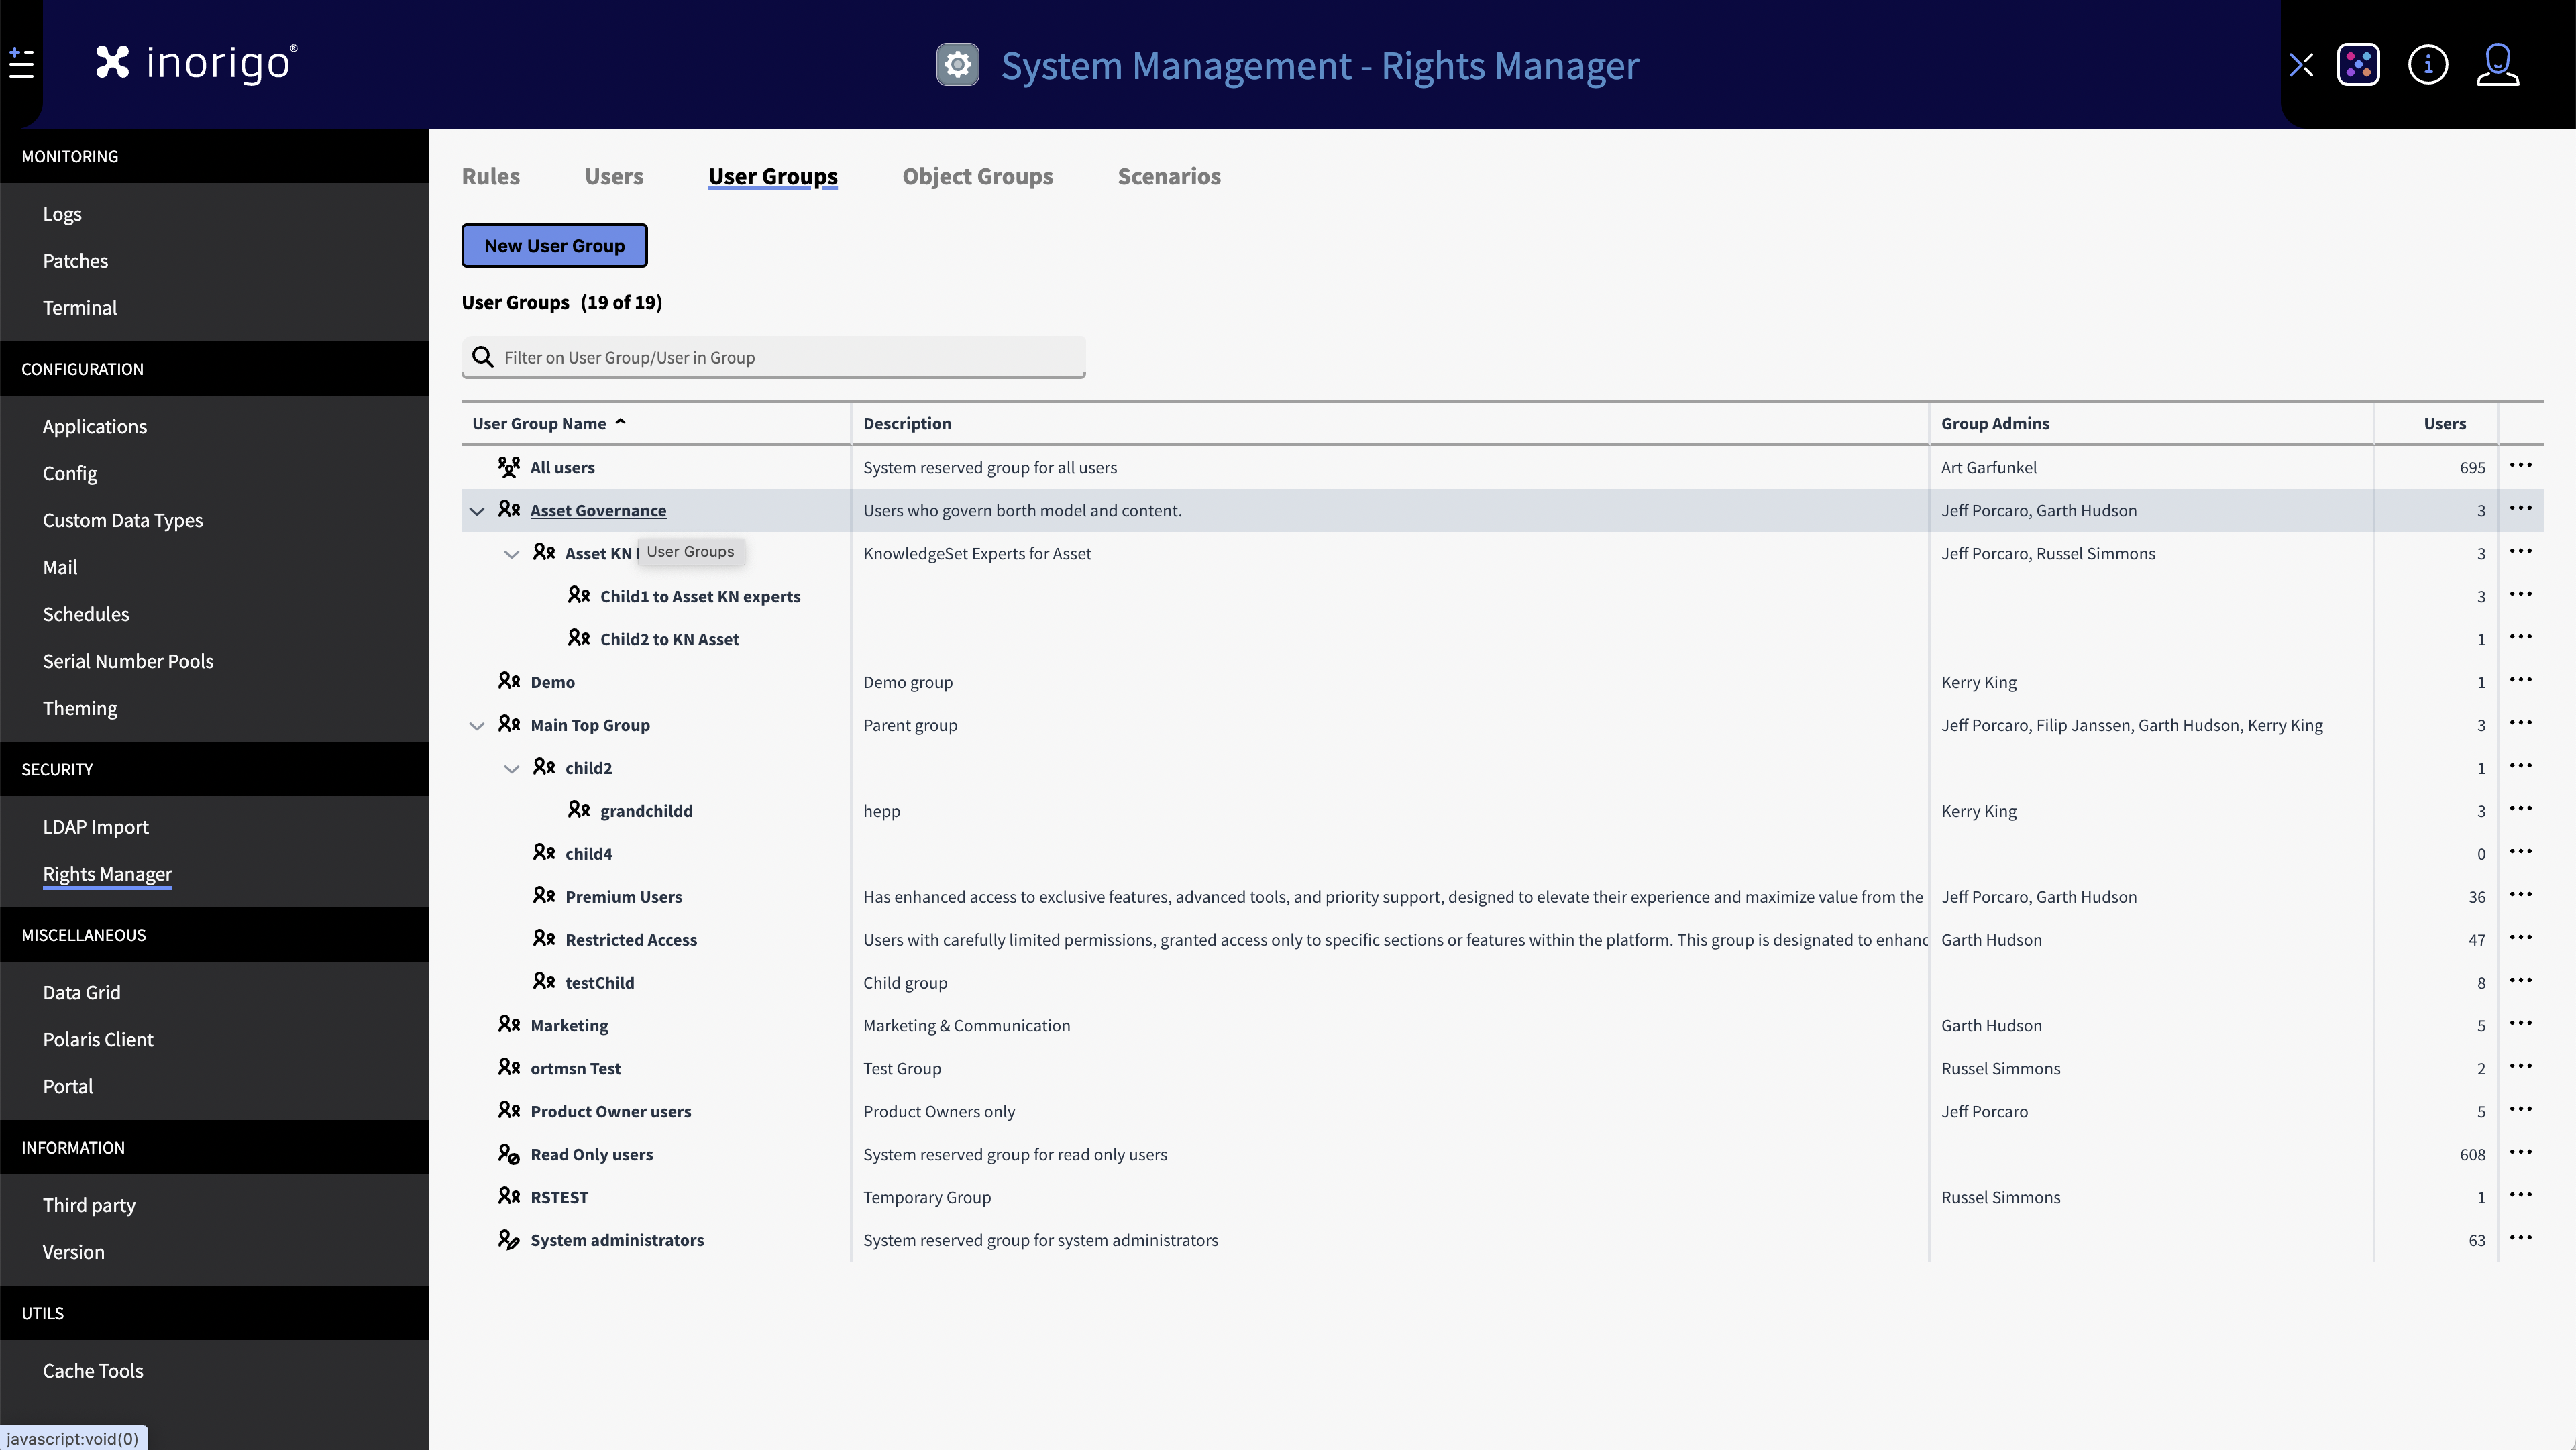
User groups allow rules to target multiple users simultaneously and treat them as a single unit. User groups are best used to organize all users within their respective departments within your organization.
There are three default user groups that cannot be deleted from the platform. These are: All users, Read only users and System administrators.
All users: Like the name implies is a group containing all users.
Read only users: Users who should only have read permissions.
System administrators: Users who should be able to configure and make new rules.
Note: System Administrators always has full access to all inorigo® modules, regardless of rules, user groups and permissions.
How to create a User Group
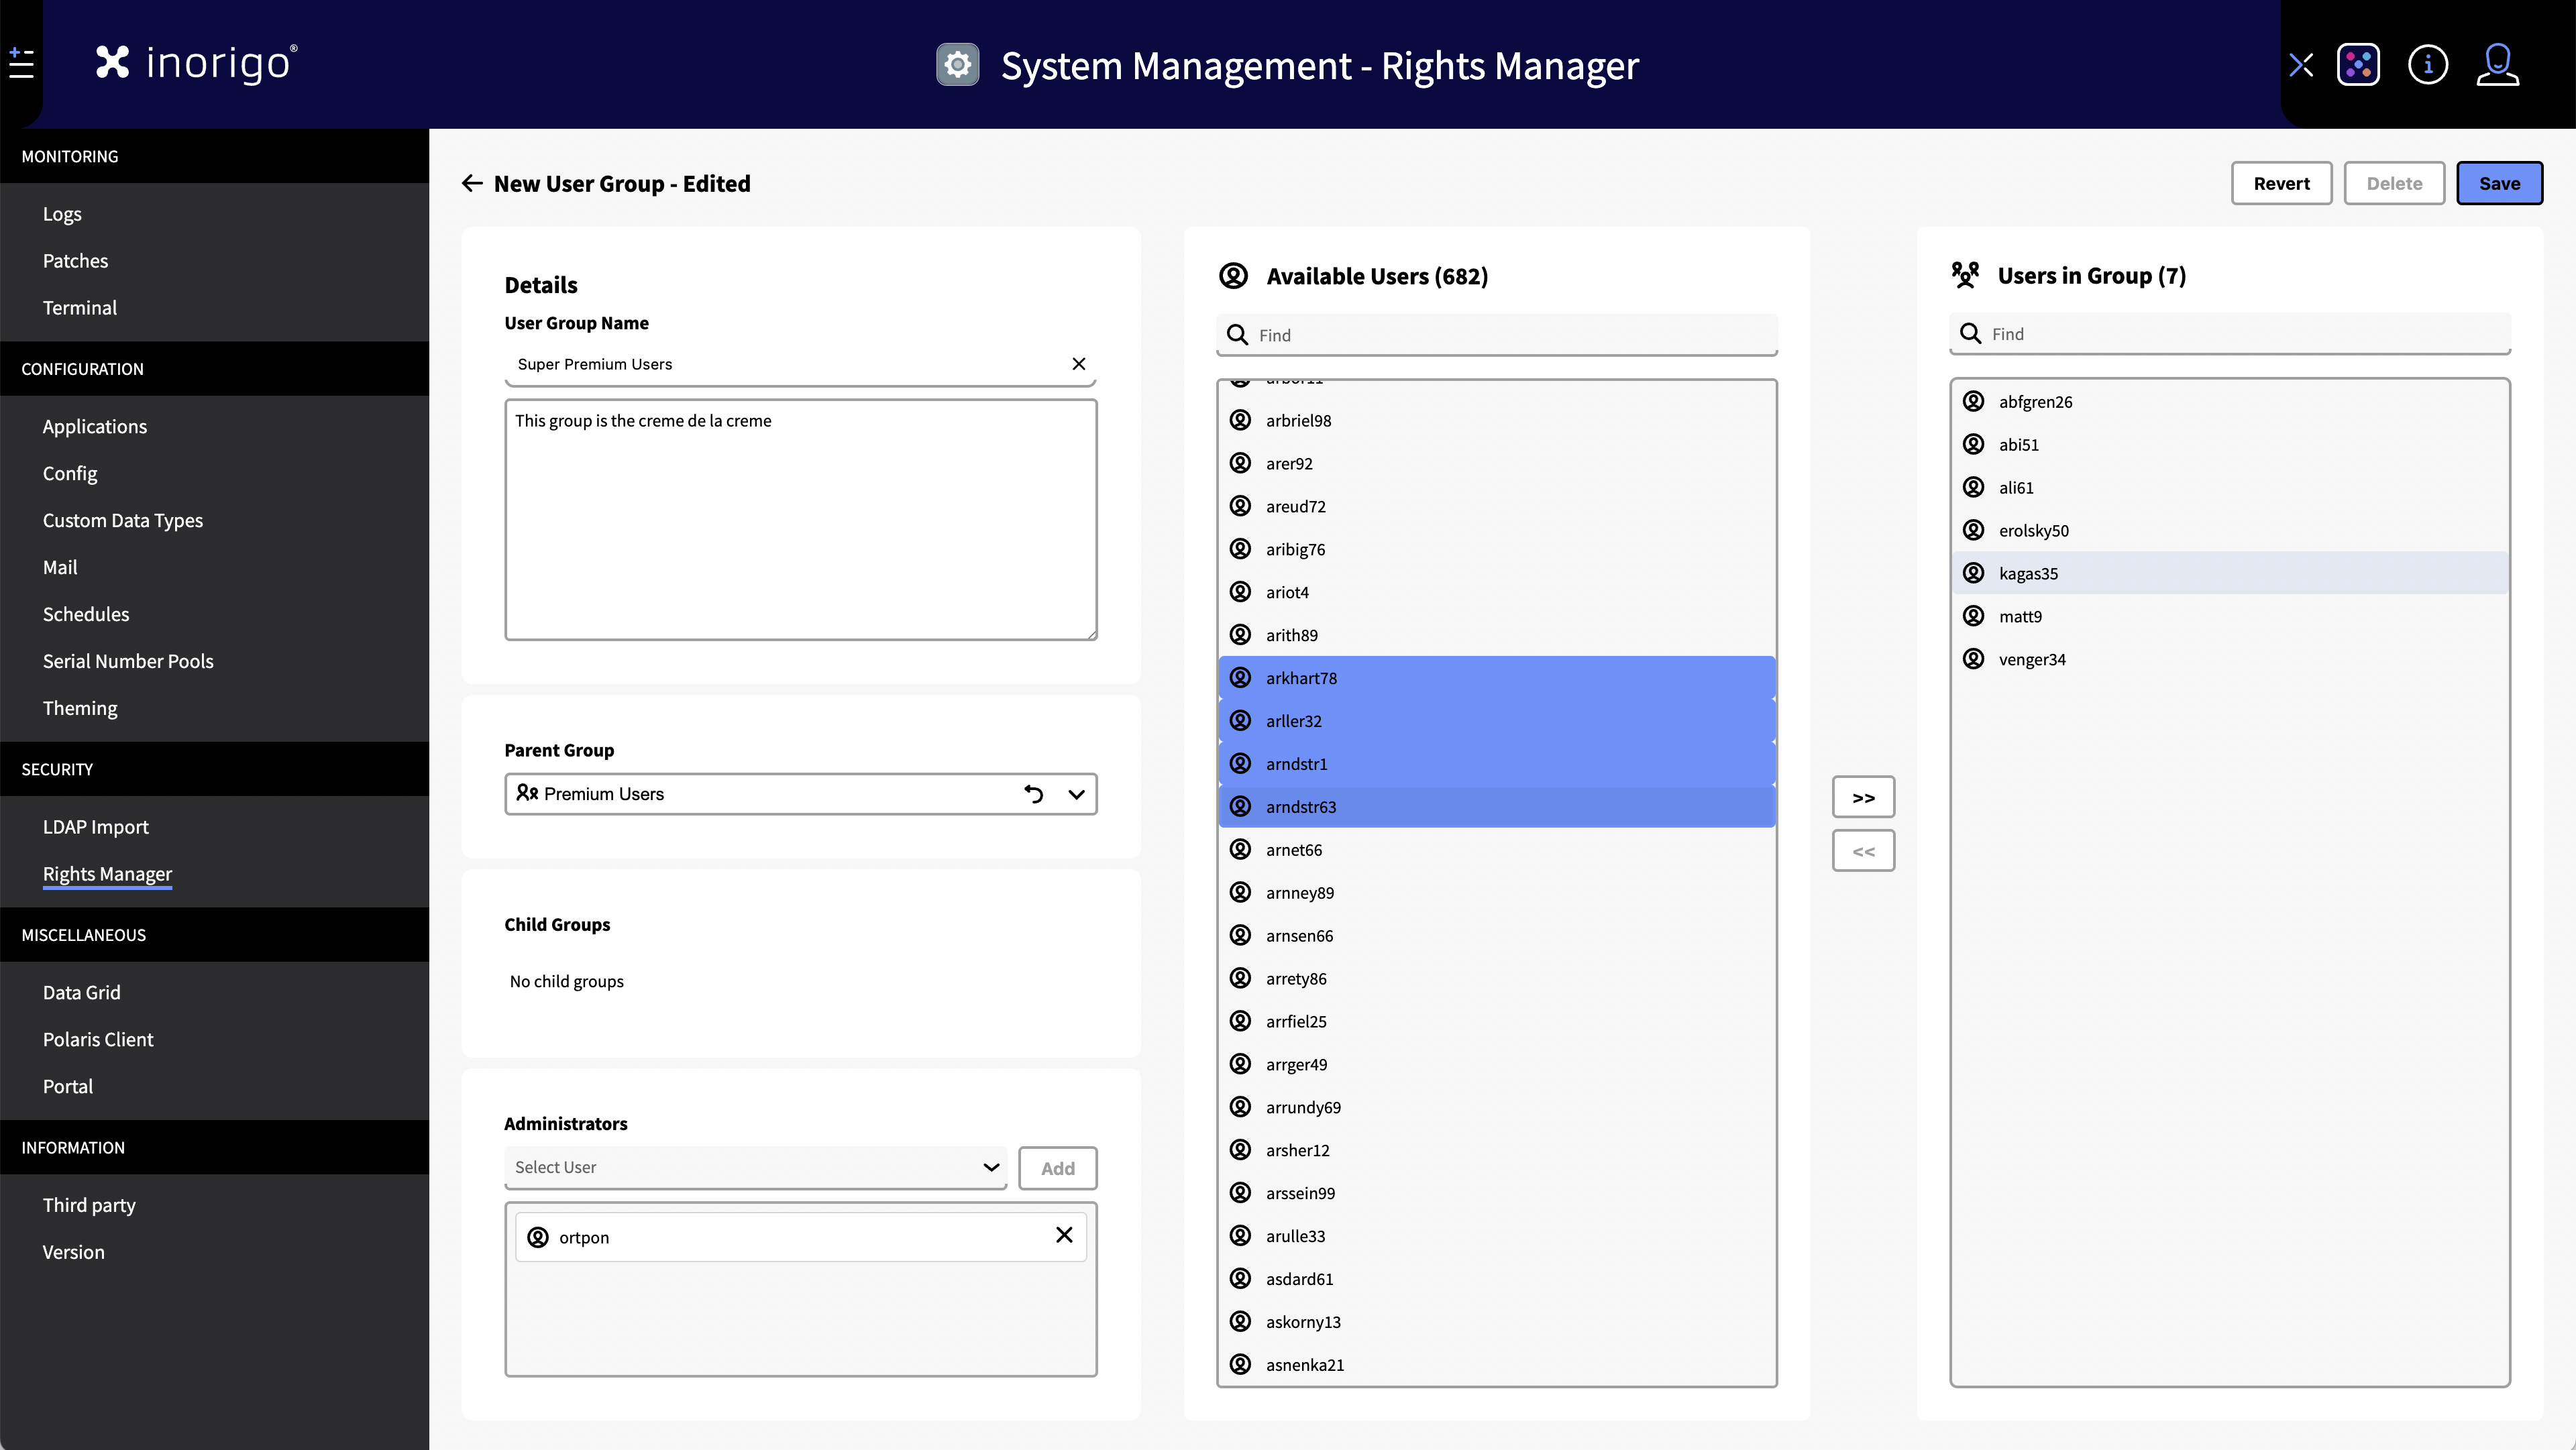
- In the User Group Tab, click on "New User Group"
- Name the group.
- Add a parent group (if desired) - The new group will become a child group to the selected parent.
- Select administrators for the group.
- Add users to the group by searching or browsing in the "Available Users" column. You can select one or many users at a time. Use the arrows to transfer the users to and from the group.
User Child Groups
You can organize user groups by creating a User child groups All users in the child group are effectively part of the parents group too, but not vice versa. That: is if you target the Parent group with a rule, all users in the child groups will also be affected. But if you target a child group this does not affect the users of its parent group.
Example: Common Users is the parent group of the child user group Special Users: Anna84 is added to the Special Users group. Any rule targeting either Common Users or Special Users will affect Anna84.
Example: Common Users is the parent group of the child user group Special Users: Bertil83 is added to the Common Users group. Any rule targeting Common Users will affect Bertil83 – But a rule targeting Special Users will not affect Bertil83.
How to assign a Child to a Parent (User group):
- Create a new group and fill it with the users needing the special access.
- Locate the group you want to assign as a parent and select it. It will now be displayed within the parent folder in the Group tabs.
Entity Groups
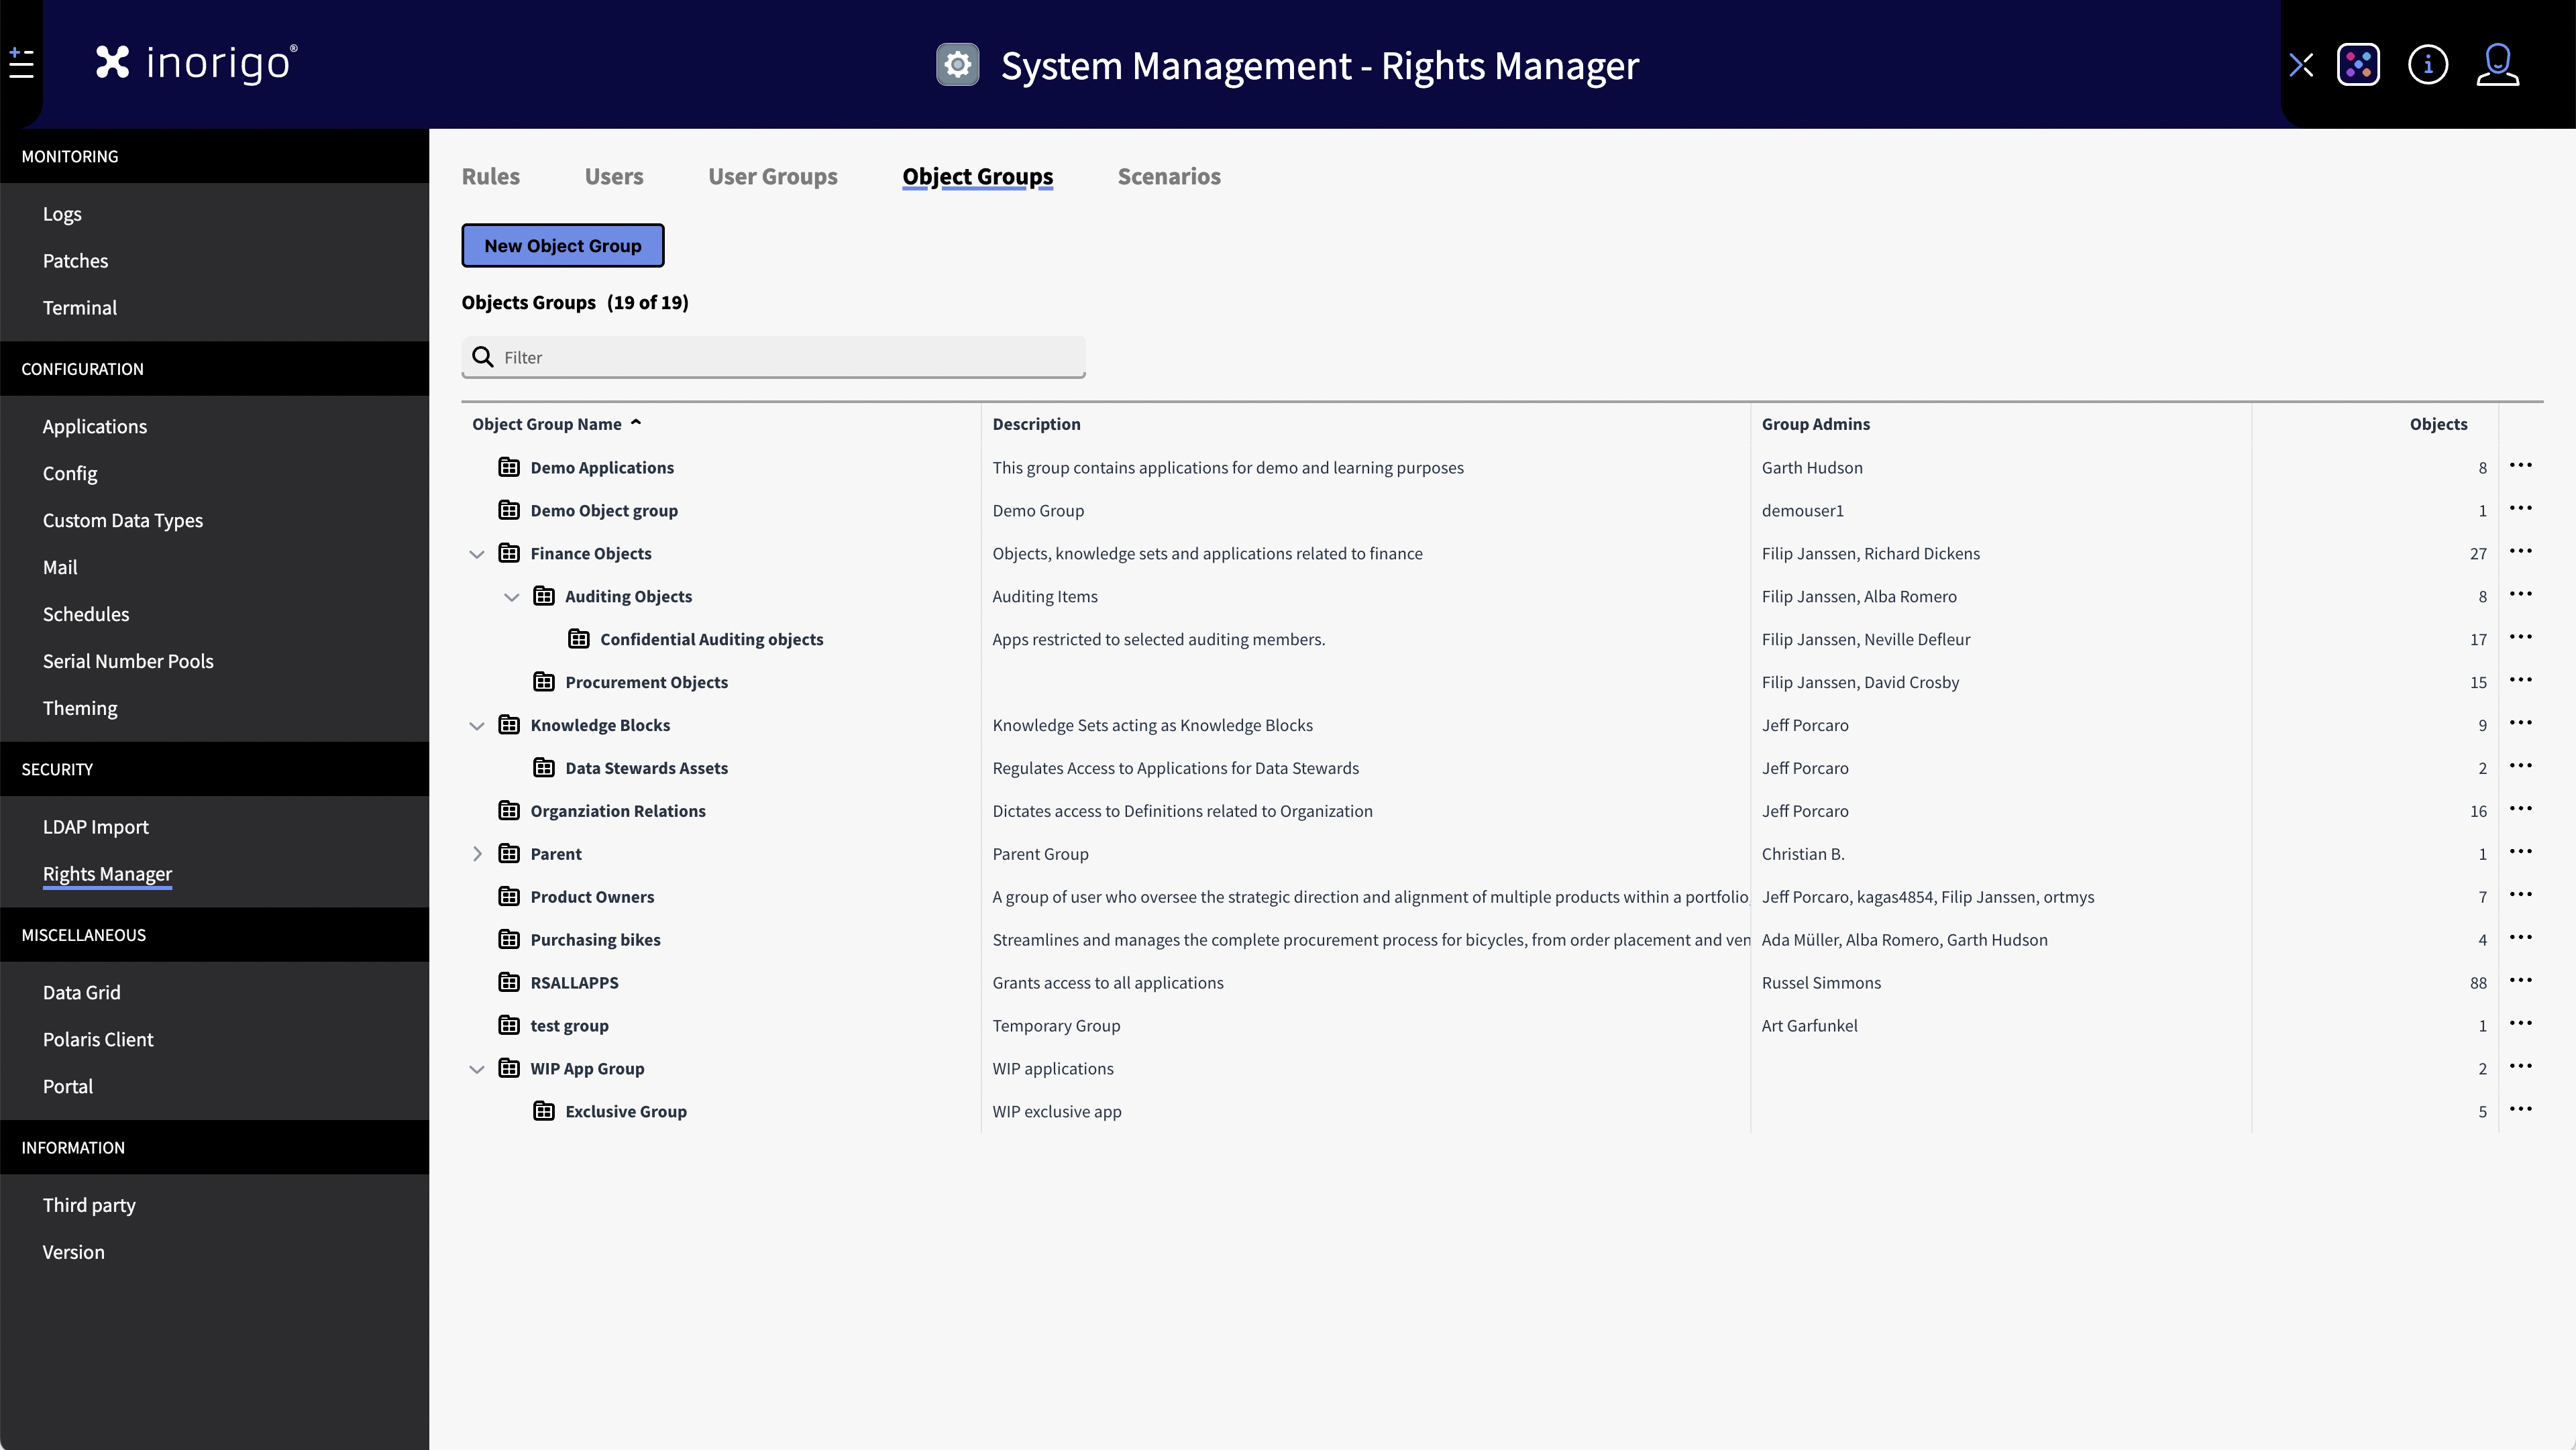
Entity groups is another administrative feature that lets you create groups of applications, modules, add-ons, tools and other inorigo® data entities. Entity groups can be used as target for rules, allowing for setting permissions to many different inorigo® entities at once.
How to create a Entity Group
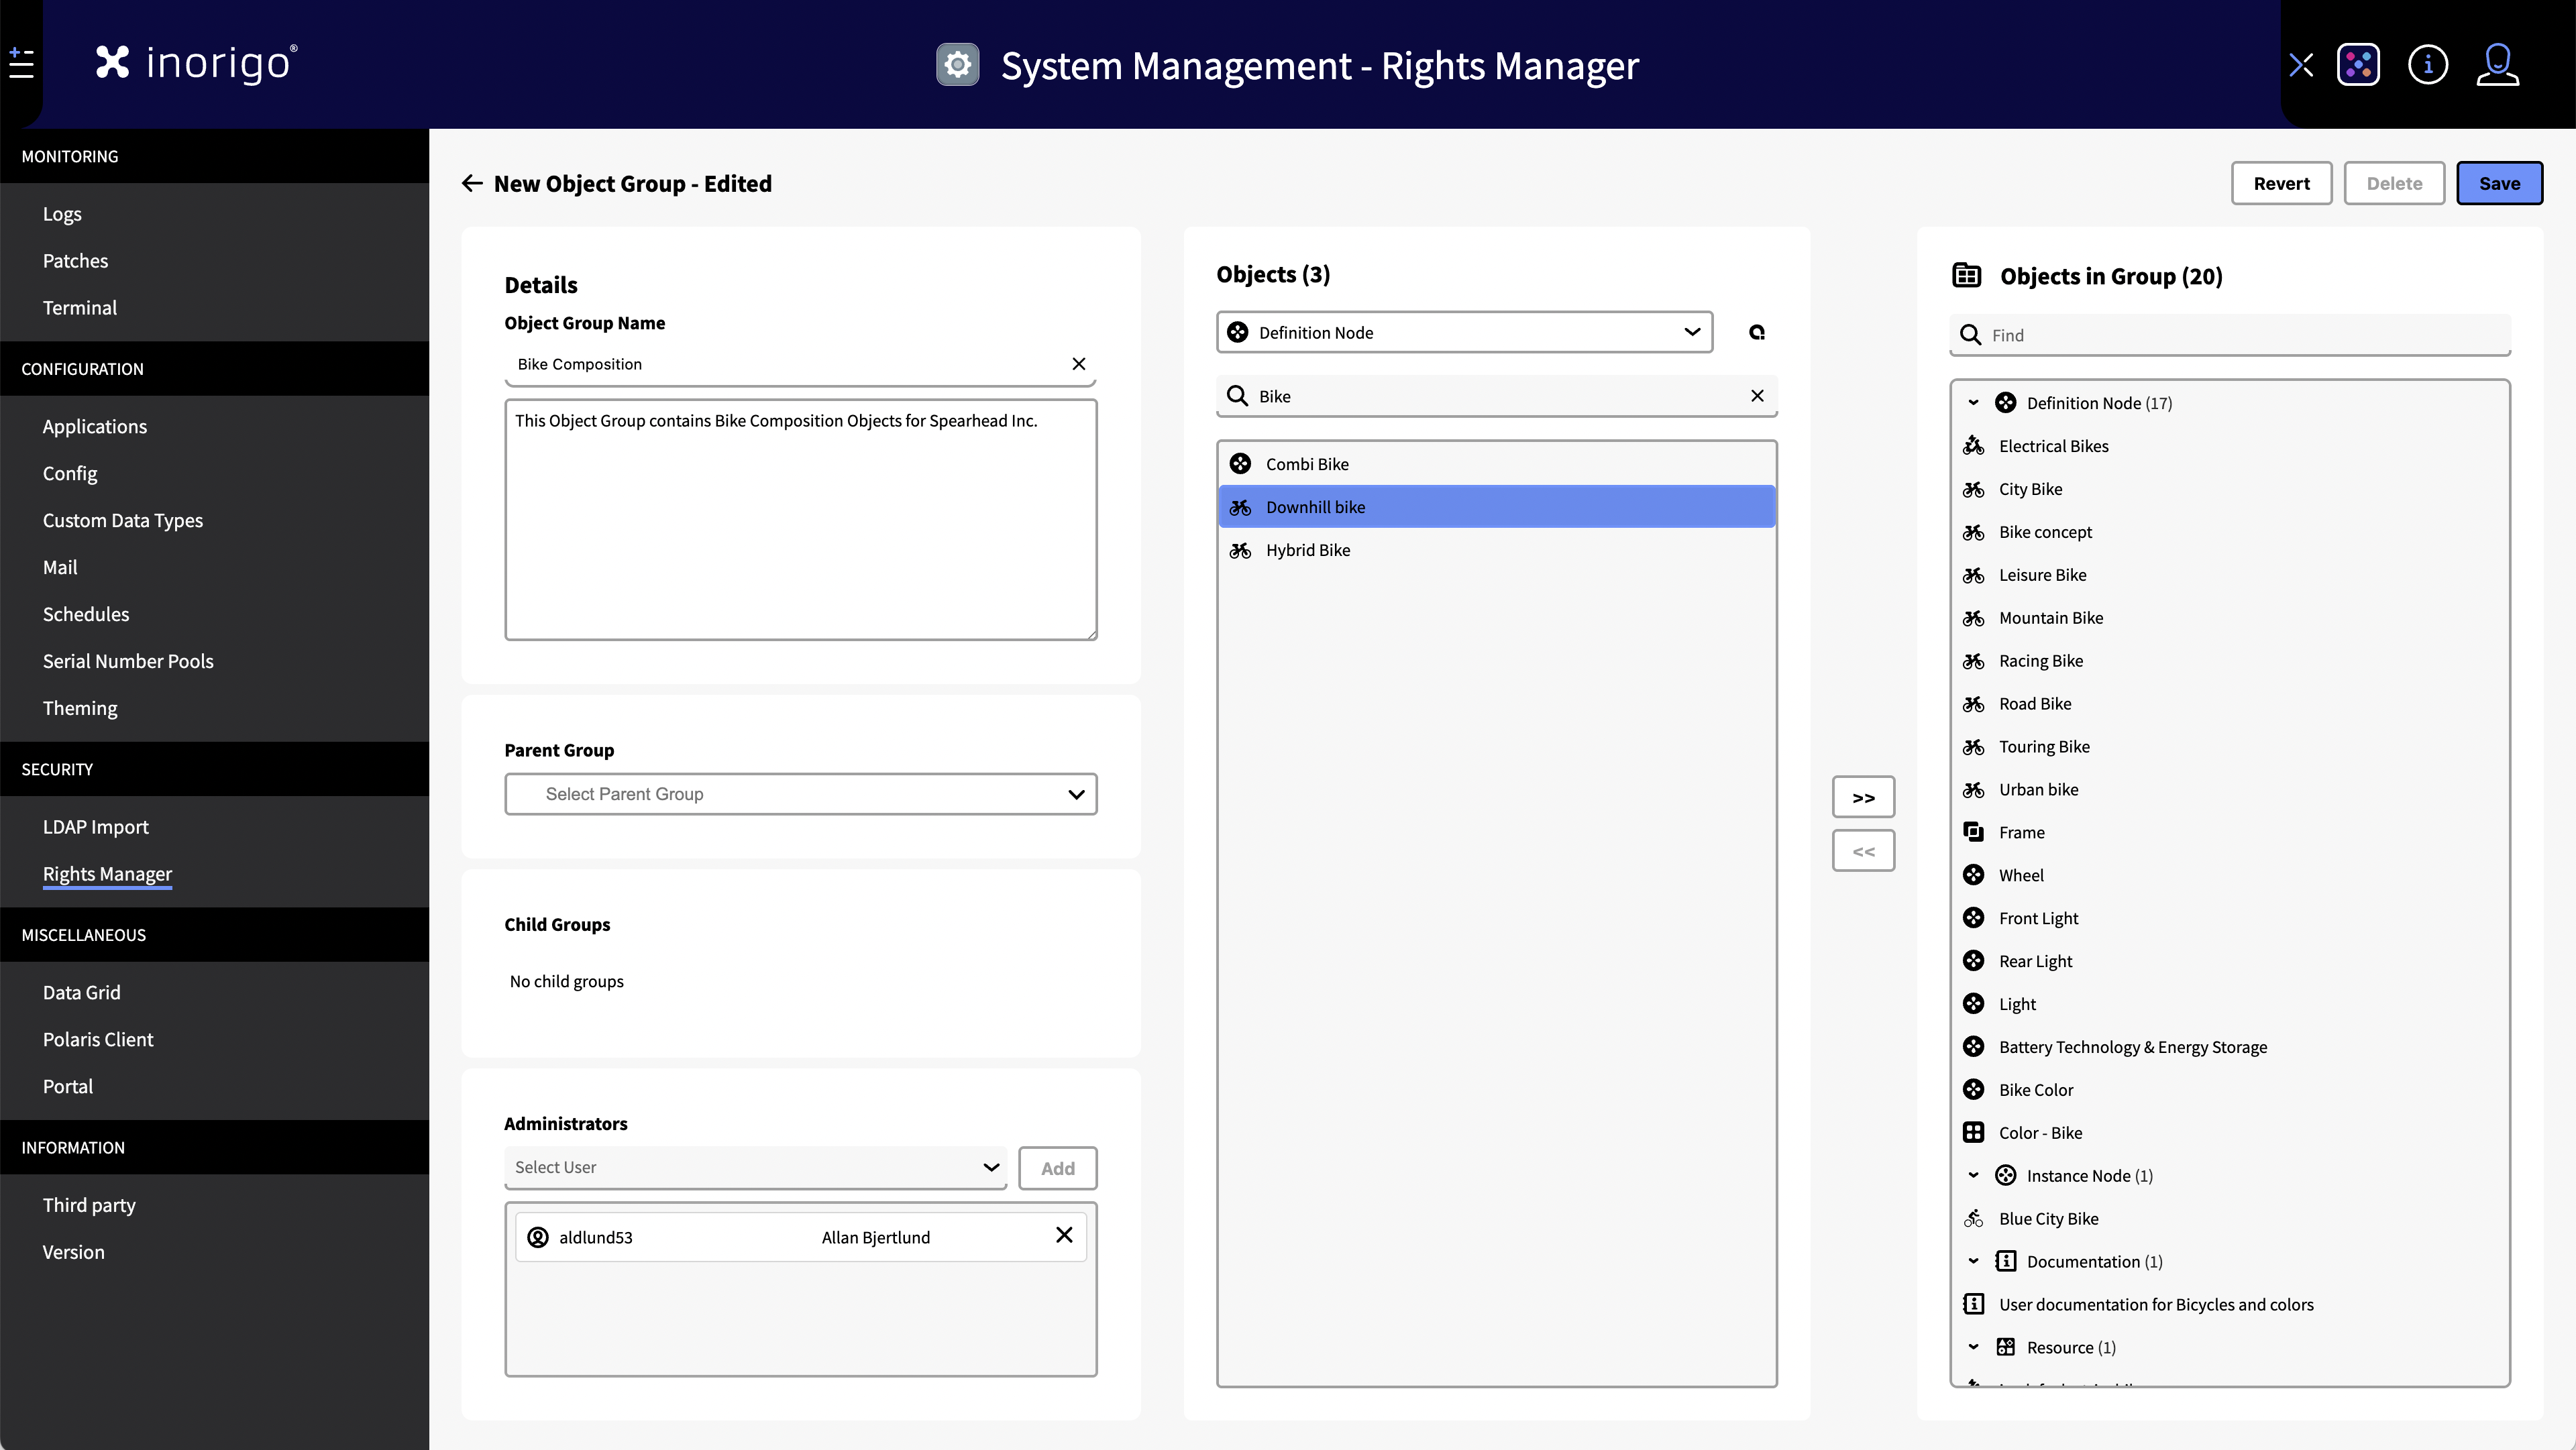
- In the User Group tab, click the New Entity Group button
- Name and write a description of the group.
- Add a parent group (if desired)
- Add users that should be administrators of the group. An Administrator can manage access to the group from the Access Manager module.
- Add what entities the group will contain, by first selecting a type, and then one or more specific entities. A group can contain many different types of inorigo® entities.
- Press Save
Entity Parent & Child Groups
Like with User Groups, it is possible to create sub-groups "children" to a Parent Group.
The principle is similar to User Groups. That: is if you target the Parent group with a rule, all entities in the child groups will be included. But if you target a child group this does not include the entities of its parent group.
Example: Common entities is set as the parent of WIP Applications (from the edit/detail view of WIP Applications). A rule targeting Common Entities will include WIP Applications and all its contents. Conversely, a rule targeting WIP Applications will not include any entities from Common Entities.
How to assign a Child to a Parent (entity group):
Create a new group or edit an existing group from the entity Group tab. Select a Parent Group from the dropdown – the group you're editing will become its child group.
When looking at the details of the parent group, or in the entity Group Tab list it will appear as a child group.
You can do this as many times as you require.

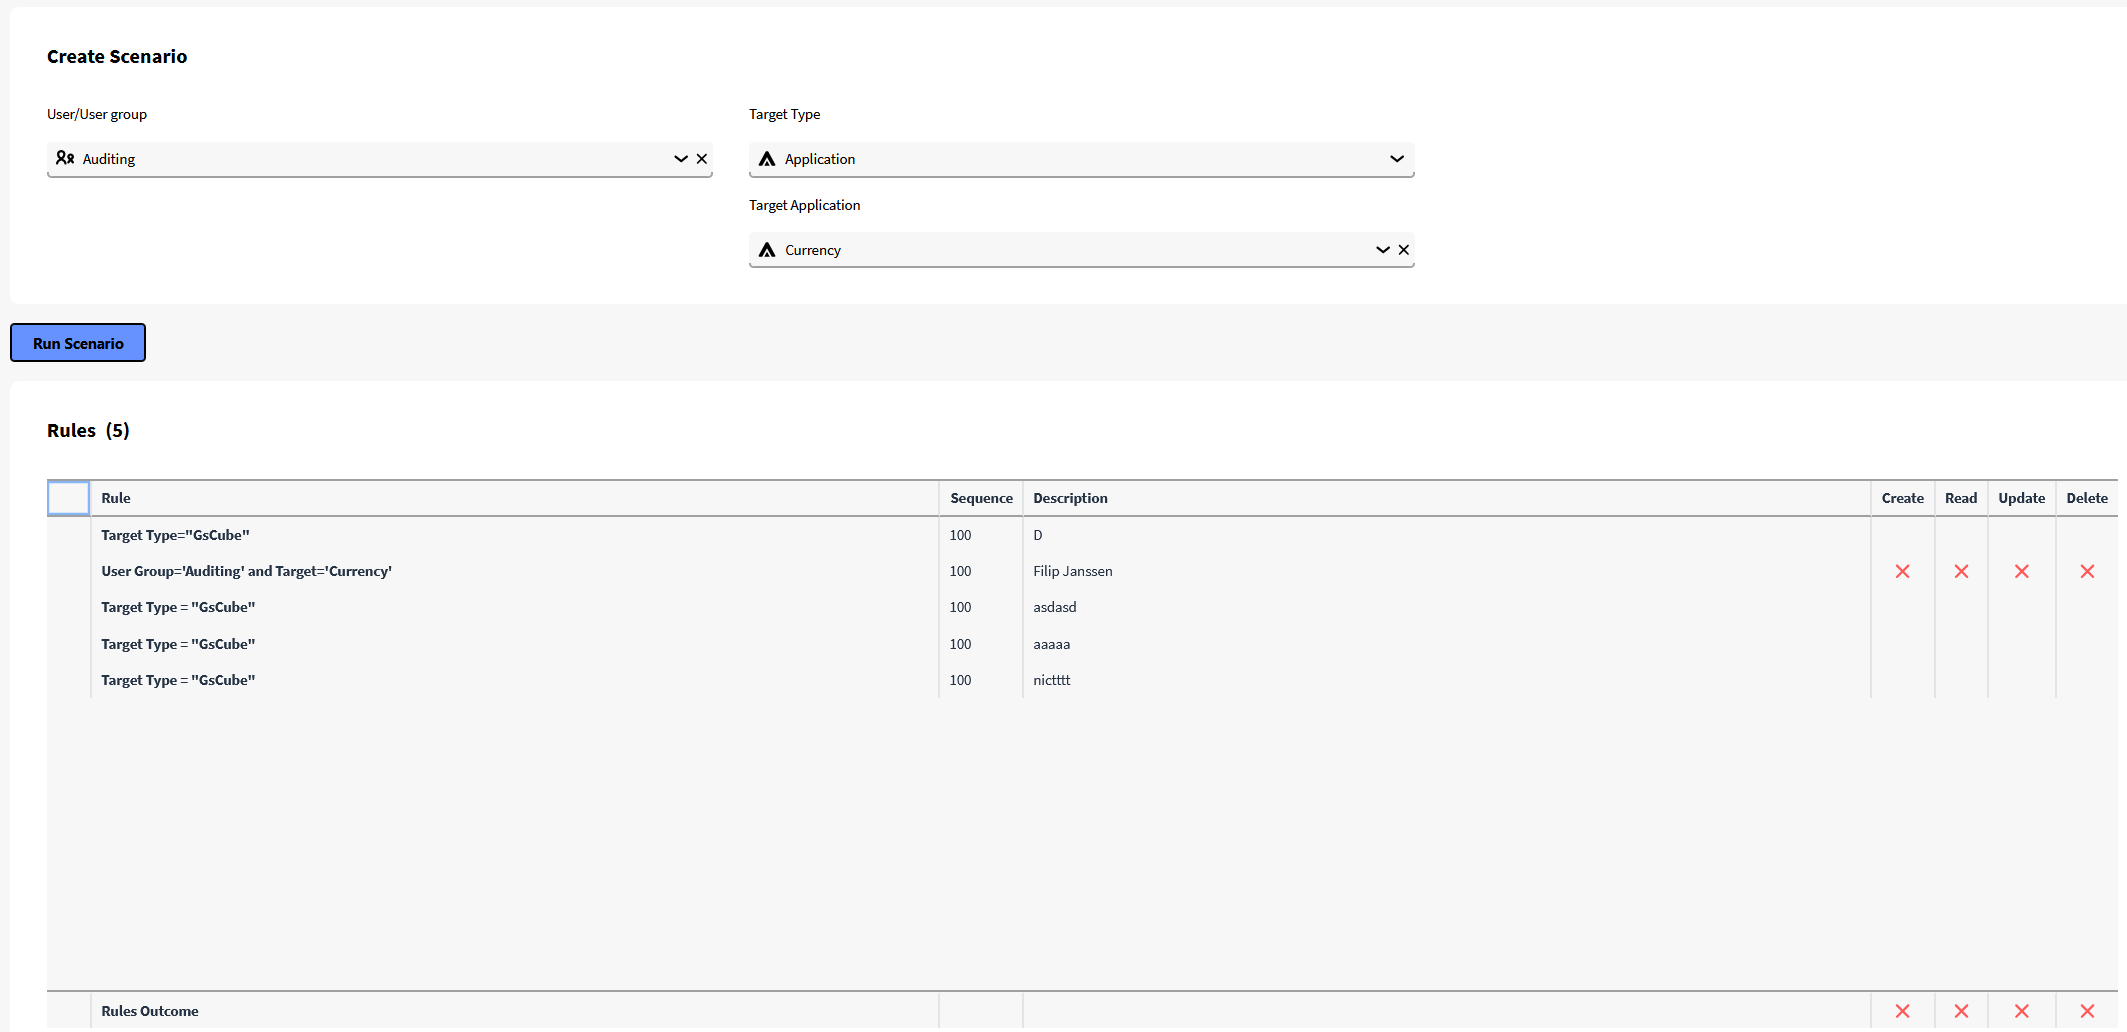
Scenarios Tab
Scenarios allow you to verify the permissions a user or user group has for a specific entity or entity group.
Once a scenario is set up, it displays all rules that grant or restrict access for the selected user or user group to the chosen target. It also shows the specific permissions each rule provides, in the order they are applied.
At the bottom, the combined result of all applied rules is shown, indicating whether the user or user group has access to the target. If no result is displayed, it means there are no rules granting or restricting access for the user.
How to create a scenario
- Select user or user group: Choose the user or group whose permissions you want to evaluate.
- Select target type: Define the type of entity the scenario will apply to.
- Select target entity: Specify the entity or entity group to be tested.
- Run scenario: Click "Run Scenario" to execute the evaluation.
Rule Samples
| Rule presentation | Target | Target Entity | Rule Level | Sequence | Permission | Comment |
|---|---|---|---|---|---|---|
| Module = 'Application Builder' | All Users | Application Builder | Initial | 0 | x | Restricts all users from using application builder. |
| User = 'adam' and target = 'Application builder' | User:adam | Application builder | Initial | 10 | Read | Adam is given access to application builder |
| User Group = 'Finance' and target Group = 'Finance Entities' | User Group: Finance | Entity Group: Finance Entities | Normal | 0 | Read | The Finance department is granted access to all finance entities within the targeted entity group |
| User ='David' and target group = 'Auditing Entities' | User: David | Entity Group: Auditing entities | Normal | 10 | CRUD | David works within the finance department but needs further access to auditing applications |
Creating an API service account
Note! This operation requires full administrative rights. Please ensure the user has the necessary permissions before proceeding.
Follow these steps:
Adding a API service account:
-
Go to the User tab, and click "add new user".
-
Fill in a name that shows what the user will be used for.
- Example: KSAPI
-
Fill in email address to the person who is responsible for the API service account.
-
Set the context to the context the API service account will work within.
-
Press "save"
Creating a API user group (Optional):
-
To make it easier to add an API service account in the future. You can create a user group for all API service accounts.
- Go to the User groups tab and click "new user group"
- Name it, and add all your current API service accounts.
- Press "save"
Adding a rule to the user/user group:
- Go to the Rules tab and click "new rule".
- Set Rule level to "final"
- Assign full CRUD rights.
- Select the user/user group
- Select target type "inorigo component"
- Select target component to "Service API"
- Press "save".
Adding a password using to the user:
-
Go to the "user tab" and find your new API service account and click on the "external" text within the "Authentication" column.
-
A window will pop up. Tick the box under "Authenticate by inorigo" and add a password to the account.
- Note! We recommend using a secure password if you have such a service at your disposal.
-
Press "save".
Rule Configuration: Parent and Child Group Scenario
Scenario Overview
We have two user groups: a Parent group and a Child group**.** The Parent group has a rule in the Normal rule level with a sequence number of 10. The rule connects the Parent group to an entity group, containing entities which every member of the Parent group should have read-only access to. Because this rule is targeting the Parent group, the Child group inherits the same rule. However the Child group needs to have additional permissions to both the entities it inherits from the Parent group and another Entity group, containing an additional set of entities that only the child group should have access to.
The goal is to extend permissions for the Child group:
- For entities inherited via the Parent group's rule, the Child group should receive create and update permissions in addition to read.
- For new entities not covered by the Parent rule, the Child group should receive read-only access.
To achieve this, two separate rules must be created.
Structural Considerations
Before defining the rules, ensure that entity groups are structured to reflect the user group hierarchy. This alignment simplifies permission management and improves traceability.
Rule Definitions
Rule 1: Extended Access to Inherited Entities
- Target Group: Child group
- Target Entity Group: Same entity group referenced by the Parent group's rule
- Permissions: Create, Read, Update
- Sequence Number: Higher than the Parent rule (e.g., 20) to ensure override
This rule allows the Child group to extend its access to entities already permitted by the Parent group, without affecting the Parent group's permissions.
Rule 2: Read-Only Access to New Entities
- Target Group: Child group
- Target Entity Group: A new entity group specific to the Child group
- Permissions: Read-only
- Sequence Number: Equal to or higher than Rule 1 (e.g., 25 or 30)
This rule grants the Child group access to additional entities not covered by the Parent rule, ensuring separation of scope.
Resulting Behavior
By applying this structure:
- The Parent rule (sequence 10) establishes a baseline of read access.
- The Child rules (sequence 20+) override and extend permissions for the Child group.
- The Parent group's users remain unaffected by the Child group's extended access.
- The system maintains a clear and predictable permission hierarchy.

© 2025 Inorigo AB. All rights reserved.