System Management
System Management is where system administrators monitor and configure an inorigo® installation: server logs and database patches, system configuration, application caches and schedules, security, plugin settings, and version information.
Overview
System Management is located in the Launcher Menu and is only accessible to authorized System Administrators.
The menu on the left groups the pages into sections:
| Section | Menu items |
|---|---|
| Monitoring | JavaMelody Monitor, Logs, Patches, Terminal |
| Configuration | Applications, Config, Custom Data Types, Mail, Schedules, Serial Number Pools, Theming |
| Security | LDAP Import, Rights Manager |
| Miscellaneous | Items added by installed plugins, for example Data Grid, Polaris Client, Sync Tool, and Portal |
| Information | Third party, Version |
| Utils | Added by the System Utils add-on |
Some menu items are added by plugins, so the menu on your installation depends on which plugins are installed.
Monitoring
Monitor the inorigo® server through statistics, log files, database patches, and the live server log.
JavaMelody Monitor
Shows statistics from the JavaMelody monitoring tool as graphs over time. They include used memory, CPU usage, HTTP sessions, active threads, and active JDBC connections.
- Choose the period at the top: Day, Week, Month, Year, All, or Customized.
Logs
Lets you read the server logs and patch logs without access to the server's file system.
- The list shows each log file with its size: the server log
inorigo_server.log, its numbered older versions, and the patch logs. - Click a log file to show its contents. The Auto Scroll checkbox controls whether the view scrolls automatically.
- Right-click a log file to download it.
Patches
Lets you view and run database patches.
- Choose which patch files to list: Pending, All, or Logs.
- Click a file to show its contents.
- To run patches, enter the database User and Password and click Run!. Make sure you use the correct database user and password.
Terminal
Shows the server log live, so you can troubleshoot in real time.
- Use the Level Filter to show DEBUG, INFO, WARN, or ERROR messages, and the Text Filter to show only messages that contain a text.
- Use Server Log Level to switch the server's log level between DEBUG, INFO, WARN, and ERROR.
- Click Clear to empty the view.
Note: Don't leave the server log level on DEBUG. It causes users to see email information when they use the report issue function.
Configuration
Configure application caches, server settings, custom data types, email, scheduled cache loading, serial numbers, and themes.
Applications
Shows runtime and data statistics for every application in inorigo®, and lets you manage their caches.
- The table shows, for each application, its Reload Mode, whether it has permanent memory, data statistics (number of versions, stale, and obsolete), and runtime statistics (minimum, maximum, and average load time, and number of viewers). Use Filter to find an application, and Refresh to update the statistics.
- Select one or several applications, then use the buttons at the bottom:
- Load Cache loads their caches, so you can see their load times and decide whether they need a schedule or permanent memory.
- Evict Cache removes their caches from memory.
- Permanent, followed by Save, gives them permanent memory. inorigo® then never reallocates memory from the application, so it only needs to be loaded once every session.
- Mode, followed by Save, sets the reload mode: whether the application shows that a newer version is available.
- Indication displays a reload indicator in the application as soon as a reload is available.
- Manual lets the user decide when to reload the application.
- Off turns the reload indication off.
Config
Holds the server's system configuration. The status of the server is shown at the top, for example Started. Click Save configuration to store your changes.
- Database settings — the database connection: host name, port, database name, the database user and password, whether to use SQL Server Authentication, and the database user and password used for patches.
- Other settings — every other server setting, listed by name. Settings that belong together share a prefix, for example:
authentication.— sign-in, including external authentication (single sign-on), LDAP, and guest usersclient.— client settings, such as memory allocationcache.andextended.storage.enabled— cache scheduling and extended storageserver.instance.— the identity of this inorigo® instance and its contactsui.— the user interface, such as the global number formatsui.format.pattern.integerandui.format.pattern.decimal, and the themes used by the Workbench and the Portal (ui.theme.workbench,ui.theme.portal)verso.runtime.— the application runtime. For example, setverso.runtime.apply.rightstotrueto let the rights set on an application control the editing actions in its filter boxes.
Custom Data Types
Lists the custom data types in inorigo®, with their Name, Default Extension, Opens With..., Presentation, Check Dependencies, and Syncable settings.
- Click Add, Edit, or Delete to add, change, or remove a custom data type.
Mail
Sets up the email that users send from inorigo® when they report a problem or ask for access. Users write the email in a dialog, and the inorigo® server sends it through your mail server. Click Save to store your changes.
There are three kinds of email, each with its own group of settings:
| Settings | Used when |
|---|---|
| Error Settings | A user clicks Report... on an error page, such as Forbidden, to send an exception report. |
| Message Settings | A user selects Report an issue in the information menu. See Report An Issue. |
| Access Request Settings | A user who isn't allowed to open an application clicks Request access.... |
Mail Configuration
Connects inorigo® to your mail server:
| Field | What it does |
|---|---|
| Mail Sender | How inorigo® sends email: SMTP. |
| SMTP Host | The host name of your SMTP server, for example smtp.example.com. |
| SMTP Port | The port of the SMTP server, for example 587. |
| SMTP TLS | Select to connect to the SMTP server over TLS. |
| SMTP Authenticate | Select if inorigo® must sign in to the SMTP server. |
| SMTP User | The user that inorigo® signs in to the SMTP server with, for example mailer@example.com. |
| SMTP Password | The password of the SMTP User. |
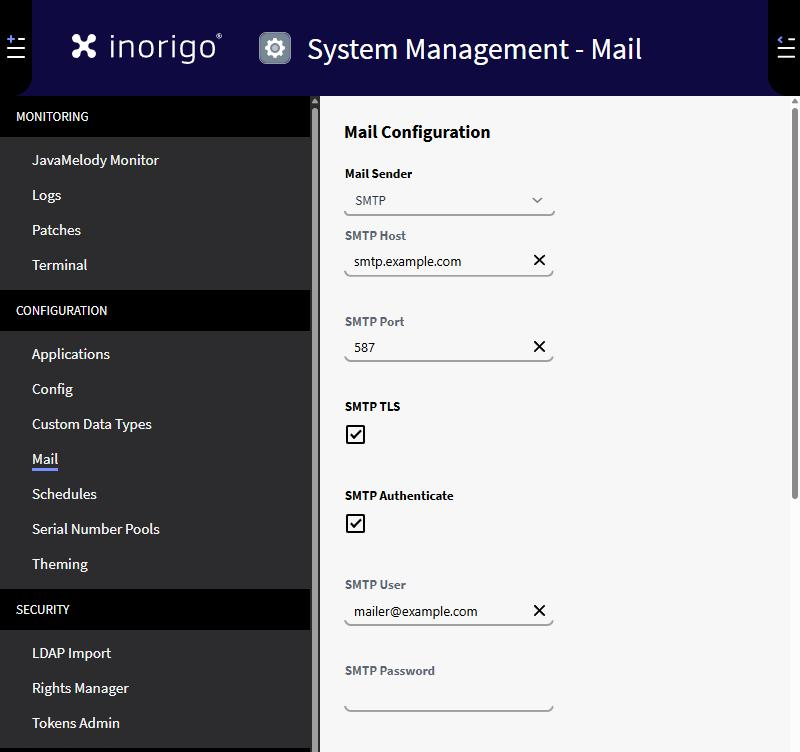
Mail Configuration for an SMTP server that requires TLS and sign-in
Error, Message, and Access Request Settings
The three groups have the same fields, each named after its group:
| Field | What it does |
|---|---|
| Error From, Message From, Access Request From | The sender address of the email, for example inorigo@example.com. |
| Error To, Message To, Access Request To | Who receives the email, for example your helpdesk at helpdesk@example.com. |
| Error Subject, Message Subject, Access Request Subject | The subject line, for example Exception report or Issue report. |
| Error Template Filename, Message Template Filename, Access Request Template Filename | The template file the email is based on, for example MailErrorTemplate.html. |
| Error Attach Variables, Message Attach Variables, Access Request Attach Variables | Select to attach files with details of the error and the system environment to the email. |
Access Request Settings also has an Access Request Mode, which decides what Request access... does:
- Mail — opens an email to the Access Request To address, filled in with details of the user and the application they tried to open, so that an administrator can grant access.
- URL — sends the user to a page of your own instead, such as a service desk form. The email fields are replaced by Access Request Target URL, the address of that page, and Access Request Button Text, the label of the button, for example
Request Access....
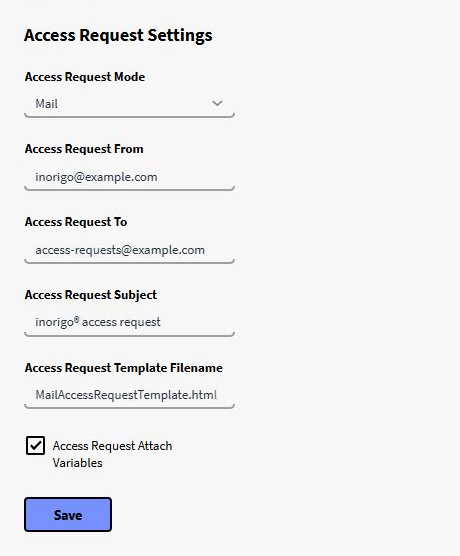
Access Request Settings that send access requests to a separate mailbox
Note: If Access Request Settings is left empty, a user who isn't allowed to open an application sees Report... instead, and the email uses the Error Settings.
Schedules
Sets up scheduled cache loading for applications and Knowledge Sets. Loading caches on a schedule minimizes loading times and keeps data up to date.
- The table shows each application and Knowledge Set with its Schedule, Type, Target, and when it was Last executed. Use Filter to find one.
- Click the calendar icon on a row to open Edit Schedule. Set when the cache loads, by Minute, Hour, Day, Week (days of the week), and Month, then click OK. Clear clears the settings in the dialog.
- Make sure that not too many schedules run at the same time, to avoid slowing down the server. Spread scheduled cache loads out to lessen the server's workload.
Serial Number Pools
Manages the pools that serial numbers in inorigo® are taken from.
- The table shows each pool's Name, Description, Current number, and Expression, which formats the serial number.
- Click Add, Edit, or Delete to add, change, or remove a pool.
- To use a pool, call it with the
$SERIAL_NOfunction in an expression, for example$SERIAL_NO("GENERAL_POOL"). See Expressions.
Theming
Lets you customize the colors of inorigo® applications, the Workbench, and the Portal.
- Choose a theme in Select Theme. The preview on the right shows how the colors look before you save them.
- The colors are grouped into Platform Colors (Non Themable), Platform Colors (Themable), Texts (Non Themable), Selection Colors (Based on Accent), and Extended Palette (Themable - Used for graphs).
- Use the buttons to manage themes: Clone, Save, Use Theme, Copy ID, Rename, Download, Upload, and Reset.
- To choose which theme the Portal uses, set
ui.theme.portalunder Config.
For advice on choosing colors, see 6. Theming & Customization in the Application UX Guidelines.

Customizing a theme in System Management
Security
Import users from a directory and manage access rights.
LDAP Import
Lets you search the connected directory, such as Active Directory, and import users into inorigo®.
- Enter or check the connection to the directory: Domain, User, Password, URL, Search Root, and Authentication.
- Choose a Search Attribute, for example
sAMAccountName, enter a Search Value, and click Search. - Select the users to import in the results. Use the filter above the results to narrow them down.
- Choose the User Group (for new users) and the Initial Context, then click Import.
Rights Manager
Manages access rights across the inorigo® platform, on the tabs Rules, Users, User Groups, Entity Groups, and Scenarios. See Rights Manager.
Miscellaneous
Note: Miscellaneous is where you configure the plugins installed on the instance. Each item belongs to a plugin, so the items you see depend on which plugins are installed.
Data Grid
Sets the Multi attributes separator character that Data Grid uses between multiple attribute values. The default is a semicolon. Click Save to store it. See Data Grid for Applications.
Polaris Client
Shows the Installed add-ons: every plugin installed on the instance, with its Name, Description, Version, Build Time, and Plugin ID. Use it to check which version of a plugin you have.
Sync Tool
Sets up how this instance takes part in synchronization with the Sync Tool. Click Save to store your changes.
- Source Settings — the source instances this instance accepts changes from. Enter the instance URL in full, ending with a slash, for example
https://<server>/inorigo/, and click Add Source URL. Click the minus button next to a source to remove it. - Target Settings — Is sync target sets whether this instance can be a sync target.
See Source & Target on the Sync Tool page.
Portal
Appears when the Portal plugin is installed. Set the URL of the navigation Portal here. Application navigation from the Portal, including the home button and opening applications in new tabs, needs this URL.
Information
Technical information about the installed version of inorigo®.
Third party
Lists the third-party libraries in the installation, with their Group, Artifact, Version, and Licence. Click Download to export the list as a CSV file, for example for compliance reviews or audits.
Version
Shows version information for the main application and each of its libraries, such as the release, build number, and build time.
Utils
When the System Utils add-on is installed, it adds a Utils section to the menu, after Information. Its tools help you manage system data, handle database changes, and prepare environments for testing. See System Utils.
© 2025 Inorigo AB. All rights reserved.