Knowledge Set Builder
The Knowledge Set Builder is a module through which sources can be filtered and joined together to create a denormalised flat table – we call these Knowledge Sets.
Overview
Video Introduction to the Knowledge Set Builder
The Knowledge Set Builder allows you to join parts of a complex inorigo® model and other external data sources into a Knowledge Set. These Knowledge Sets can then be exported to external tools via the API or be used to build inorigo® applications.
The Knowledge Set Builder can make use of data in the information model, Data Sources saved in the Data Source Editor Tool, and other Knowledge Sets. When multiple sources are joined together, mapping columns are used to match the data.
Every joined source can be filtered through queries, and calculated columns can be added as additional columns to the Knowledge Set.
The Canvas
The main area of the Knowledge Set Builder is the canvas. Each table in the Knowledge Set Builder is represented by a card from which it is possible to apply a filter (a query) to decide which columns that should be included in the Knowledge Set.

Navigation
You can move and navigate the canvas by 'clicking and dragging ' the canvas.
You can zoom in and out using the mouse scroll wheel or touchpad.
Open Dialog
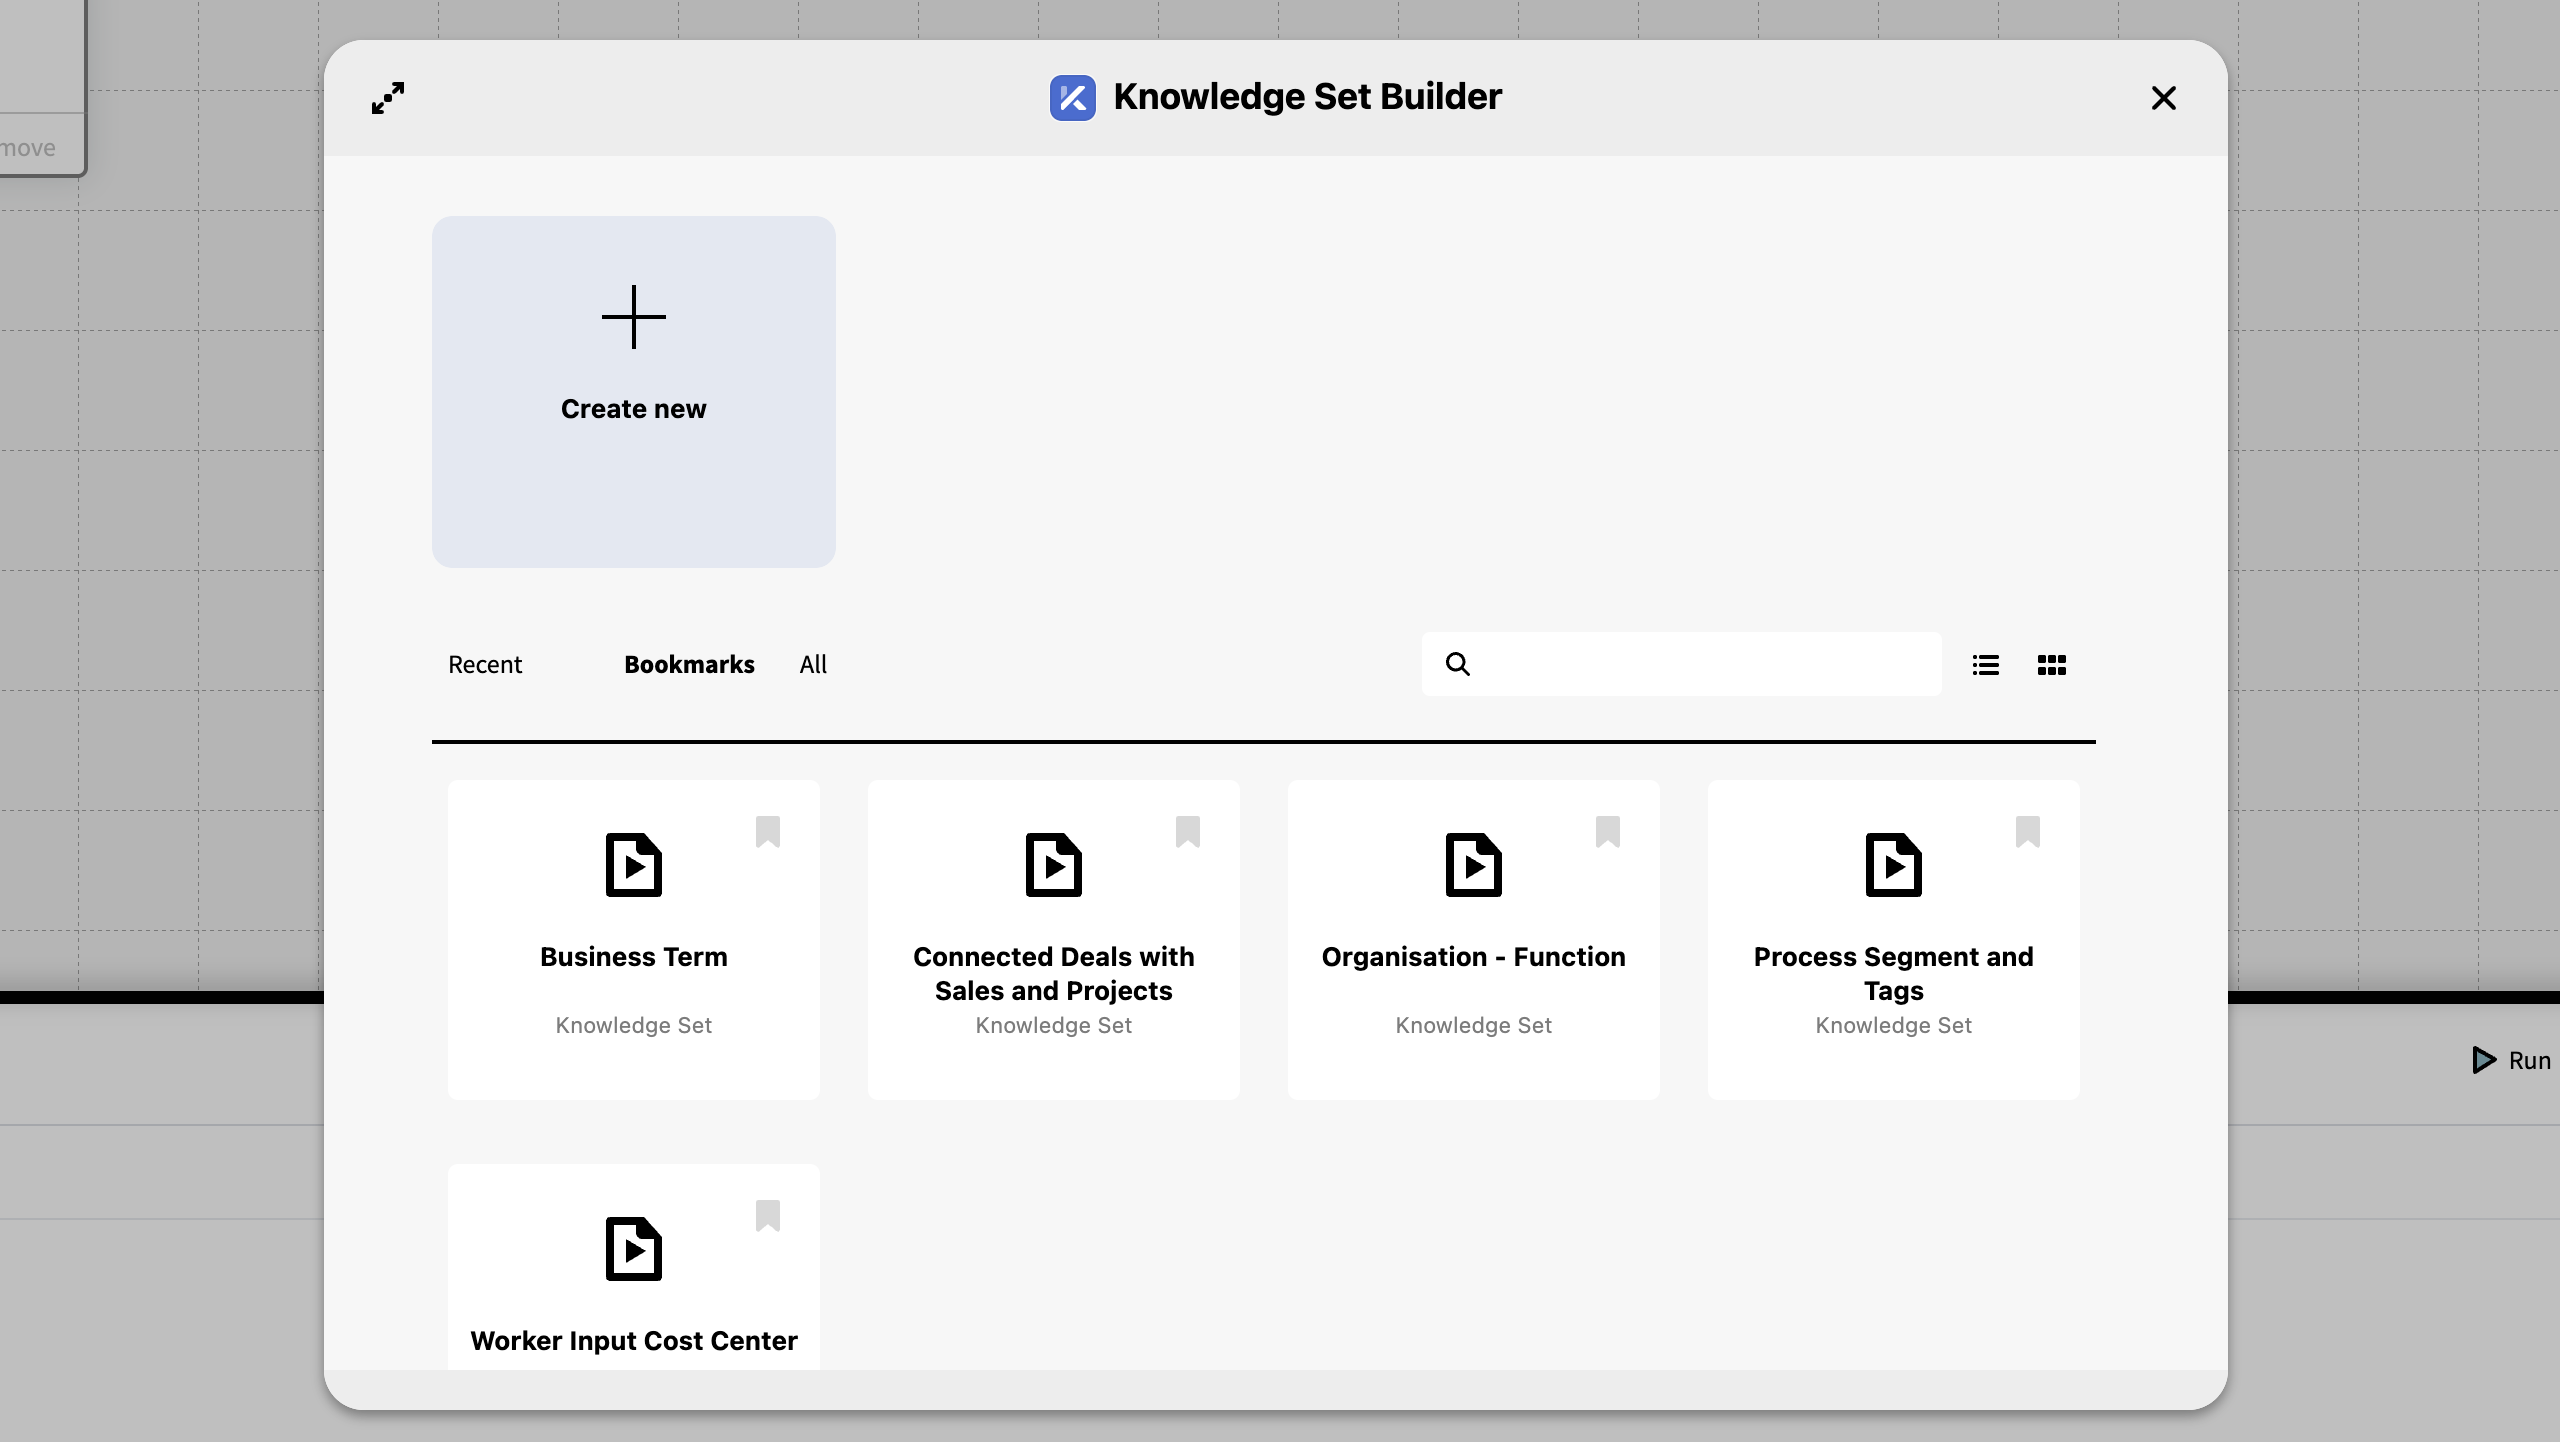
When the Knowledge Set Builder is opened from the Workbench the 'Open Dialog' is shown. Three tabs shows Recent, Bookmarks and All Knowledge Sets. The contents of these tabs can either be shown as a list or a grid of cards. There's a button to Create New Knowledge Set in the top left.
The Open Dialog can also be accessed from within the Knowledge Set Builder from the File Menu. Ctrl + O (PC) or ⌘O (mac)
Toolbar
The toolbar is located In the top right corner of the window.
File menu

The file menu holds the following basic actions:
| Function | Description | Shortcut |
|---|---|---|
| New… | Creates a New Knowledge Set | |
| Open | Launches the Open dialog | Ctrl + O / ⌘0 |
| Save | Saves the current Knowledge Set | Ctrl + S / ⌘S |
| Save As | Creates a copy with a new name | Shift+ Ctrl + S / ⇧⌘S |
| Rename… | Opens a dialog to rename the current Knowledge Set | |
| Delete | Deletes the current Knowledge Set. Disabled if the Knowledge Set is being in use. See Usage. | |
| Parameters | Lists all Parameters saved with the knowledge set and allows for creating new and editing | |
| Revert | Discards all changes and reverts to last saved version | |
| Open in GraphQL | Opens a new tab with the Knowledge Set expressed in GraphQL |
Usage

The Usage icon has a badge that displays the number of times the Knowledge Set is being used in inorigo®. Pressing the icon opens a dialog that lists all the Knowledge Sets, Data Sources and Applications that are currently using the Knowledge Set. It is possible to navigate to these from the dialog.

Deleting a Knowledge Set
If a Knowledge Set is in use it cannot be deleted. To delete a Knowledge Set in use – first find and delete or clear the usages (or delete it through the model builder module).
Result Table Icon

This icon lets you toggle the Result Table on and off. The Result Table is persistent, meaning that it will remember its last size/position, for the current session, when toggled off.
Tables
Knowledge Sets are built by joining multiple tables together. The tables are represented by cards on the canvas that are joined together through edges or "joins".
The Base Table
The Base Table is the first table in a Knowledge Set. A Knowledge Set must always have a Base Table and is therefore automatically added when you select Create New. Since you always need a Base Table it cannot be deleted.
The Base Table can be based on the model in inorigo®, an external data source or even another Knowledge Set.
Renaming a Table
You can rename a table by clicking the title of the card.
Navigating to a Source
When a table is using a Data Source or another Knowledge Set as the data type, you can navigate to the source by pressing the link on the table card.
Table Filters
A filter is a query which you configure to return the data you want to include in your table.
By default the Base Table is configured to get all inorigo's® Instance Nodes – which of course isn't that useful by itself: That is why we apply filters.
Creating a Filter
To create or edit a filter simply press the Filter button on the table card. This opens a dialog with a query editor.
Pressing the icon in the top left corner maximizes the dialog's size.

The query function lets you build a search query by selecting criteria connected through the logical operators AND and OR. As you build your query it will summarize the whole query into a single string that is visible at the top of the dialog.
Introduction to the Query Editor
Editing a filter in Knowledge Set Builder is essentially the same as a Query in the Query Editor – only presented in a dialog.
A more in depth guide how to construct queries can be found under the section on the Query Editor
Previewing the Filter
By pressing the icon located in the top right corner of the dialog, you can toggle the Result Table which lets you run and preview the filter.
With the Result Table visible press Run ▶︎
By default the filter returns the entities ID's, but you can toggle to show the presentations instead.
The result table can be resized by dragging the panel to your preferences.
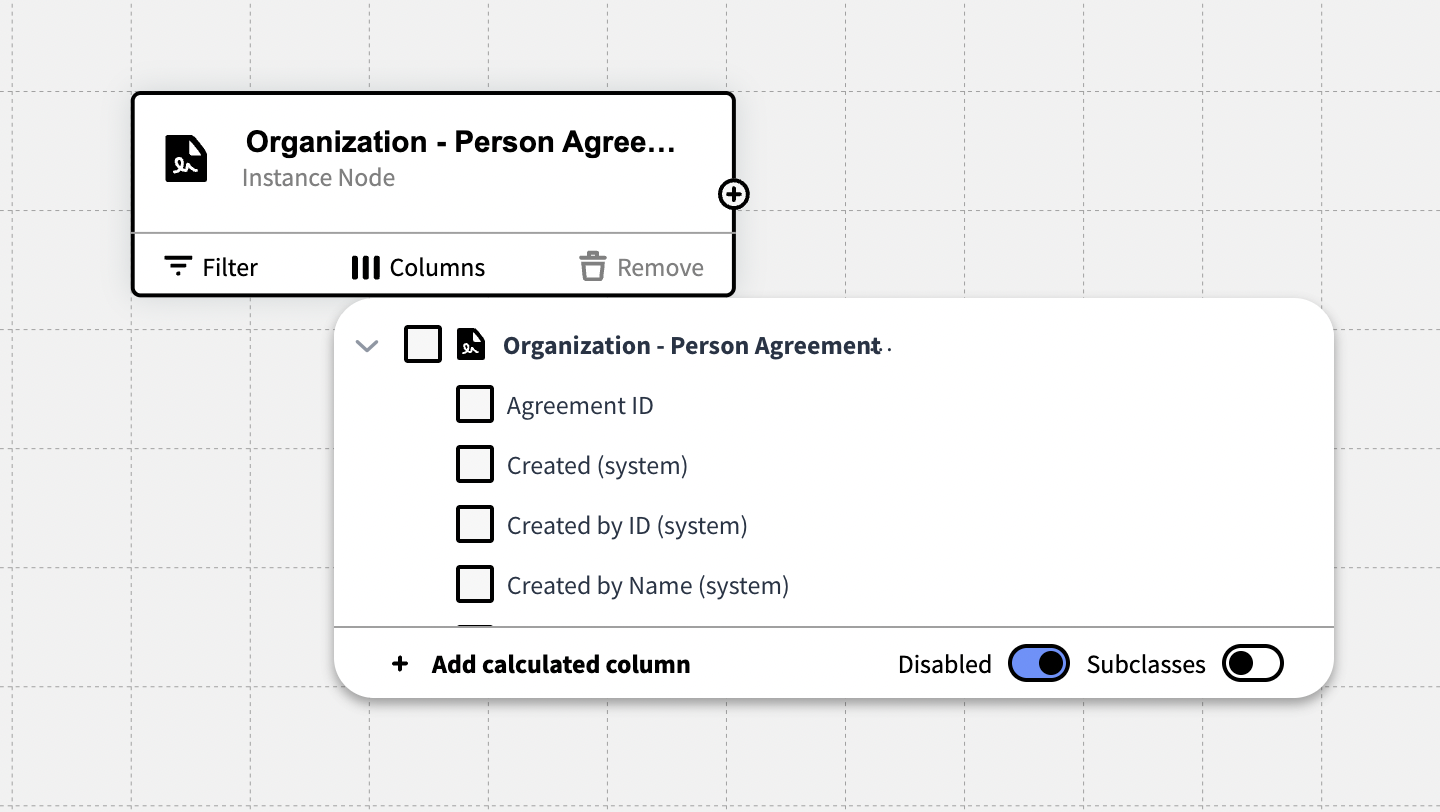
Columns
The table's filter allows you to narrow down the data you want to use in each table, you should then decide which of the columns to include in the Knowledge Set.
For inorigo® entities, columns hold the attributes defined for the entities.
Selecting Columns
There are two ways to select which what columns that are to be included in the Knowledge Set.
On each Table:
On the table, press Columns to get a list of all attributes available for that table.

On the Result Table:
On the Result Table press Columns to get an aggregated list of all attributes for all tables in the Knowledge Set

The attribute ID is per default enabled. This attribute refers to the units unique ID that will enable inorigo® to recognize the entity in the database. Thus, the ID needs to be included if a Knowledge Set containing inorigo® entities is to be used in an application.
If no attributes are included, the Knowledge set will be empty.
Column Options
Renaming the Column Headers
You can rename the column headers by pressing the pen icon that appears when hovering over a row.
Disabled
When this option is checked, attributes that has been disabled in the Model or Metagraph builder will be shown.
Subclass
When this option is checked, attributes belonging to any subclass will be eligible for selection.
Calculated Columns
By writing an expression in the expression editor a Calculated Column can be added to a Knowledge Set.
A Calculated Column can for example contain calculations of values from the other content in the Knowledge Set.
Since calculated columns might have a negative impact on performance, a warning ⚠ is issued for columns of this kind.
Check the section on Calculated Columns to learn more about Calculated Columns and expressions.
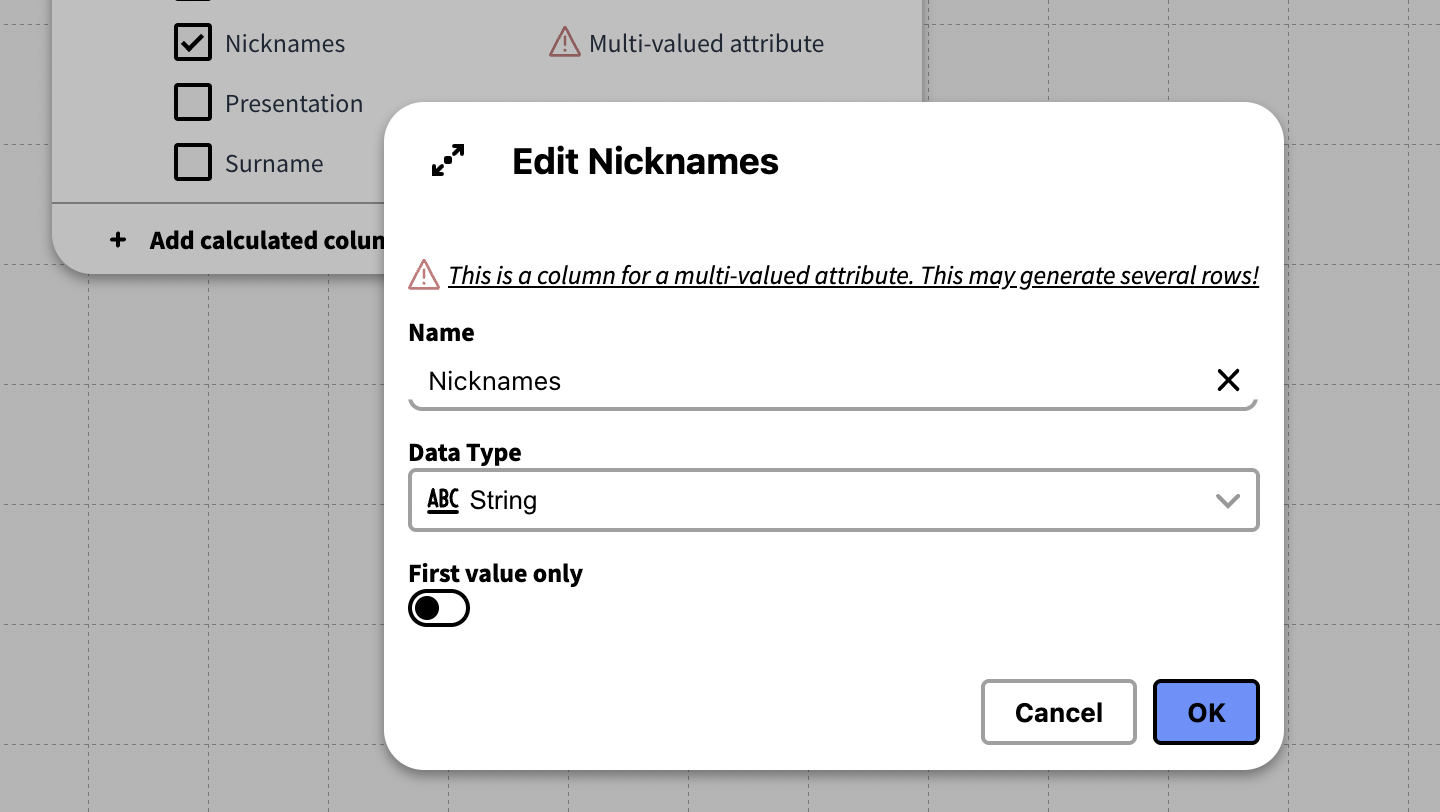
Multi Valued Attributes
When an attribute has multiple attribute values (occurs whenever a multiplicity is set to more than one.), the values will be divided over separate rows. A warning ⚠ is issued for columns of this kind.
Pressing the pen icon will allow you to edit the attribute. The First Value Only option will exclude all but the first attribute value from the Knowledge Set.
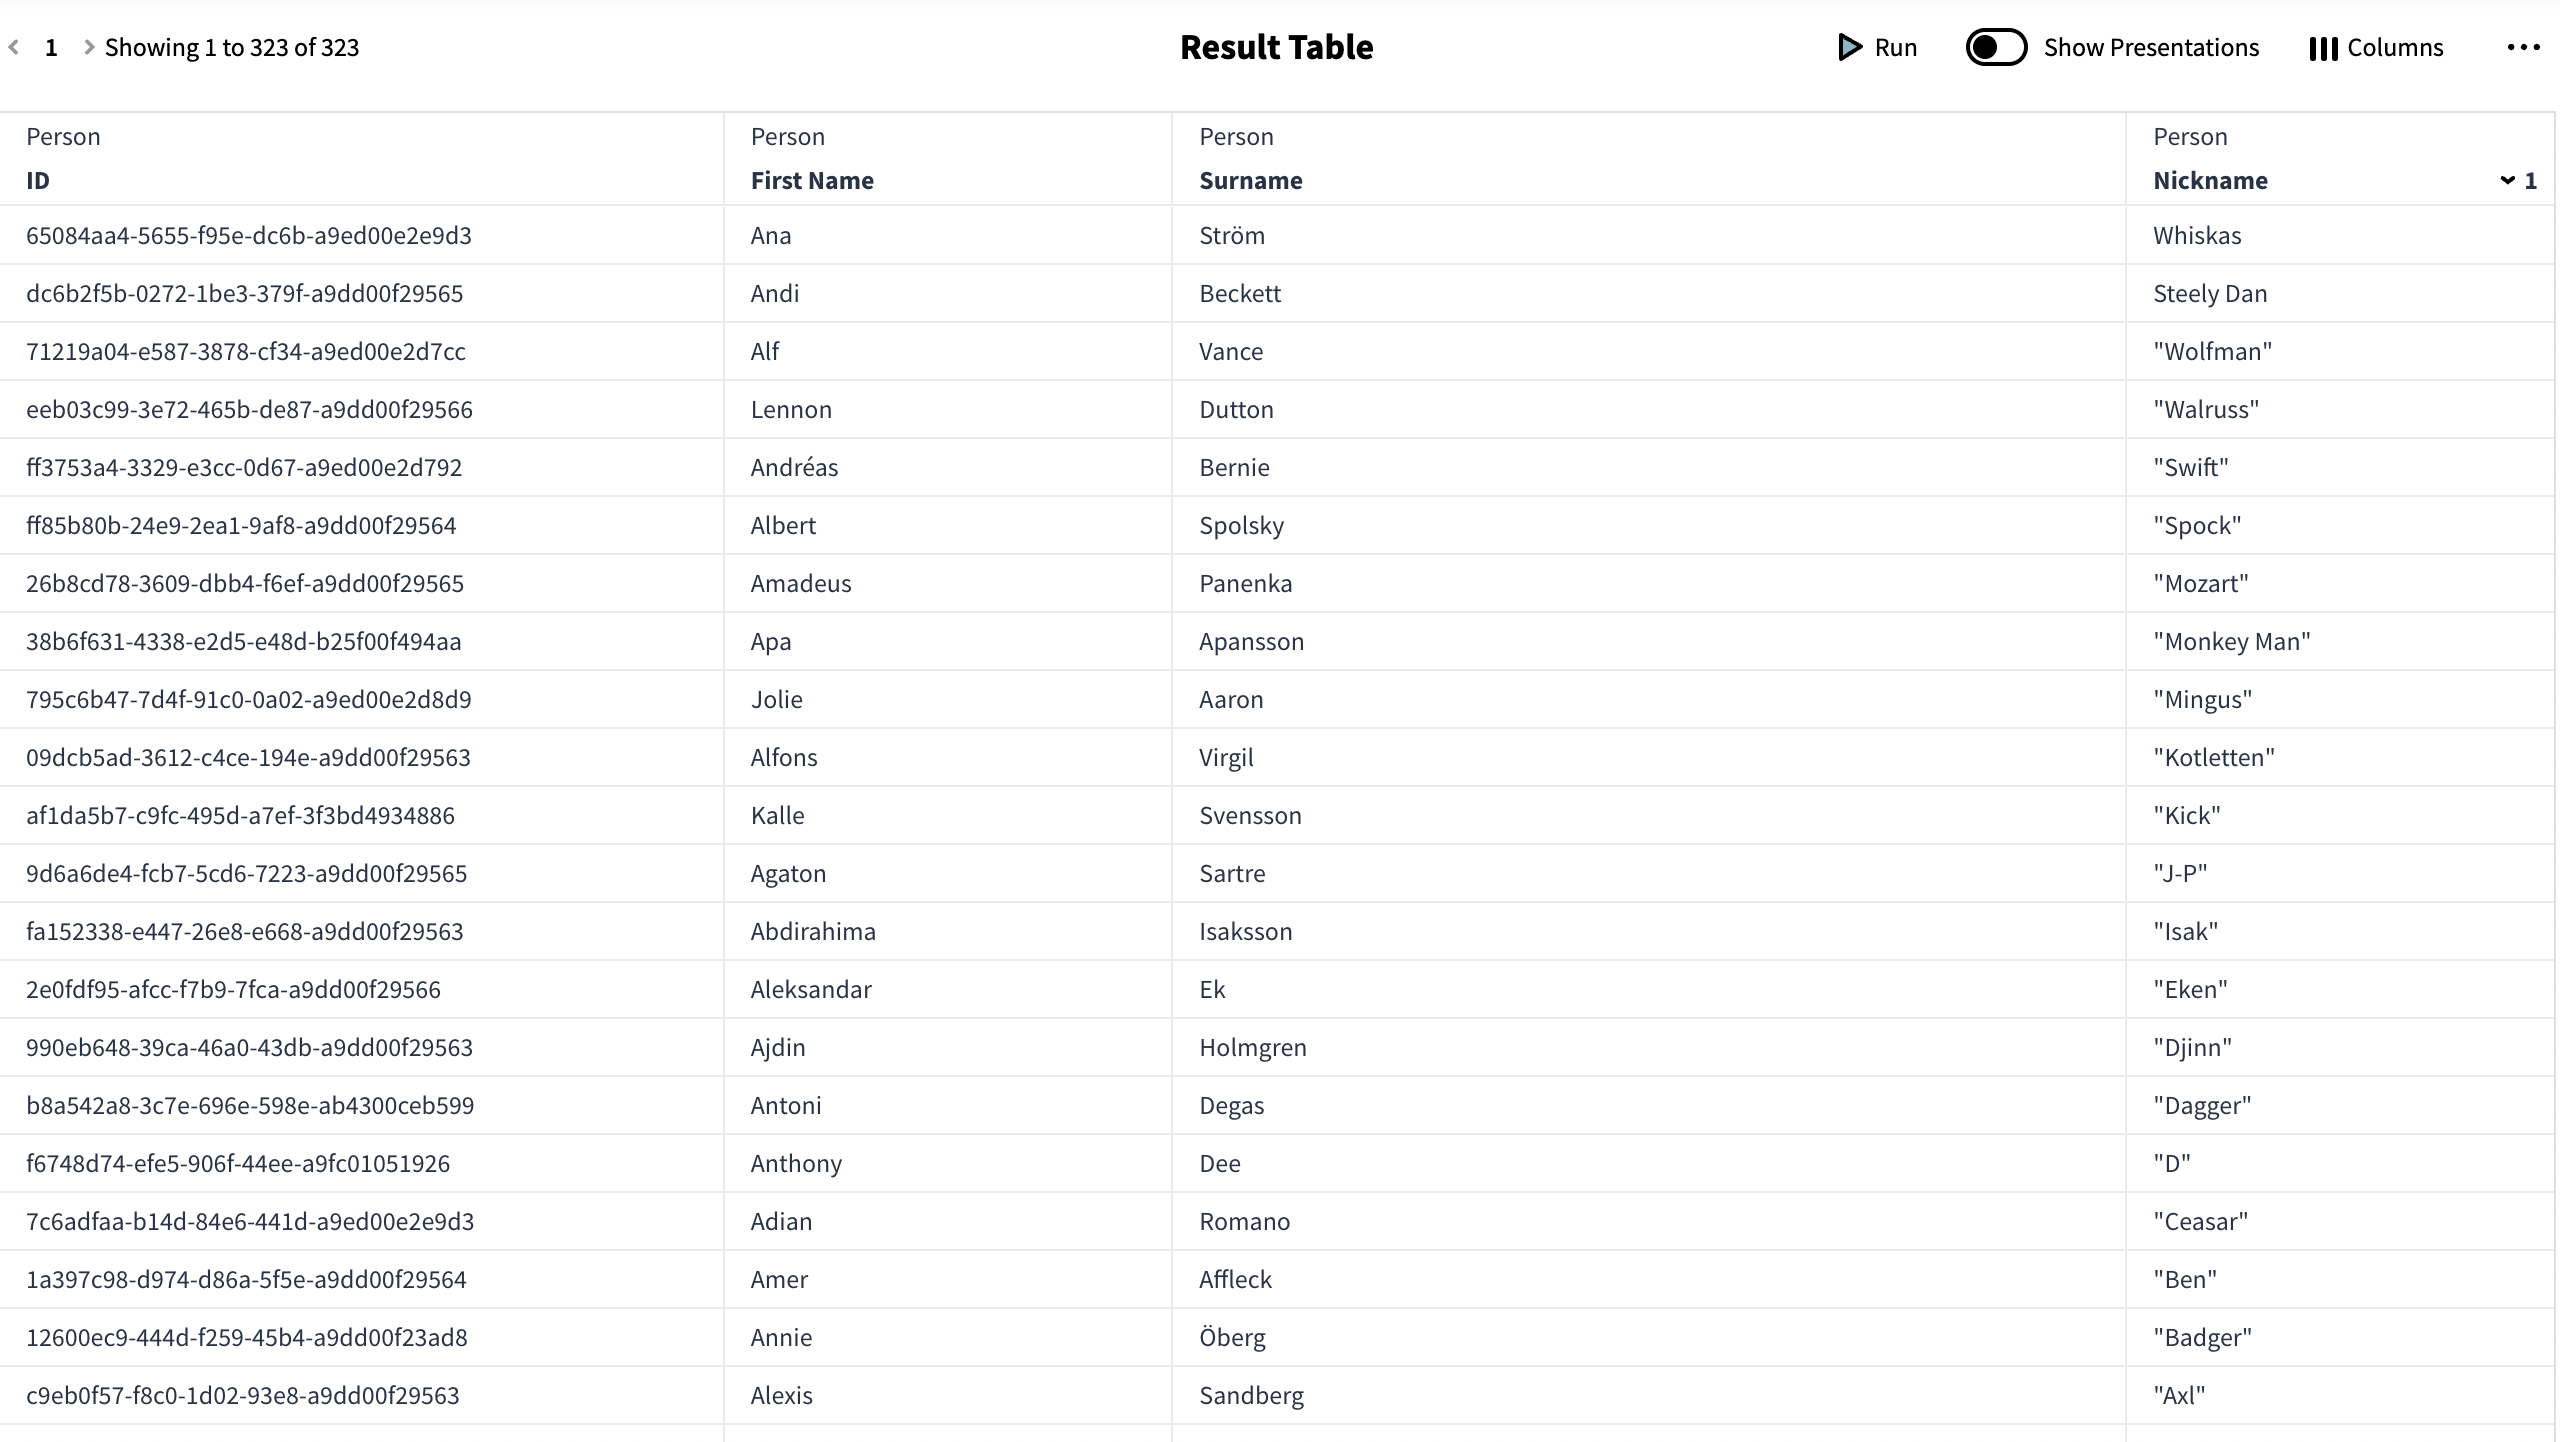
The Result Table
The Result Table is where you can see the outcome of the Knowledge Set. It is a panel that appears from the bottom of the window. The Result Table can be can be toggled on and off through the Toolbar icon and be resized to your preferences.
Notice that the ID attribute need to be included for inorigo® entities that are to be loaded from a Knowledge set. If only "Names" for example are included – and the Knowledge Set is opened in the Application Builder or somewhere else in the inorigo® suite, the names will appear as strings, rather than inorigo® entities.

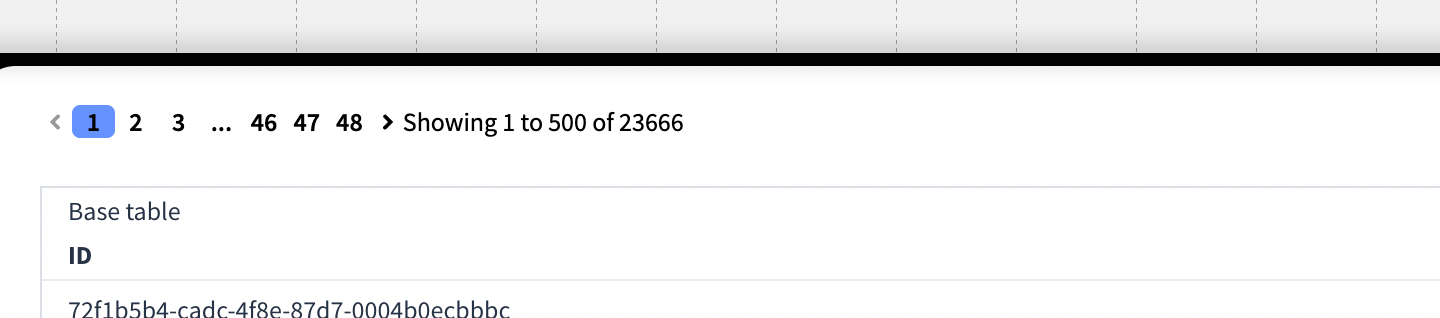
The Result table shows up to 500 results per page. To see the next page simply click a number or arrow. You can also select […] to navigate to a specific page.
Running the Knowledge Set
To see the result of the Knowledge Set press the Run icon ▶︎ located on the right side of the Result Table.
Result Table Context Menu
Right-clicking the Result table will bring up a menu with options.
From here it is possible to open an entity in another module , bookmark or copy its ID or text.

Result Table Options
Show Presentations
By default the Knowledge Set displays the ID column. You can temporary toggle this column to instead show the Presentations. Note that his option is just for previewing and isn't saved with the Knowledge Set.
Unique Rows
In the menu […] in the result table there's an option to enable Unique Rows. (Previously called Distinct Rows)
This forces the Knowledge Set Builder to remove all duplicate rows in the Knowledge Set.
Note that forcing Unique Rows doesn't improve performance as inorigo® applies it after the Knowledge has been calculated.
The setting applies to a Knowledge Set over the API as well, but has a support function for positive override. See the API documentation for more information.
Sorting Columns
You can sort the table columns by pressing the column header. Once for ascending, twice for descending and a third time to reset the sorting. Note that you cannot change the sorting while Show Presentations are enabled.
If the Knowledge Set is saved after sorting, the sorting will be persisted and also apply to API calls where no specific sorting is specified. More information is available on the documentation on API – Swagger UI.
The order of the columns in a knowledge set may also be customized by dragging and dropping the column header. Top headers can be reordered freely, and sub-headers can be reordered underneath the top header.
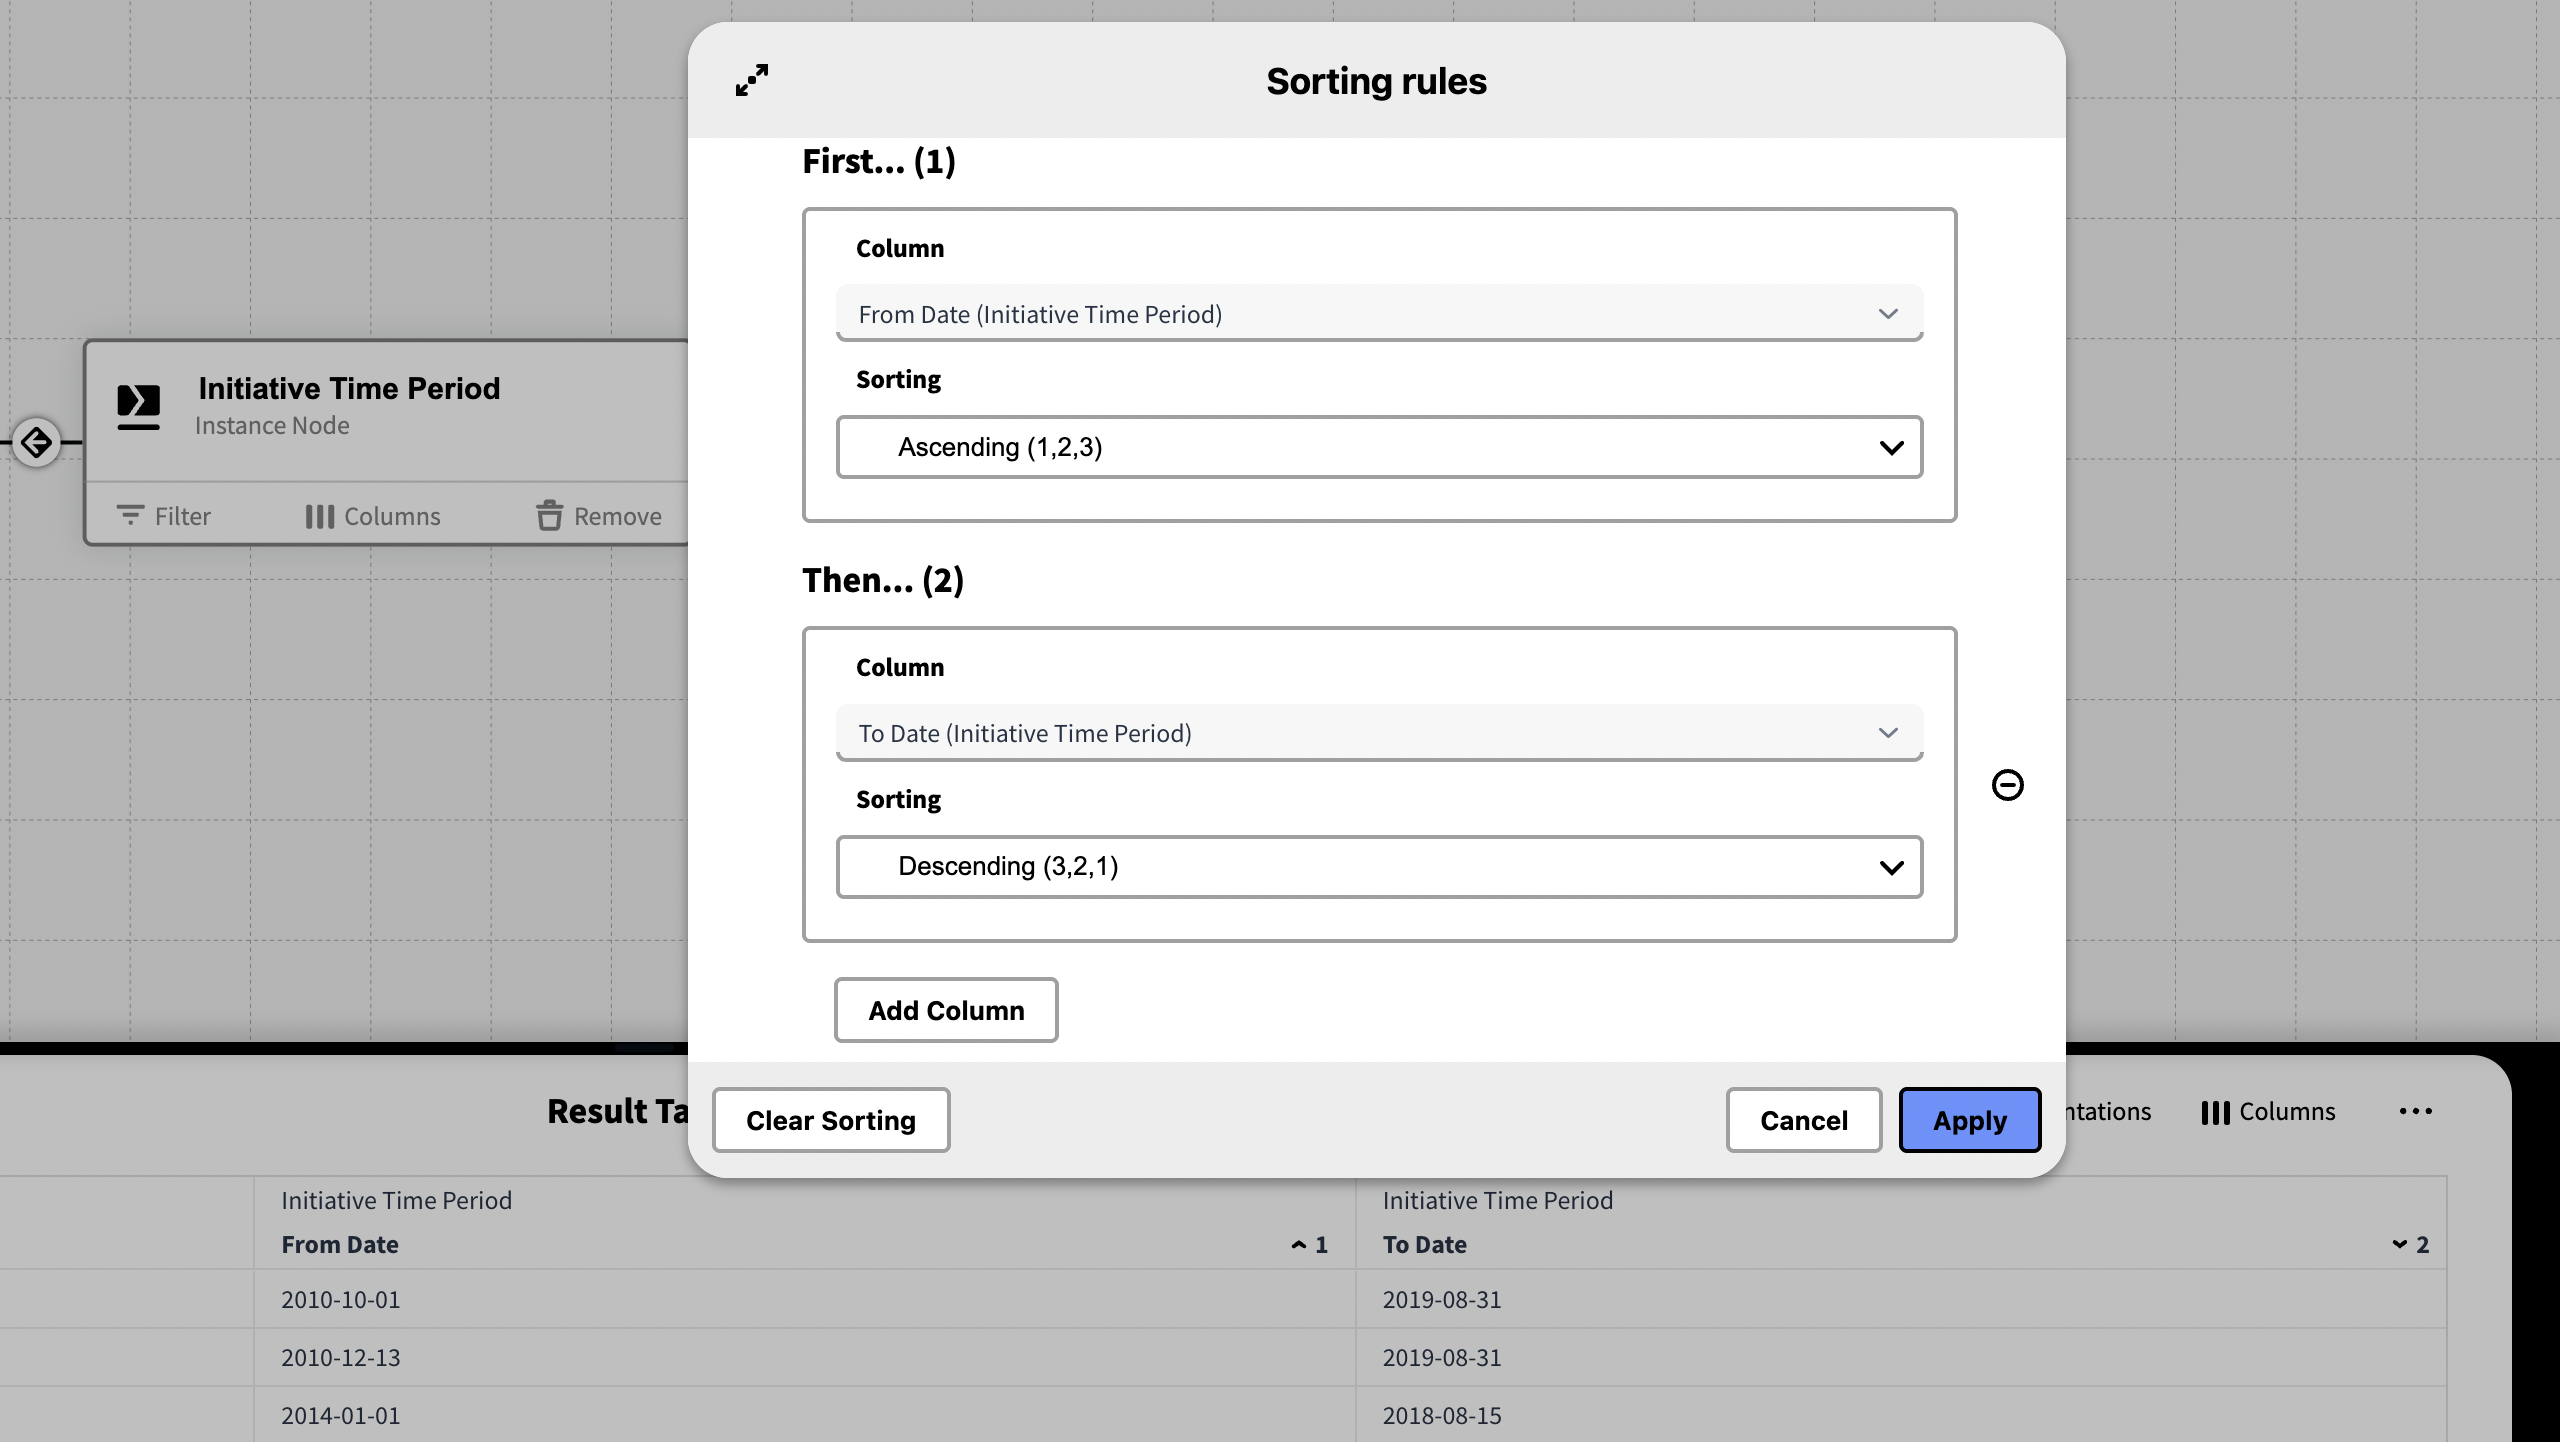
Sorting Rules
Sorting rules lets you define the order in which data is arranged by specifying one or more columns to sort by, in sequence. Each column can be sorted in ascending or descending order, and the sort is applied top-to-bottom—first by the primary column, then by the next, and so on.
Sorting Rules are found In the menu […] located in right side of the result table.
In the dialog you can add and remove columns and set the order which they should be applied.
Joining Tables
A Knowledge Set can be constructed by any number of tables that are joined together.
When joining a table with another table, the Knowledge Set returns the content of both tables divided over columns. Filters can be added to every table in a Knowledge Set.
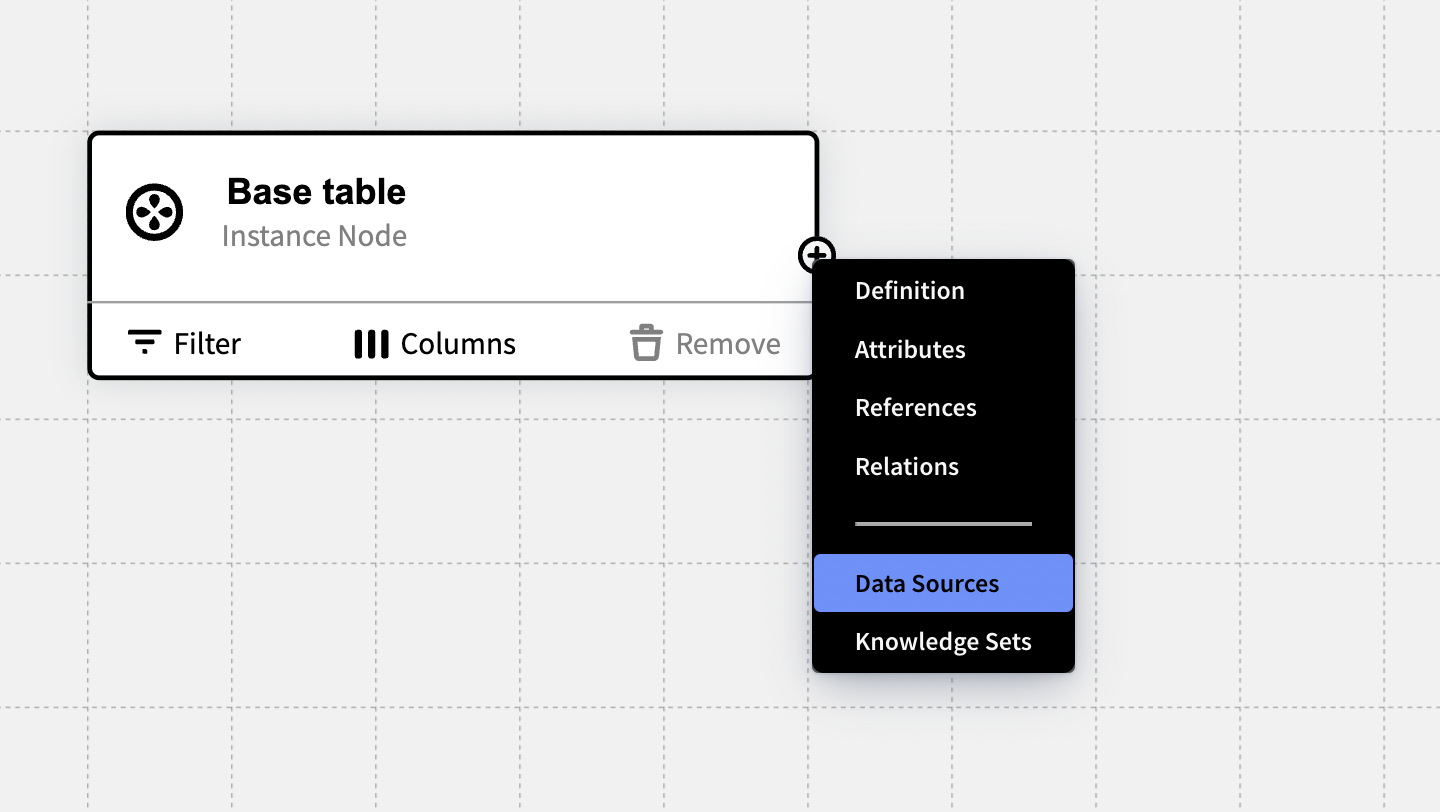
Once a Base table has been created, you will be able to join from that table to all available connections (Definition, Instance, Attribute, Reference, Relations, Data Sources and other Knowledge Sets).
To join a table, press the plus icon ⊕ that appears when hovering over the table on the canvas.
This procedure may be continued. By joining from any table in a Knowledge Set we can create Knowledge Sets from the chains of information in the model and external sources.

The available Attributes, References and Relations to join with are automatically loaded and unavailable options are not shown in the menu.
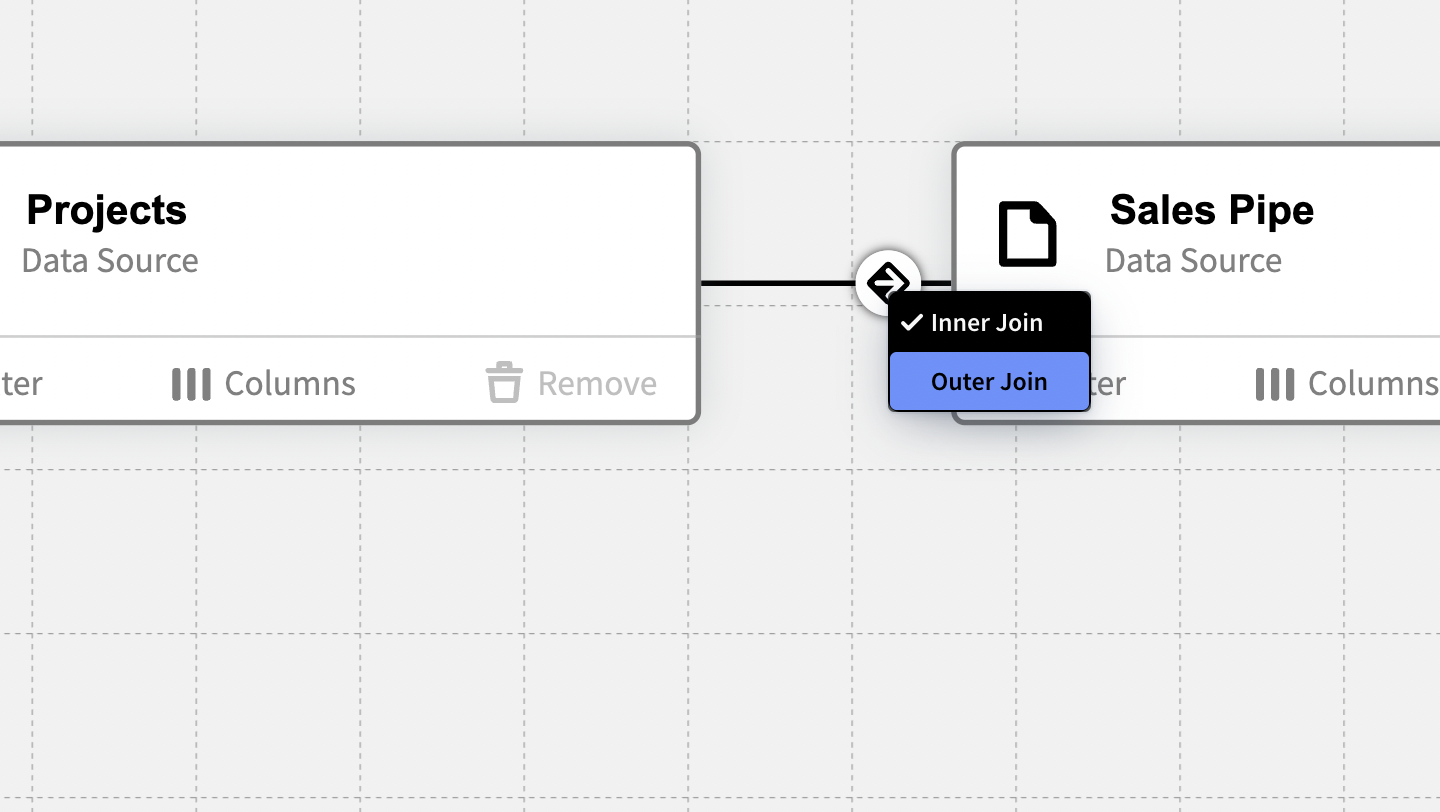
Inner & Outer Joins
A join is combining the rows from two tables. An inner join attempts to match up the two tables based on the criteria you specify in the filters, and only returns the rows that match.
Inner Join
If a row from the first table in the join matches two rows in the second table, then two rows will be returned in the result table. If there’s a row in the first table that doesn’t match a row in the second, it’s not returned; likewise, if there’s a row in the second table that doesn’t match a row in the first, it’s not returned.
Outer Join
An outer join attempts to find match up the rows from the first table to rows in the second table. If it can’t find a match, it will return the columns from the first table and leave the columns from the second table blank.
Inner Join is set by default: To change between an Inner and outer Join press the circular icon on the join itself.
Data Sources in Knowledge Sets
Video tutorial on how to build a Knowledge Set that incorporates external Data Sources
A Data Source can be used both as an initial base query, or be joined to via another query in the Knowledge Set Builder.
All Data Sources is by default available in the Knowledge Set Builder under Data Type when constring a filter and the Join menu (Dependent on inorigo® context and user rights). You can read more about how to use the Data Source Editor Tool to set up a Data Source here.
Joining with Data Sources
A Knowledge Set can be built with a Data Source as the Initial Base table, by choosing a Data Source as Data Type, as displayed in the image below.

It’s possible to join both from a Data Source – to entities in inorigo®, and to a Data Source – from inorigo®.
Joining to a Data Source
To join to a Data Source to another Data Source, a Knowledge Set, or from entities in inorigo® – select Data Source from the join menu by pressing ⊕ on the table's card. Data Sources that have been created in your context are by default available from the Knowledge Set Builder.
In the dialog, select from the available columns for both From and To tables and then click join. Run the Knowledge Set to confirm that the join worked as you intended.
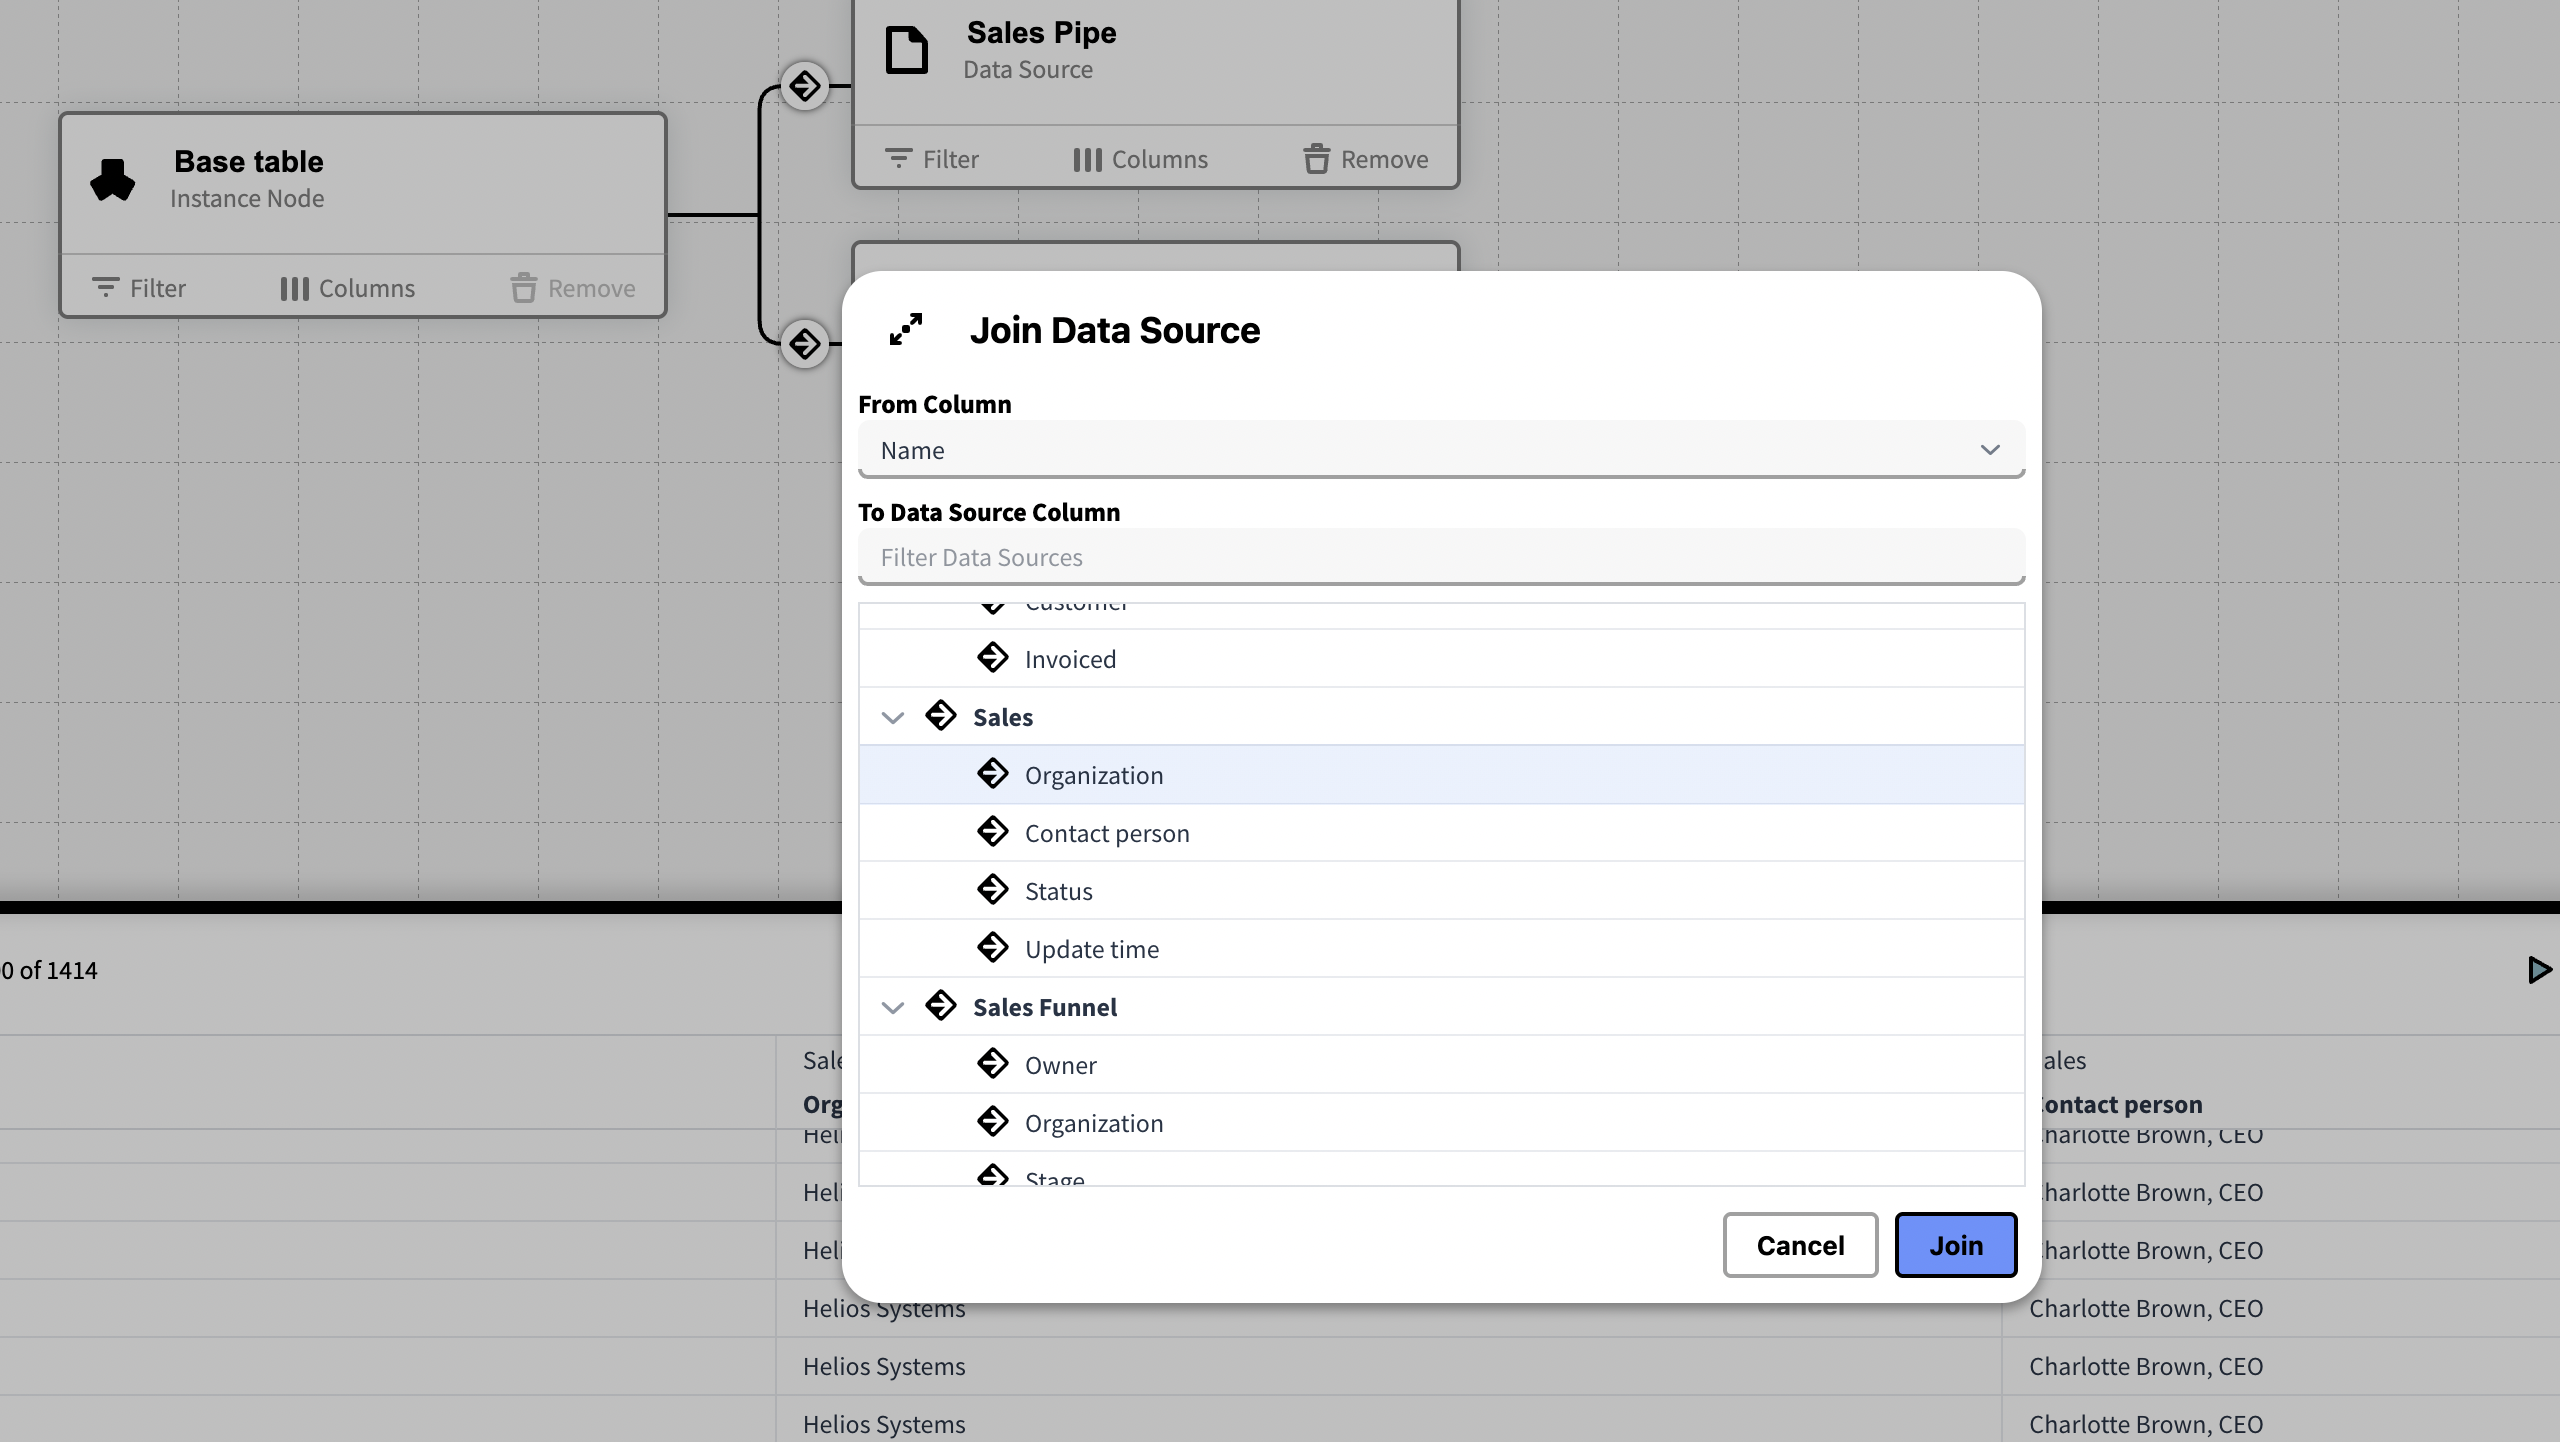
The mapping columns should contain identical rows for the two sources to join correctly.
Joining from a Data Source to the Model
Joining from a Data Source to another Data Source or a Knowledge Set is achieved in the same way as when joining to a Data Source, as described above. However, when joining from a Data Source to an entity in inorigo®, you are required to make a few additional entries.
Select Model from the join menu by pressing ⊕ on the table's card.
In the dialog choose a column from the Data Source to join from.
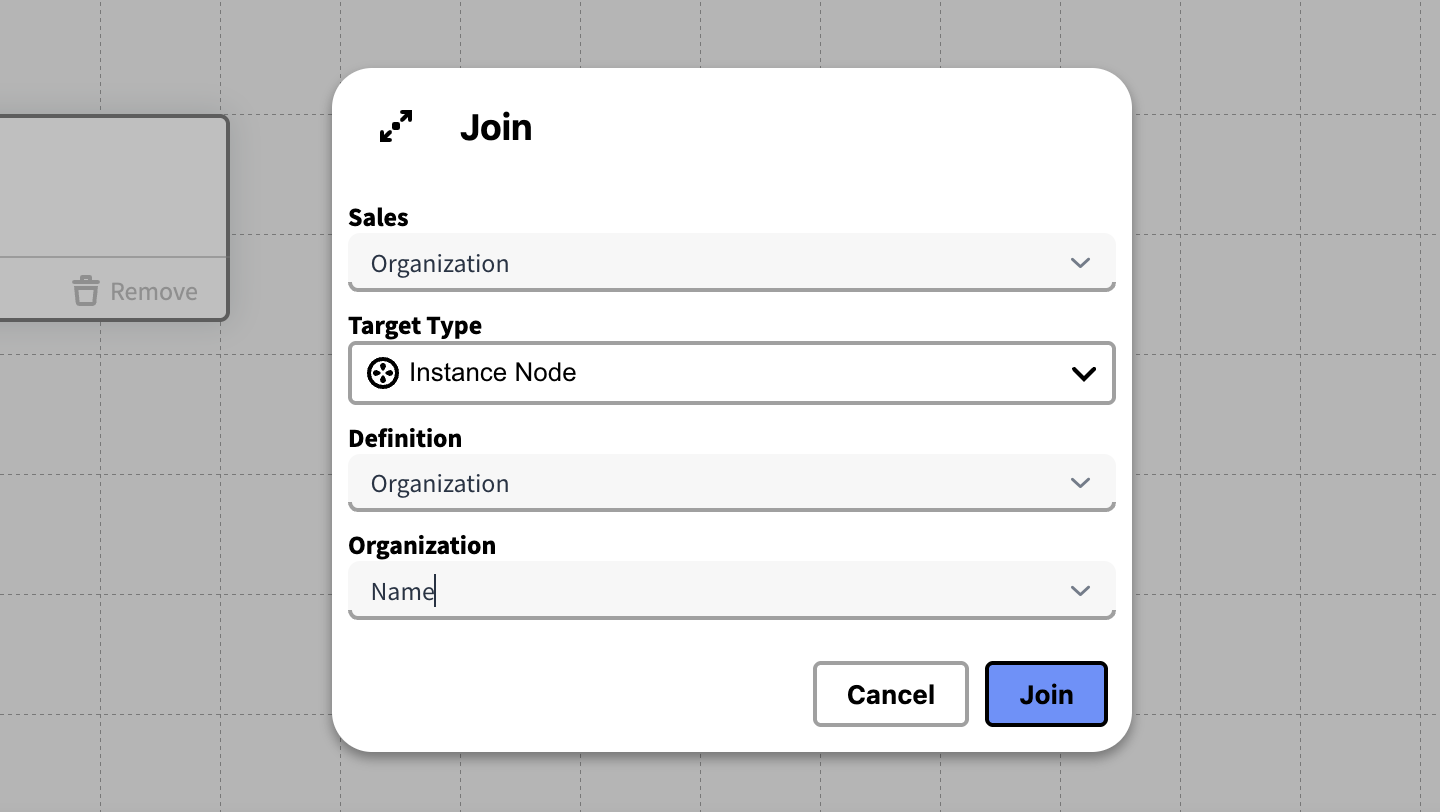
In the dialog above, to find the attribute of an entity to join with, you must first select a Data Type. Depending on your choice you have to make additional entries.
For Instances nodes, a Definition node is always required to locate them. Thus, when joining to Instances, first provide their Definition Node – then choose what attribute to join with.
Press join to complete the join, and Run ▶︎ the Knowledge Set to confirm that it works as you intended. To join on additional Columns, follow the same procedure as described above, under Joining to a Data Source.
Joining to a Knowledge Set
Joining a Knowledge Set to another Knowledge Set allows bigger reusability of the sets of data used throughout the inorigo® instance. By keeping Knowledge sets of frequently used information they can quickly be implemented and kept updated in applications or external tools that communicate with the Knowledge Set via the API.
To join a Knowledge Set to another knowledge Set, select the desired Knowledge Set from the join ⊕ menu.
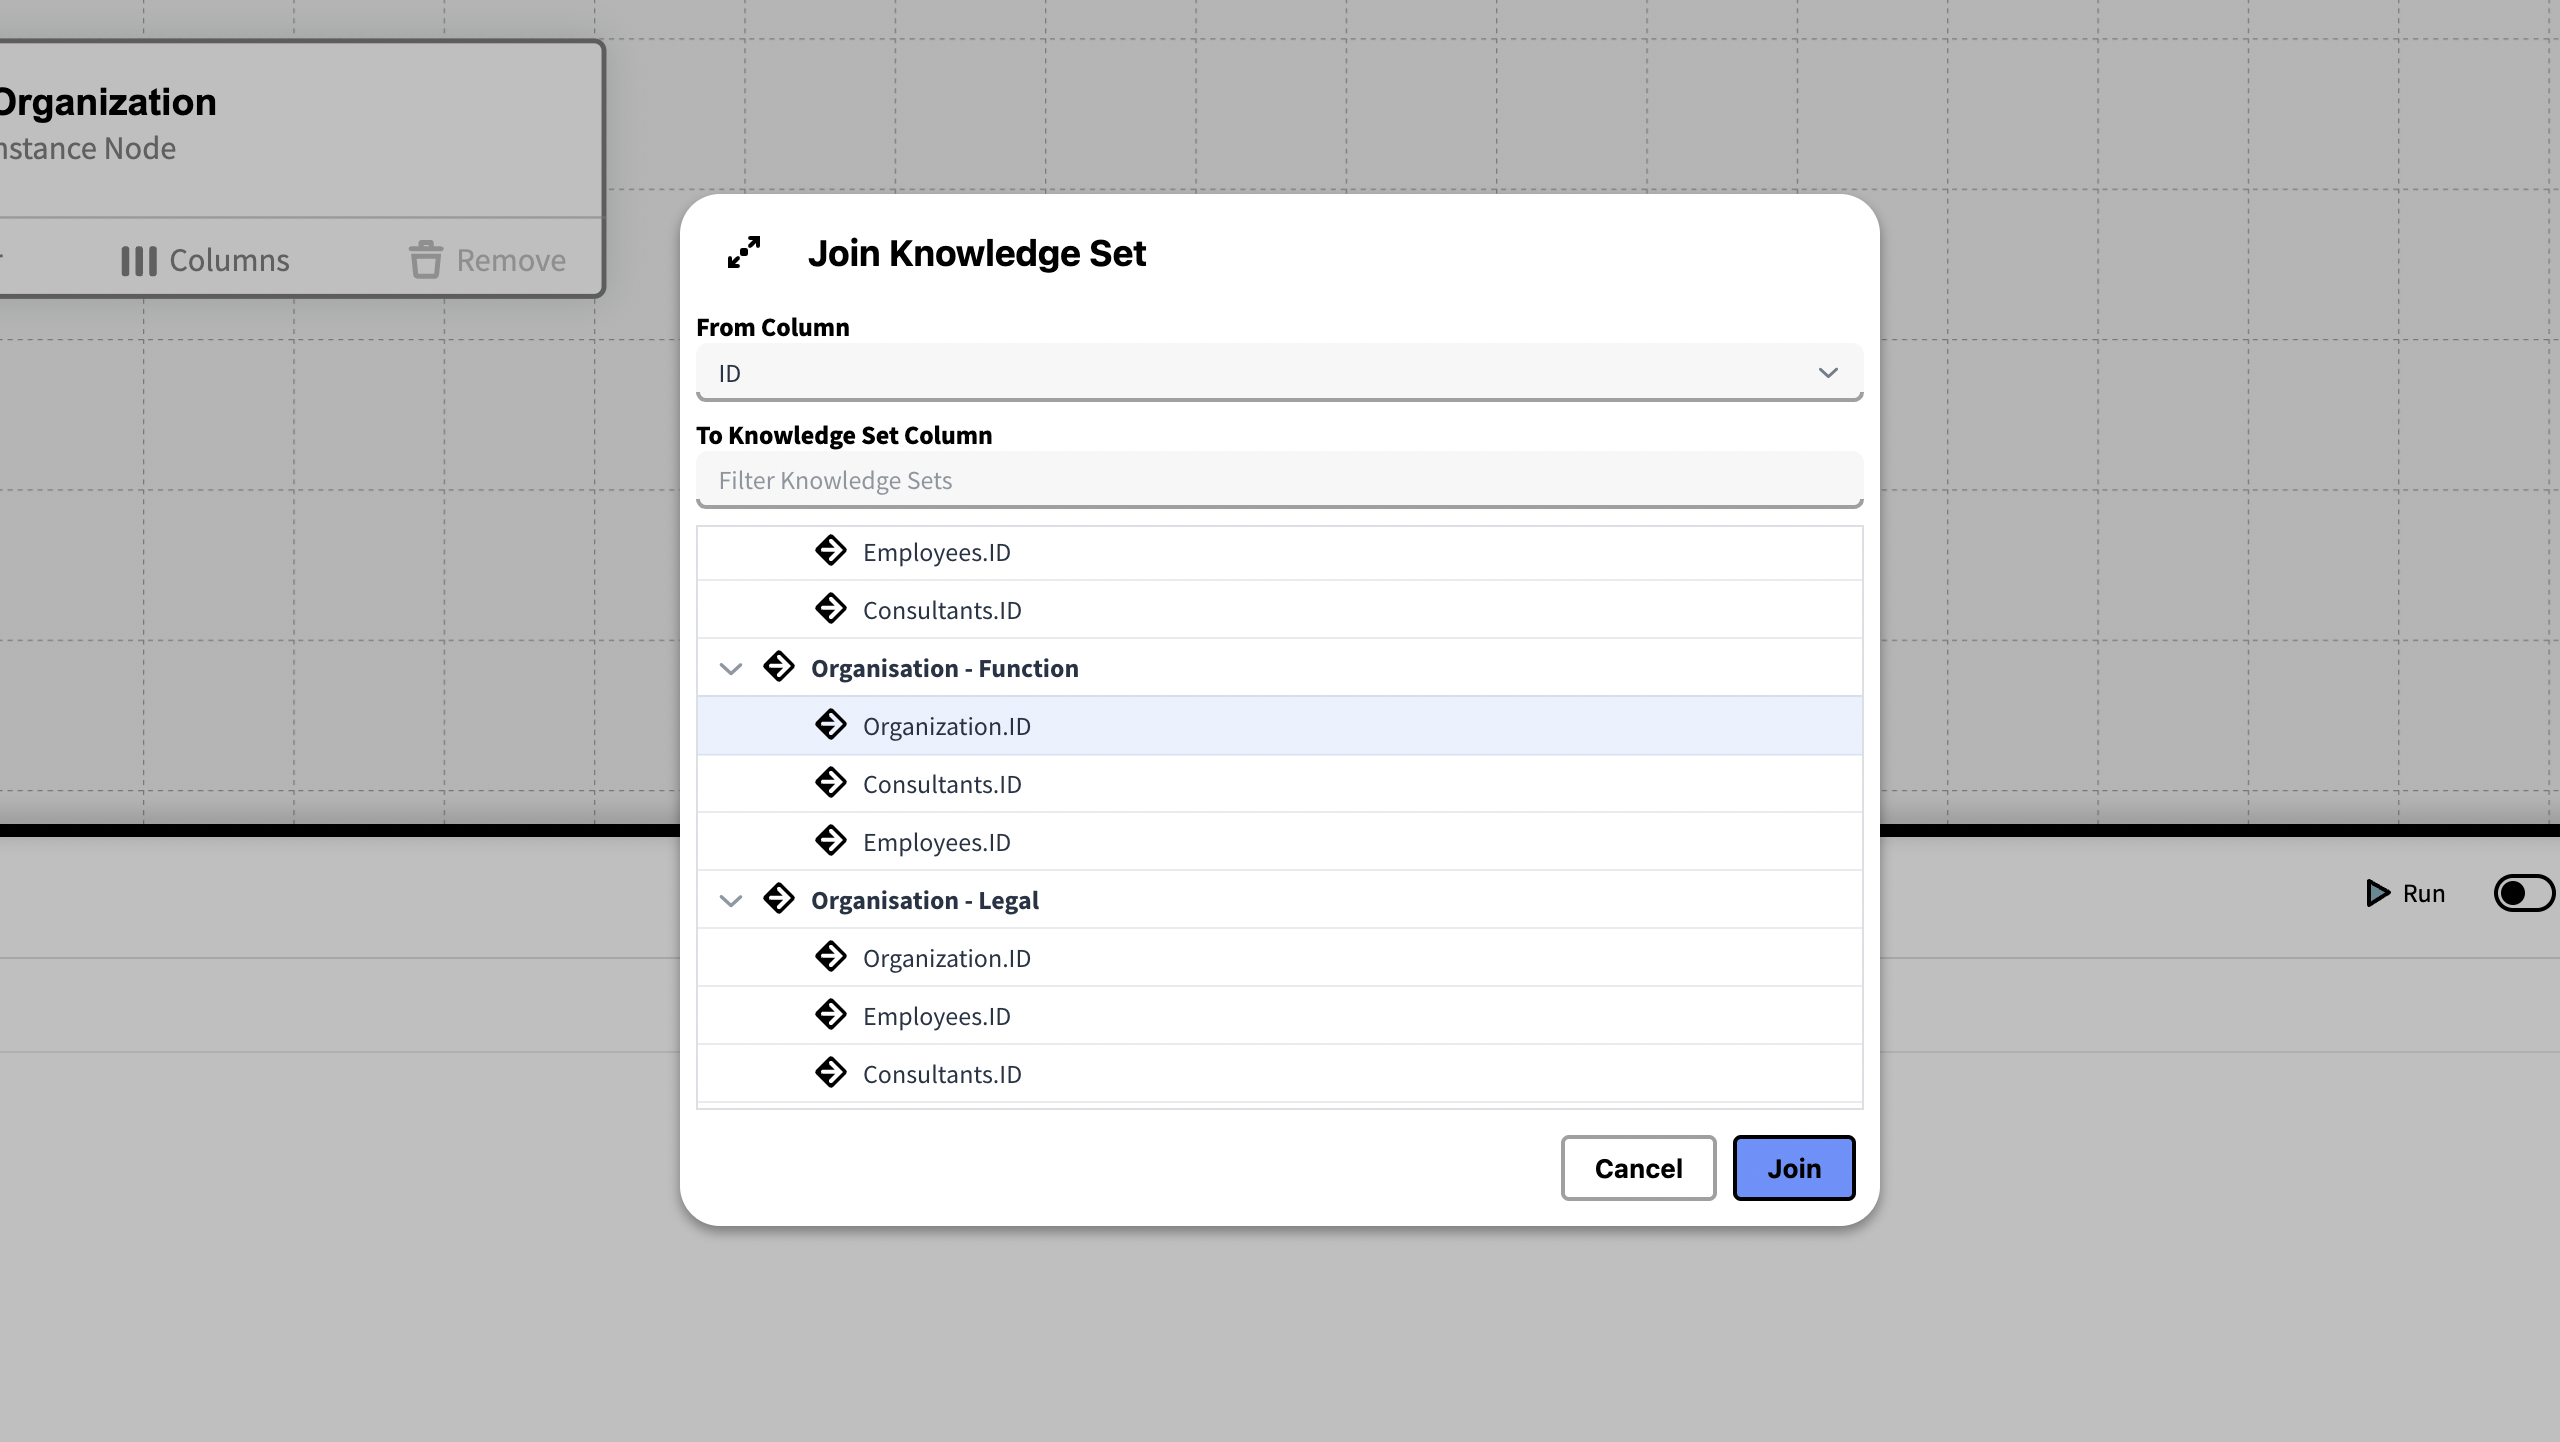
Choose attributes to join the Knowledge sets together. inorigo® entities are allowed to have the same name or presentation, therefore using their unique ID for the joining column will guarantee a unique identifiers for each row in the joining column. Thus, joining on ID is always recommended when inorigo® units are joined.
Joining to Multiple sources
You can join to additional sources from any table by pressing the ⊕ icon.
Calculated Columns
While the content of a regular column in a Knowledge Set is determined through a filter, the content of a Calculated Column is determined by the expression used to generate it. A Calculated Column can for example contain calculations of values from the other content in the Knowledge Set.
This section covers how to create a Calculated Column in a Knowledge Set and how to make use of the Expression Editor. To fully understand the capabilities of Calculated Columns in Knowledge Set one must first learn how to format expressions in inorigo®. You will find the documentation on functions used to write expressions here.
To Create a Calculated Column, click Columns from any table in the Knowledge Set Builder and press Add calculated column.
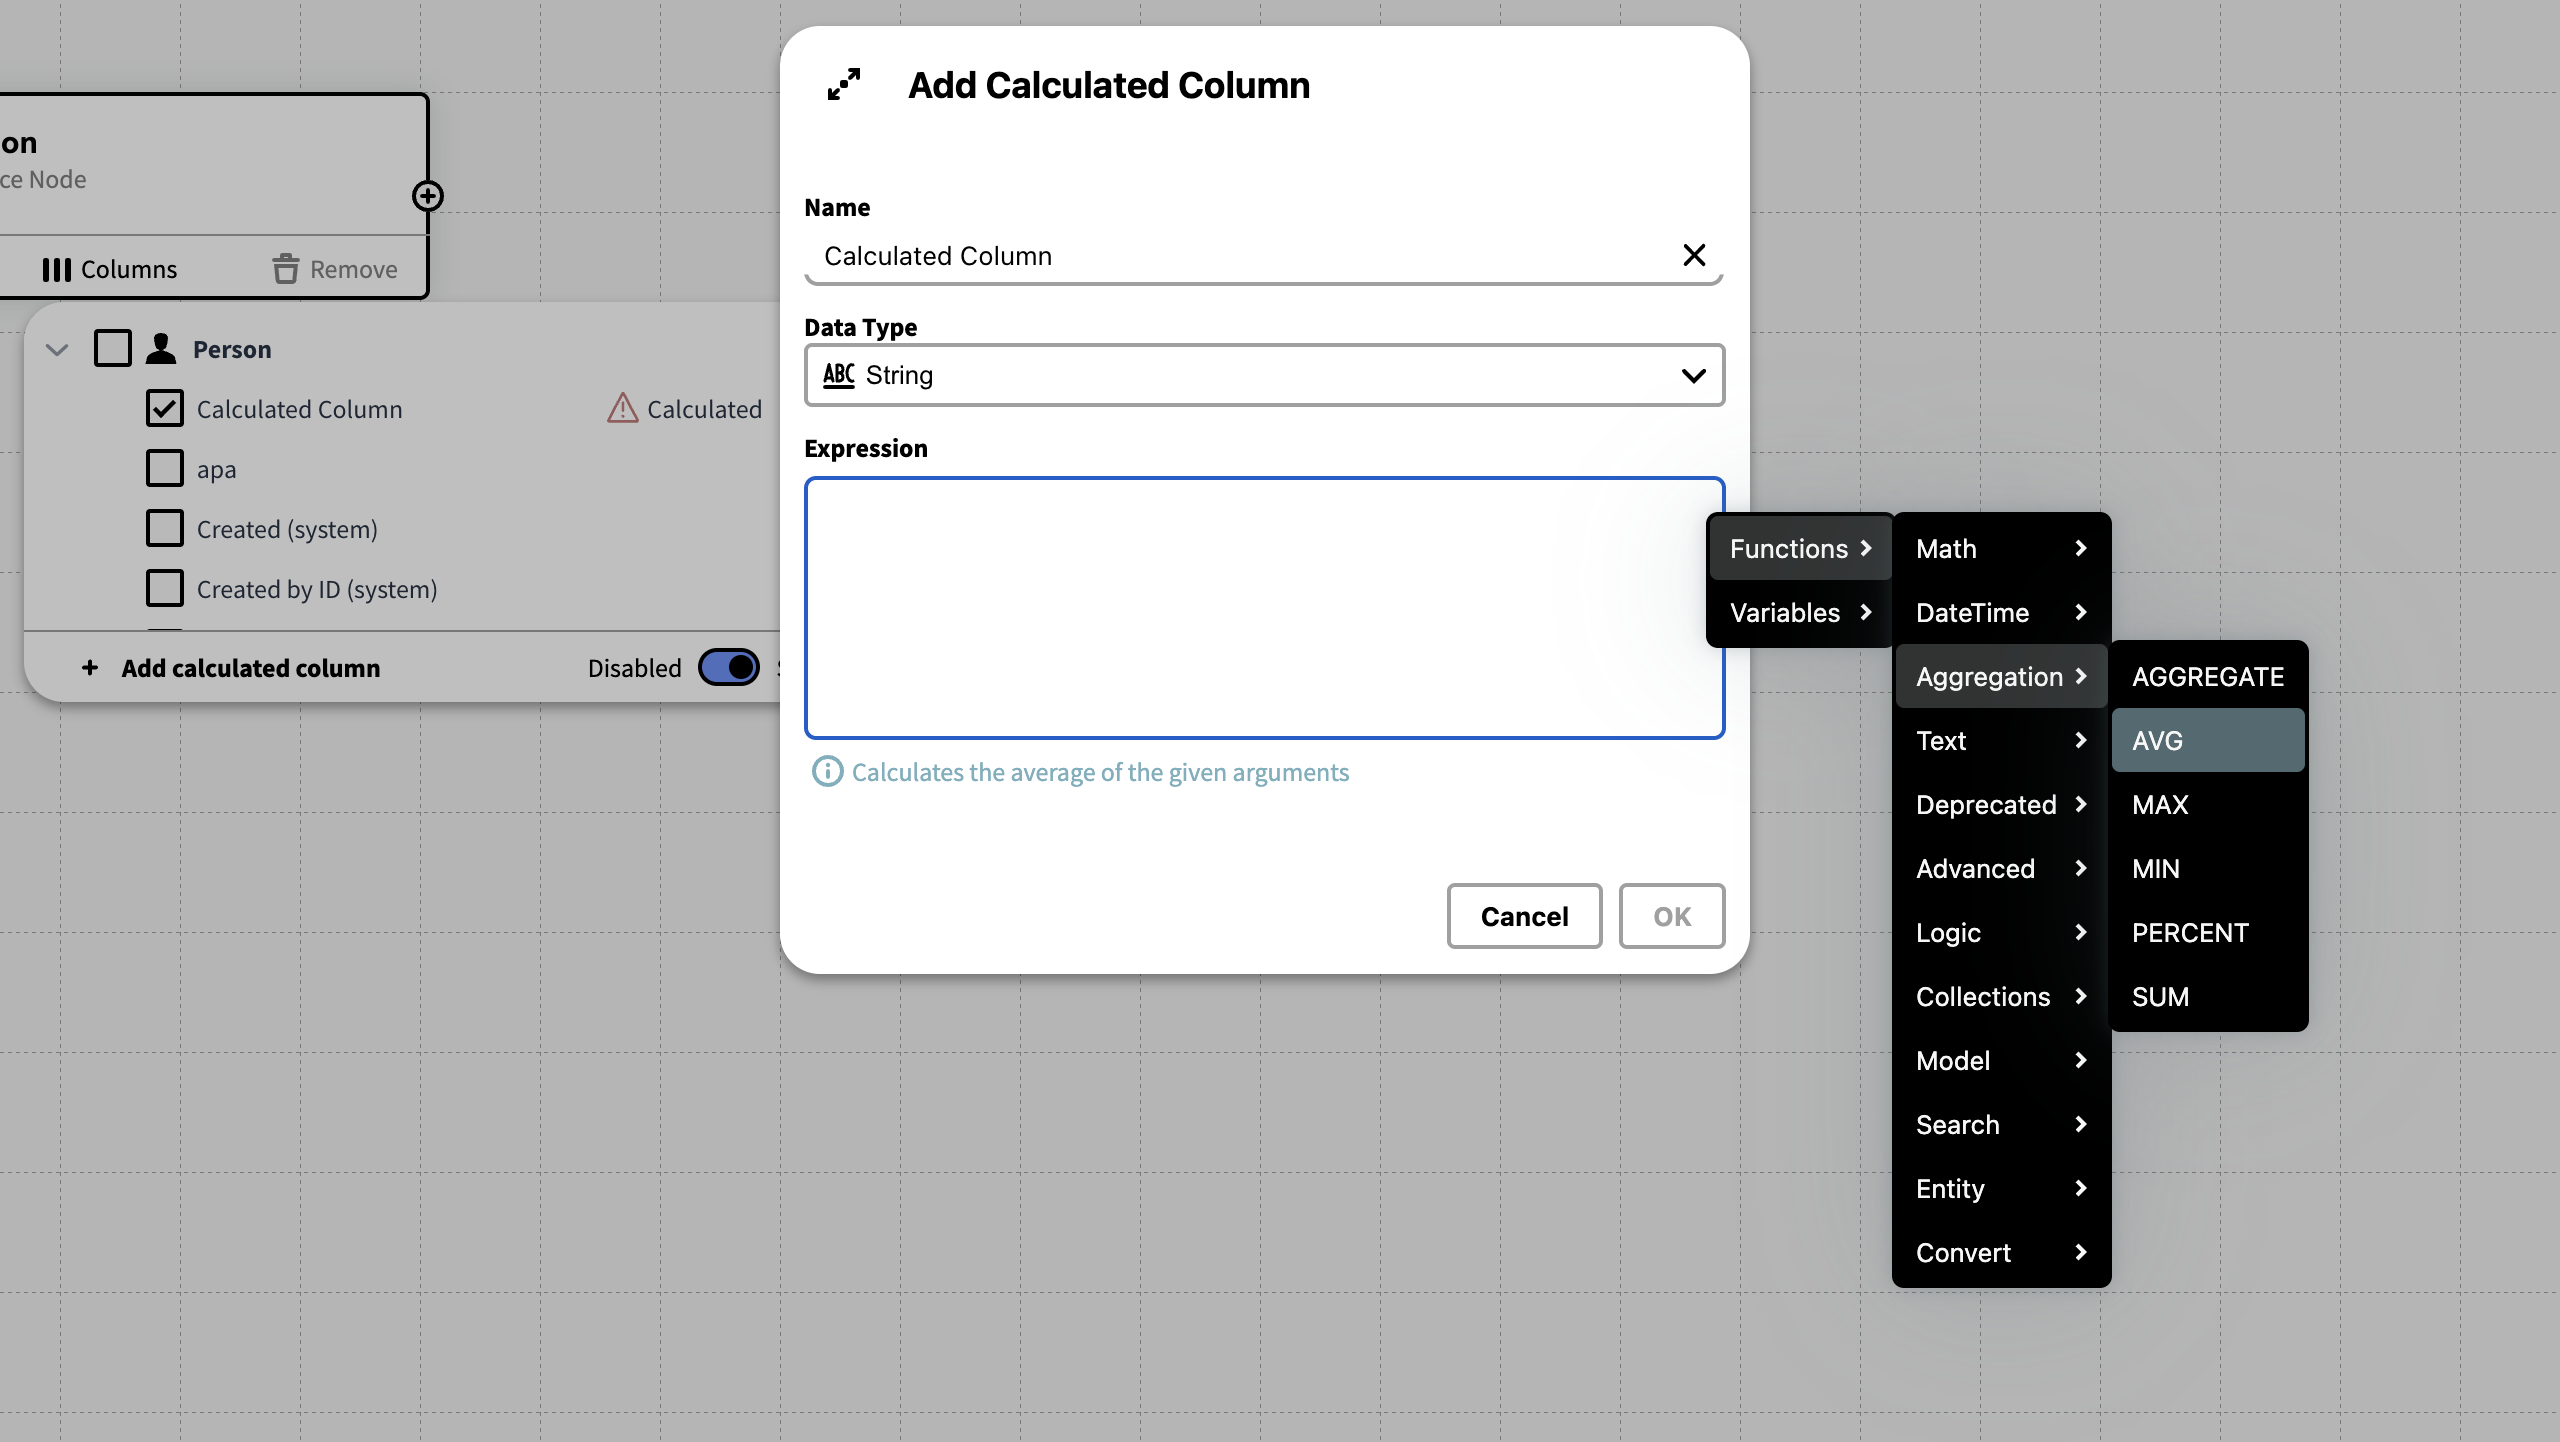
Functions & Variables Menu
To get a list of all available Functions and Variables Right Click the Expression field.
Common Variables
All variables are case sensitive!
Use these shortcuts to fetch information regarding the given Knowledge Set.
| Cell | |
| columnDataType | Data Type for the given column |
| columnID | ID for the given column |
| columnIndex | Index for the given column |
| columnKey | Identifier for the column (reordering columns affects keys) |
| columnNo | Column number (reordering columns will change this) |
| columnTitle | Header/title of the column |
| rowIndex | Row index (row's index position) |
| rowNo | Row number |
| Row | |
| $get(@row,ID) | Gets the value of a cell at the given row and column |
| ColumnID | ID of the selected column in the Knowledge Set |
| Column Name | Name of the selected column in the Knowledge Set |
| Column Full Name | Full descriptive name of the selected column |
| Data Set | |
| @columnCount | Number of columns in the current Knowledge Set |
| @dataset | Reference to the current Knowledge Set |
| @rowCount | Number of rows in the current Knowledge Set |
Example – Merge Columns
A Calculated Column can be used to join several columns together. In this example we're adding the values of a persons' First Name, Nickname and Last Name into a new column.
The following expression gets the rows from the provided Column ID. ” ” is added between the expressions to add a space between the first, nickname and last name.
{First Name} +" "+ {Nickname }+" "+{Surname}
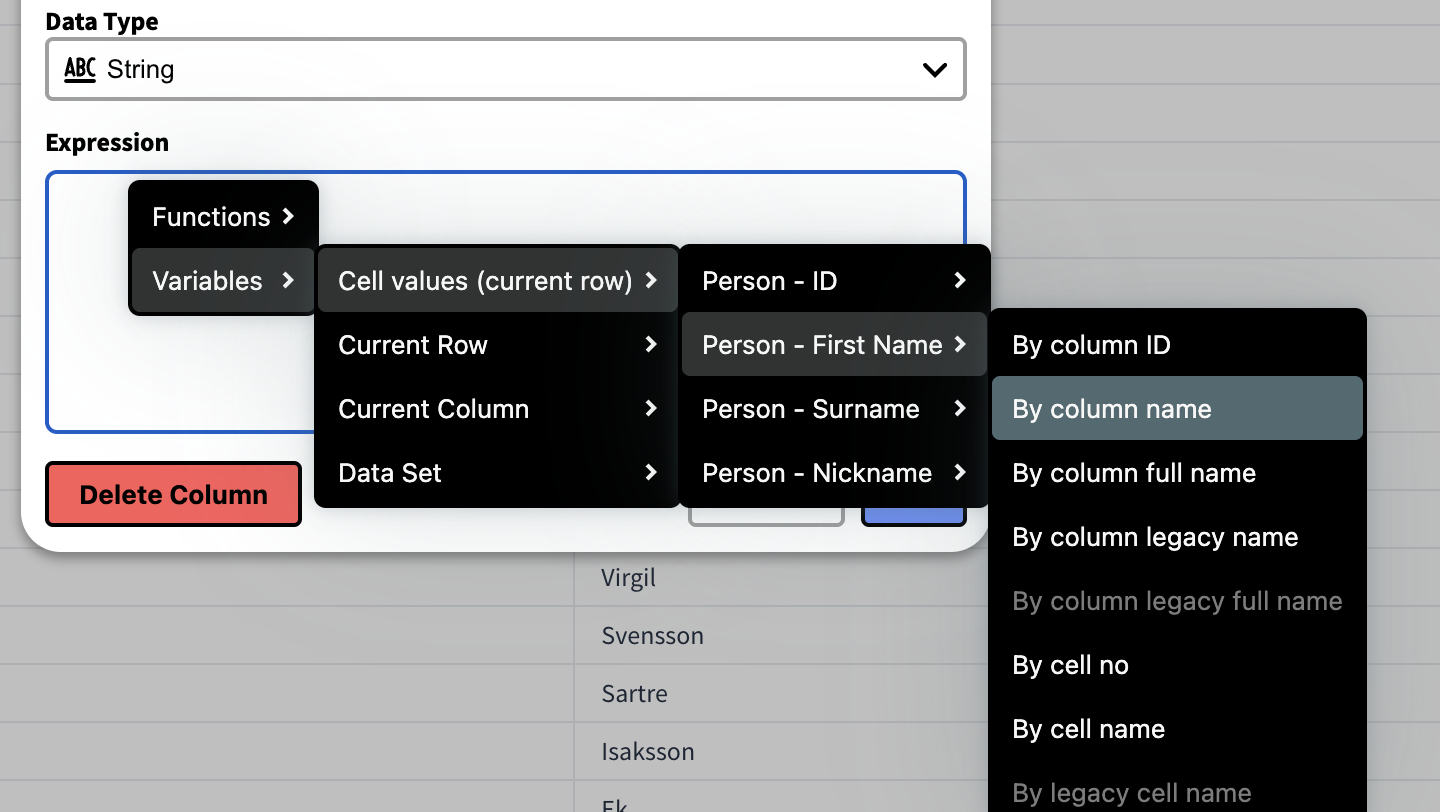
You can find the variable by right clicking the expression field.

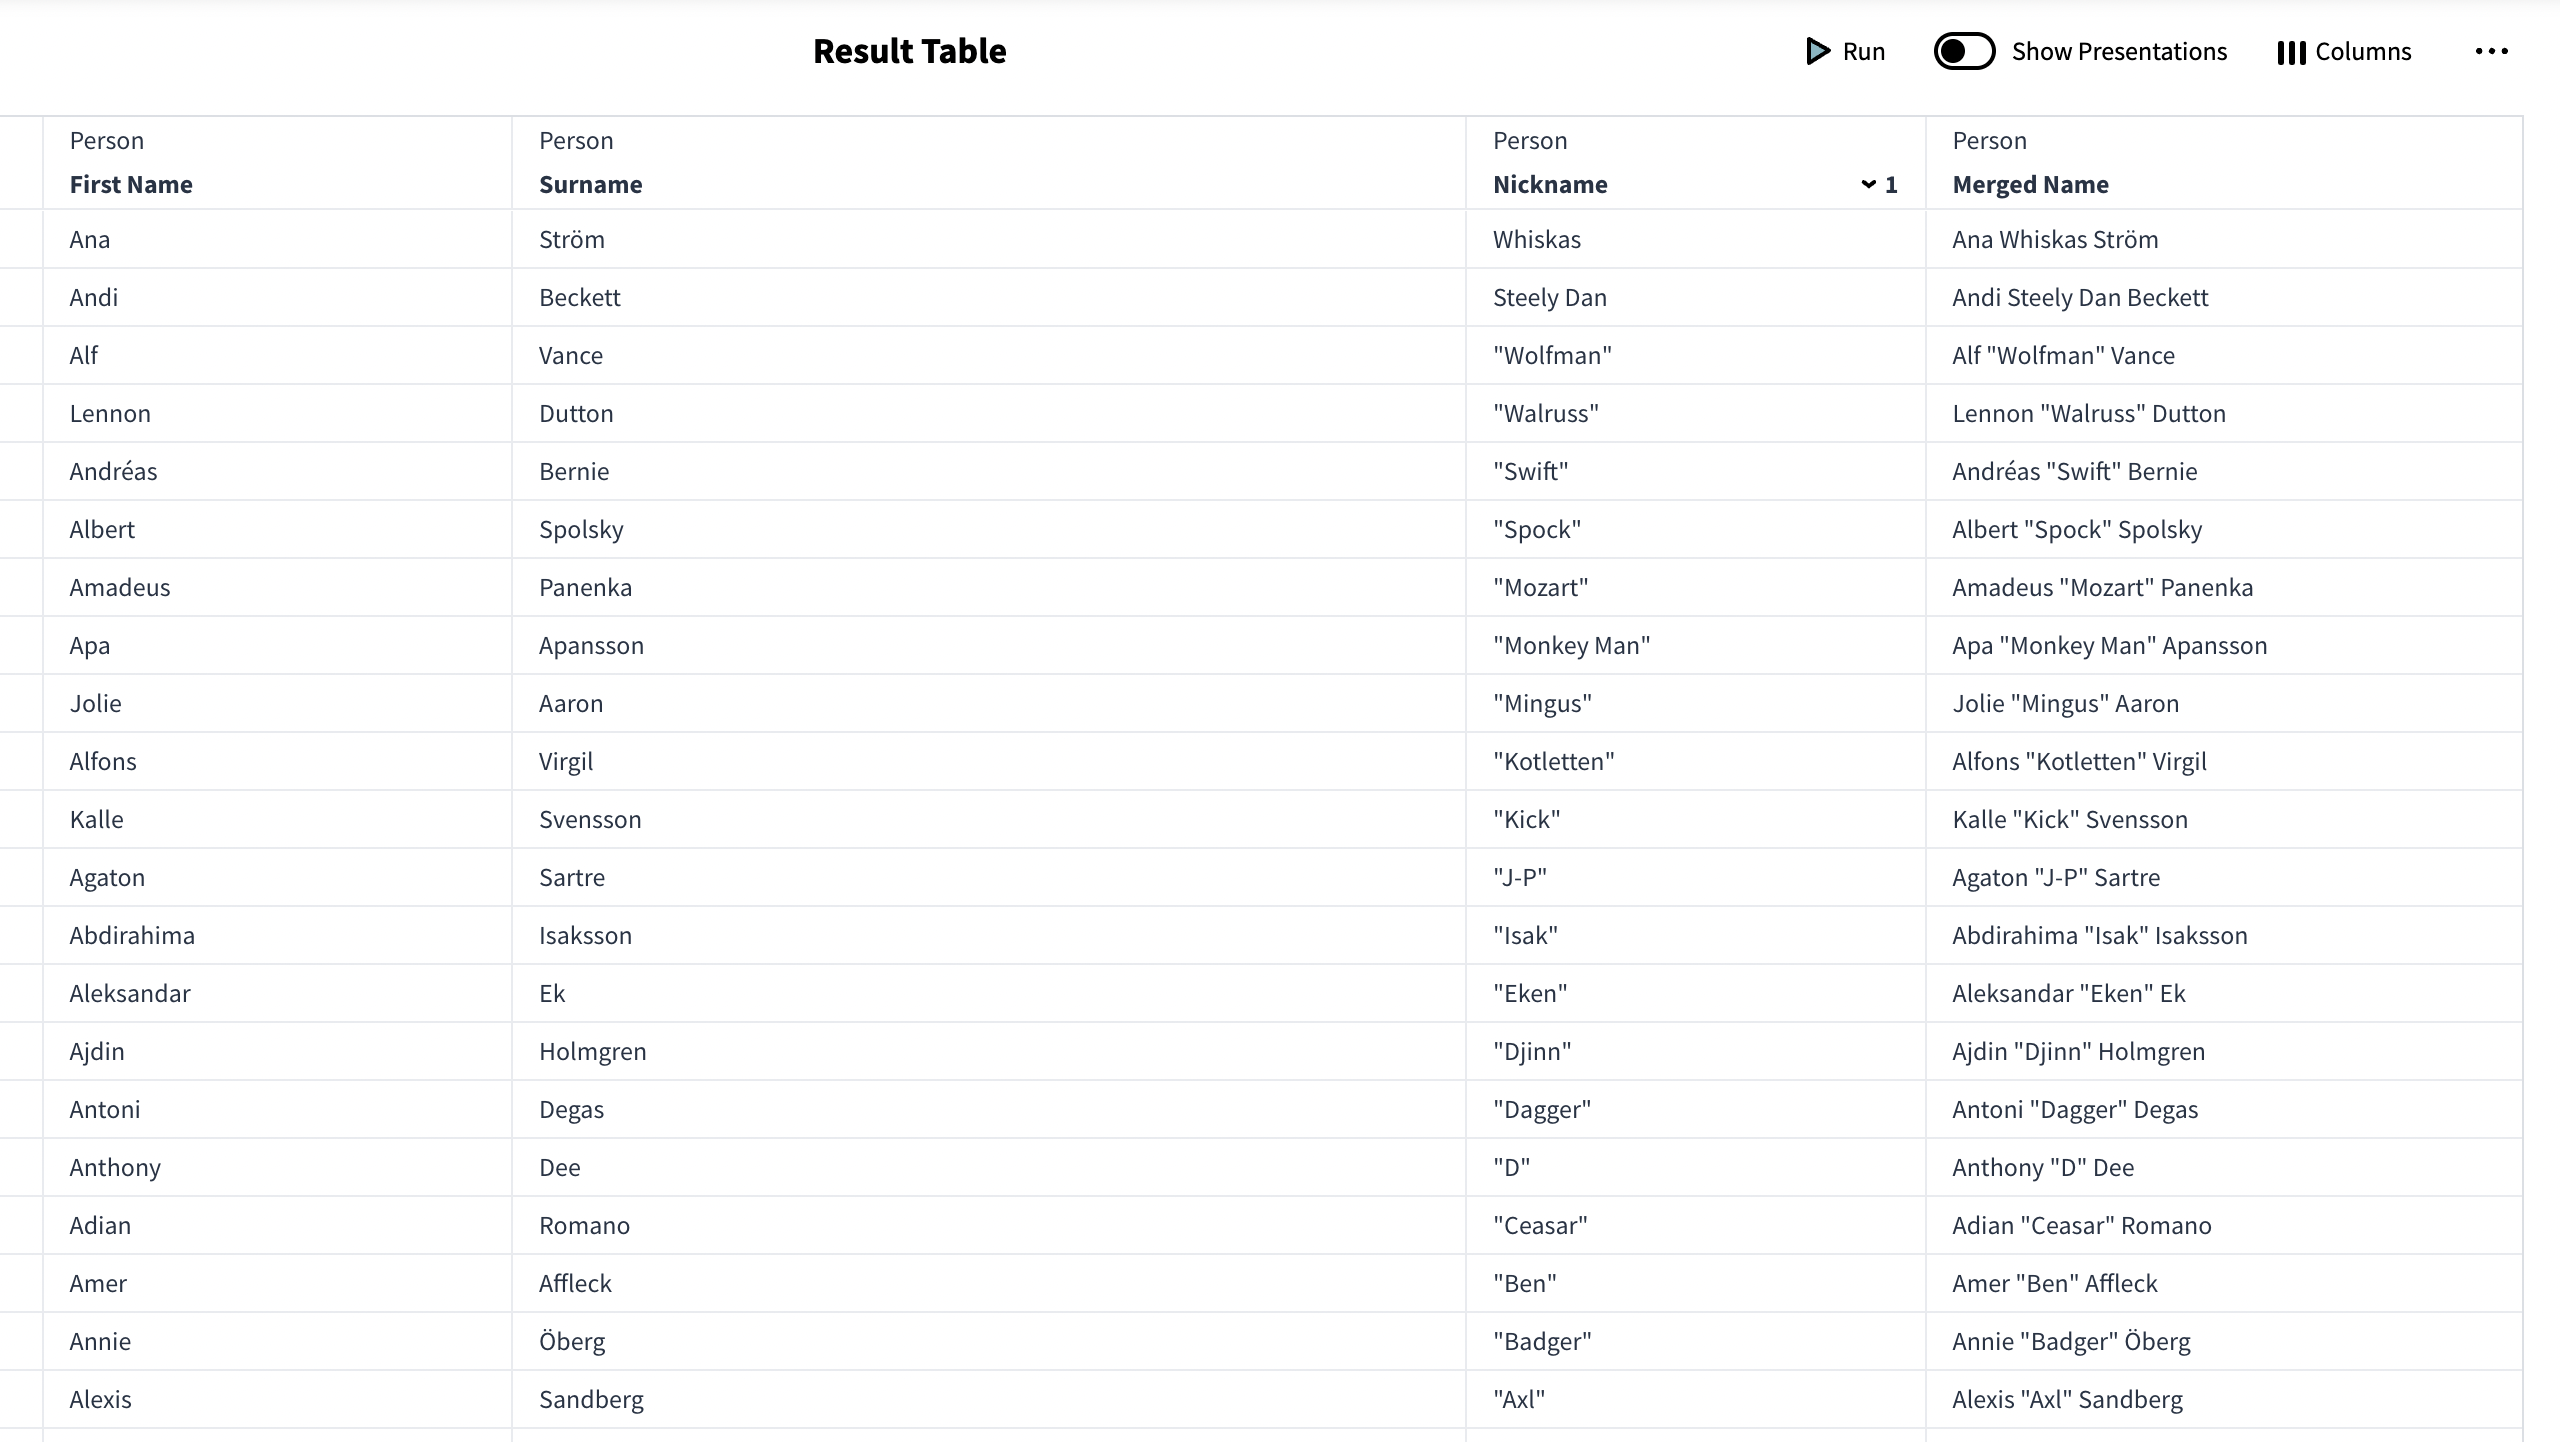
Resulting Knowledge Set
Example – Average Value
A Calculated Column can be used to add cell values together and calculate the average value for each row.
In this example we have a Data Source with work hours for some employees, and want to calculate the average work hours for the six first month of the year.

In order to do so we're going to create a calculated column and start by giving it a name and set the data type to Double. Double is used to return numbers with decimal points. (An integer only represents whole numbers without any fractional part.)

To find the average value of the cells in a row, we must add them together and use a function to return the average.
To do so we're going to use the following expression:
$ROUND($AVG($PACK({cell.1},{cell.2},{cell.3},{cell.4},{cell.5},{cell.6})),1)
$ROUND(...,1): Rounds the result to 1 decimal. If Integer was used instead of Double this would not be necessary.
$AVG(...): Calculates the average of the cell values.
$PACK(...): Packs multiple values into a list or array. In this case the values of the cells.
{cell.1}, {cell.2}: Refers to the cells by their cell number. Cell.0 is the first cell of the table, which contains the name.

The above expression summarizes all values from the given cells
The Calculated column now returns a summary of the values in the column Average Hours

Parameters
Parameters are used to set up query statements that should be configurable. This is useful for values that continuously change, or that are to be configurable outside of the Knowledge Set Builder, like the API.
A good example is to create a parameter with the variable {NOW}, which returns always returns the current date and time, this allows us to set up filters that always use the current date, rather than a fixed one in a query. Another example is to let users change the content of a column by setting another defining unit over the API. We can use then use the knowledge set as a foundation for interactive, custom built solutions for the end users.
You can read more how parameters work under Parameters section under the Query Editor documentation.
Export & Download Knowledge Sets
Knowledge Sets can easily be exported over inorigo’s® API, to Application Builder or to a file format like CSV or xlsx.
API
The Web Services documentation houses instructions for how to work with Knowledge Sets over the API, its available under help in your inorigo® instance, that you will find in the toolbar under the info icon ⓘ.

Download Knowledge Sets
Download a Knowledge Set by selecting Download from the […] Menu in the Result Table.

You can download to the following formats.
- Excel (xlsx)
- Semicolon (CSV)
- Tab (CSV)
- Comma (CSV)
- Json (json)
In addition you can enable the following options:
Add Timestamp to the Knowledge Set: This both adds the current day and time of day to the filename.
Shorten Column Names: Column names will be shortened by removing text preceding the last found period(.).
Replace unique identifiers by presentation: All unique identifiers in the result will be replaced by their equivalent presentation.

Importing a Knowledge Set to Application Builder.
Once a Knowledge Set has been saved it will be available as a inorigo® entity.
To import a Knowledge Set to an Application via Application Builder, create a new New Filter Component through the menu, and then Advanced > Knowledge Set.

Note that selecting Knowledge Set under the Generic Model will provide a filter component containing Knowledge Set units, rather than the contents of a given Knowledge Set.
When a Knowledge Set is selected inorigo® will ask if you want to add all columns.
- Press Cancel to only add a single Advanced filter component containing all columns given in the Knowledge Set.
- Press OK to add every column to a separate filter component, in addition to the advanced filter component.
Making changes to the queries that defines the content of a Knowledge Set will have immediate effects on the filter components in any application that make use of the given Knowledge Set.
Notice that adding or removing columns to the Knowledge Set will not automatically affect the content of an application. If additional queries are added to a Knowledge Set, it needs to be re-added to the application for the new columns/filter components to appear.
© 2025 Inorigo AB. All rights reserved.