Data Grid for Applications
inorigo's® Data Grid tool allows members to edit and create multiple entities in a spreadsheet-like component. It offers similar functionality as forms, but extends its capabilities to handle multiple entities at once.
Overview
The Data Grid organizes information according to the attributes of the source that it is linked to, as well as any nested units defined by a recipe.
To learn how recipes work click here.
Working with the Data Grid for Applications
When a Data Grid is embedded in an inorigo® application it is in a read-only-mode.
To interact and edit with an embedded Data Grid component, provided you have permission, press the Pen icon in the data grid component's footer. This opens up the Data Grid in a dialog which allows adding and edit entities.
To open a Data Grid dialog from a selection of entities in a filter component, press the Data Grid icon in the filter component's footer. This option must be enabled in Application Builder.
Since the Data Grid is populated from the selections of a filter component, you cannot interact with the application and change the selection while editing a Data Grid.

Apply: Saves all changes without closing the dialog.
Revert: Discards any changes without closing the dialog.
Cancel: Closes the dialog and discards any changes.
Save: Saves all changes and closes the dialog.

When there's an unsaved value in the grid this is indicated by a grey triangle in the lower right corner of the cell. In addition a grey triangle is also shown in the first column the: "row-number column".
When there's an error in the grid this is indicated by a red triangle in the lower right corner of the cell. In addition a grey triangle is also shown in the first column the: "row-number column". This is often due to that there's a a required value that's missing. You can hover over any triangle to see a tooltip and get additional info.
In order to save all errors must first be resolved.
Transferring data from Data grid to Excel
You can easily copy information from the data grid to Excel using these keyboard shortcuts:
- Copying Cells: Use Ctrl + C to copy selected cells and Ctrl + V to paste them into Excel.
- Copying Cells Including Column Headers: Use Ctrl + Shift + C to copy to copy selected cells including the column header and Ctrl + V to paste it into Excel.
Making Changes and Adding Information in the data grid
The data grid allows you to make multiple changes or add information.
- Copying from Excel to Data grid: You can copy selected data from an Excel sheet and paste it into the data grid. Values that is not validated correctly will be marked red and needs to be corrected before it is possible to save, i.e. pasting "hello" into a a date field will be marked red.
Example: If you have an Excel sheet with person data and paste it into a data grid showing persons, it will import the information and validate the data according to the grid's attributes, creating new users as needed.
Updating Existing entity
You can update existing information for current entries using the paste match function.
- Copying New Information: Copy the new information for existing persons from Excel.
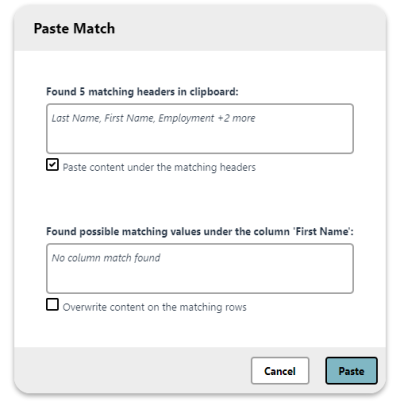
- Pasting to Match: Right click and select "paste match" and a dialog is displayed in which it is possible to select how the matching should be performed.
See Paste Match - Values for matching on values in a column.
See Paste Match - Headers for matching values into the the correct column according to the column header.
These can be combined.
General commands
| Command | Function |
|---|---|
| Ctrl + D | Duplicates all selected values in on or more columns to all the cells below |
| Ctrl + Shift + D | Duplicates the top cell downward, incrementing each value with "+1" (Depending on the datatype of the attribute.) For instance a Date or Integer. (e.g., dates +1 day, numbers +1) |
| Ctrl + A | Select all entities |
| Ctrl + Alt + Shift + D | Like "Ctrl + Shift + D" but increases the values for all selected columns. |
| Ctrl + C | Copy selected values |
| Ctrl + V | Paste selected values |
| Crtl + Shift + C | Copy selected values and include the column header |
Creating a Data grid in Application Builder
This is a simple example how to create a Data Grid of persons within an organization.
Step 1: Creating a Filter Component
- Right click and select the instance node.
- Search and select "person" and press query.
- Now we have a filter component (p0) displaying all persons in inorigo®.
Step 2: Setting Permissions
- While having the p0 filter component selected navigate to the settings panel.
- Check the permissions to Create, Read, Update, and Delete.

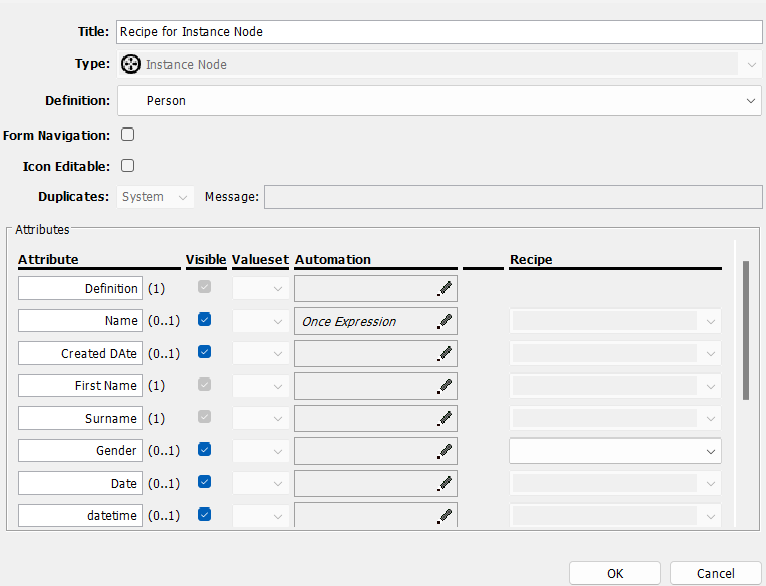
Step 3: Creating a Recipe
-
In the permissions panel, there is an option to create a recipe. (see picture above)
- This opens a dialog, where you determine what attributes will be visible and possible to edit in your Data Grid.
- Select the attributes that you want want to include then press OK.
-
The recipes panel now contains a recipe for persons, determining which columns will be in the Data Grid.
Step 4: Linking the Data grid
- At the top of the settings panel click the Link to button.
- Select the option under plugins where you will see Data Grid.

Step 5: Selecting the Source Filter Component
To get the Data Grid to work you need to connect it to a source, following these steps:
- Select the Data Grid, and go to the settings panel.
- Select the filter component, that you want the Data Grid to be sourced from, in the Source panel.
- Since we have only one filter component, we choose P0 as the source.
- press Ctrl + S to save and open the application in a web browser.

Now you have a simple but fully working Data Grid
It is possible to paste match values in the Data Grid from any spreadsheet.
Paste Match - Headers
Copy and paste your table from a spreadsheet without the need of the column headers to be in the correct order:
Excel table from which we copy.

The headers must be included in the copied values.
Note that the headers are not in the same order as the data grid below. It is also case insensitive.
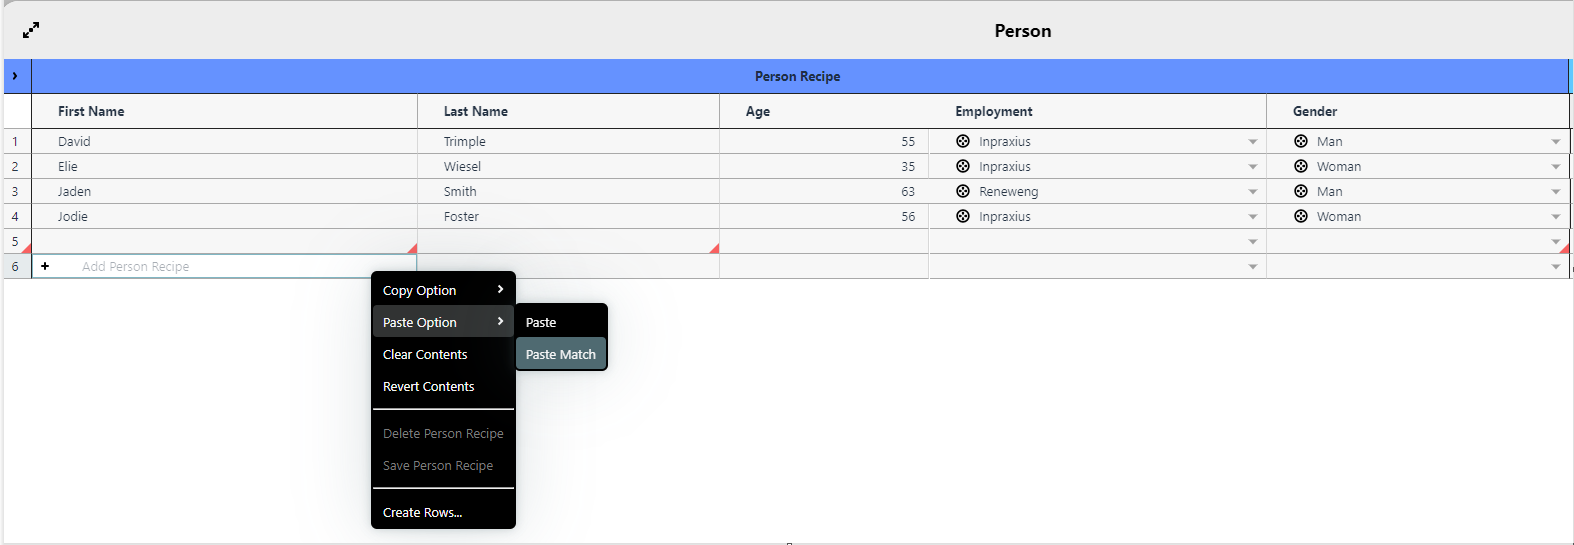
When we have copied the data from excel we right click on a cell in the data grid and click Paste Match:
Inorigo finds matching header names in the data grid from our clipboard:
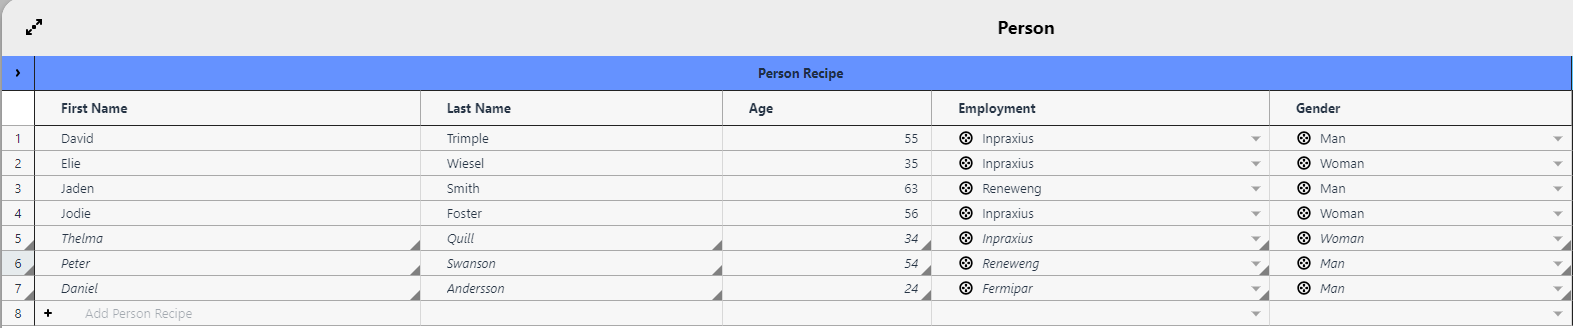
And here is the result after Paste Match:
Paste Match - Values
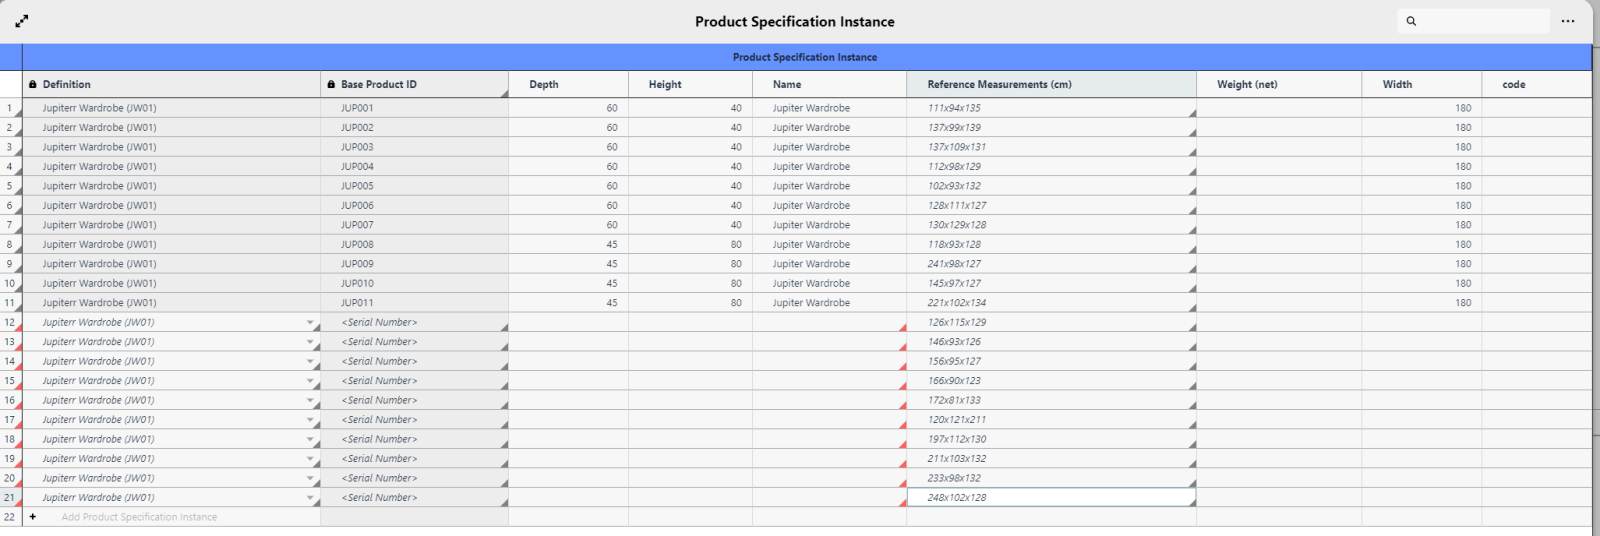
In this example we have a Data Grid containing a list of wardrobes. These have "Base Product ID" and "Reference Measurements (cm)" attributes.
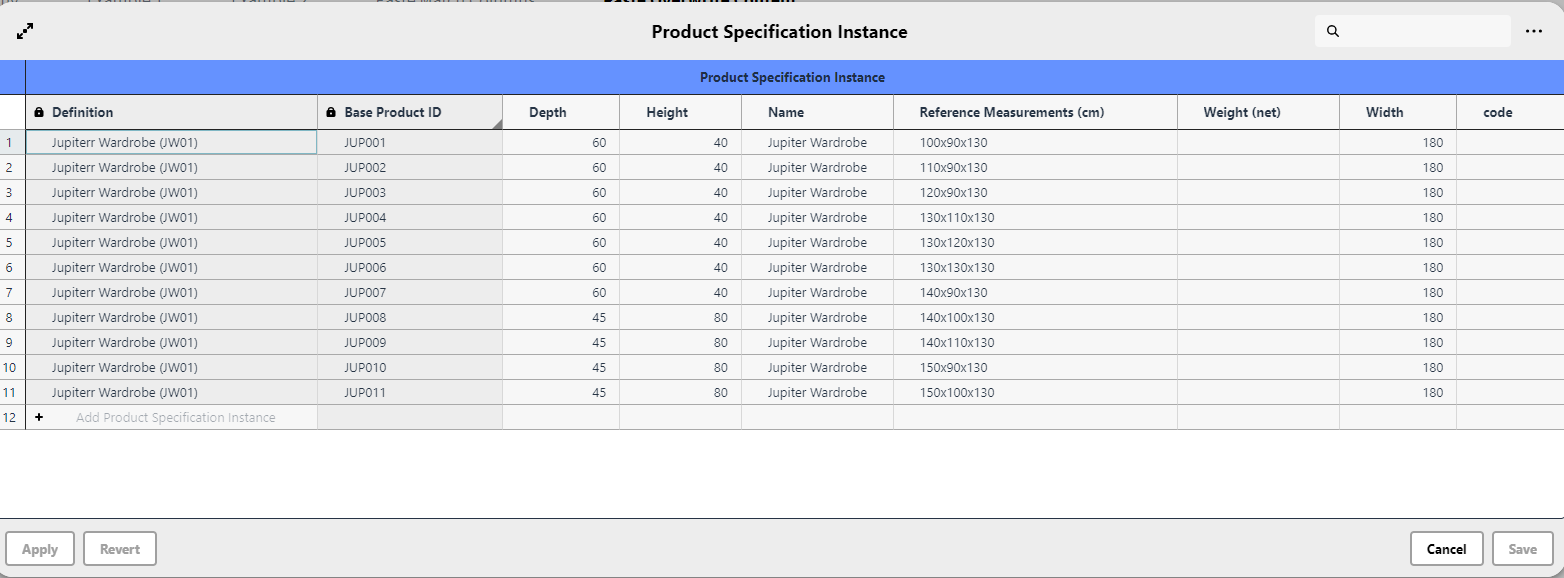
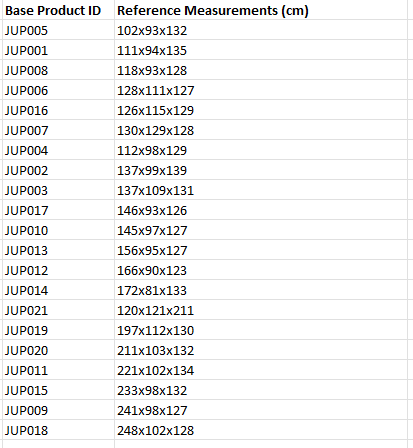
We want to paste match the data from this spreadsheet into the Data Grid to update the Reference Measurements (and some new ones) according to the Base Product IDs:
Note that the IDs in the excel are not in order
We paste match into the first cell within the Base Product ID column in the Data Grid:
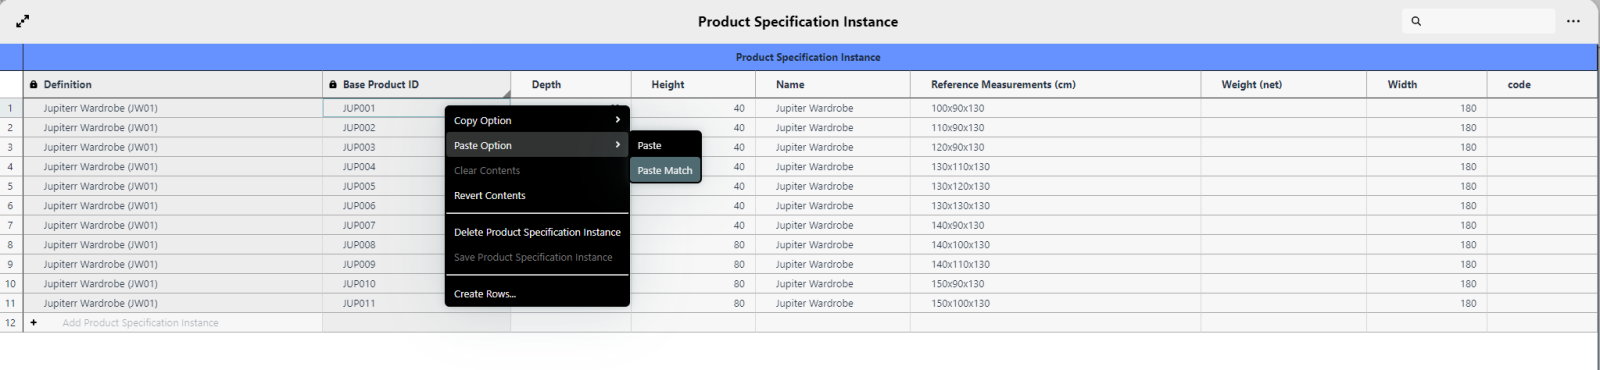
Note that here we get matching values as well, in addition to matching headers:
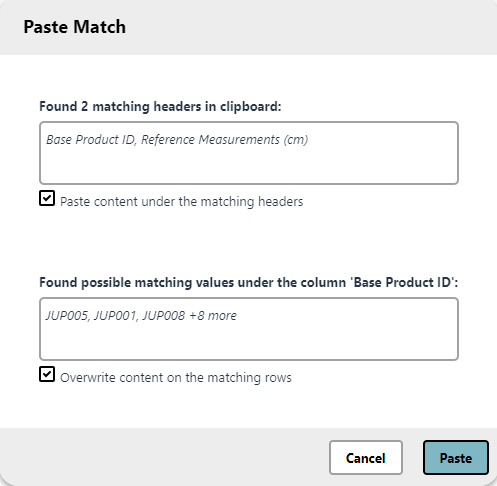
Result of the Paste Match. That values in "Base Product ID" and "Reference Measurements (cm)" has been updated accordingly. Values with no matching "Base Product ID" is added as new rows.:
Data Grid Settings and Capabilities
Note: Settings apply only to the Data Grid for Applications component.
Furthermore please note that some of the, Data Grid for Applications, capabilities are only available for this type of Data Grid component.
Nesting and Deep Nesting
Note: Nesting and Deep Nesting can only be created and used for the Data Grid for Applications.
Nesting and deep nesting lets you update and create instances on multiple levels only using Data grid.
To learn more click here.
© 2025 Inorigo AB. All rights reserved.